
Imagine an easy-to-use Divi website backed by efficient lead generation and conversion processes, resulting in a seamless customer experience from navigating a page to ordering a product.
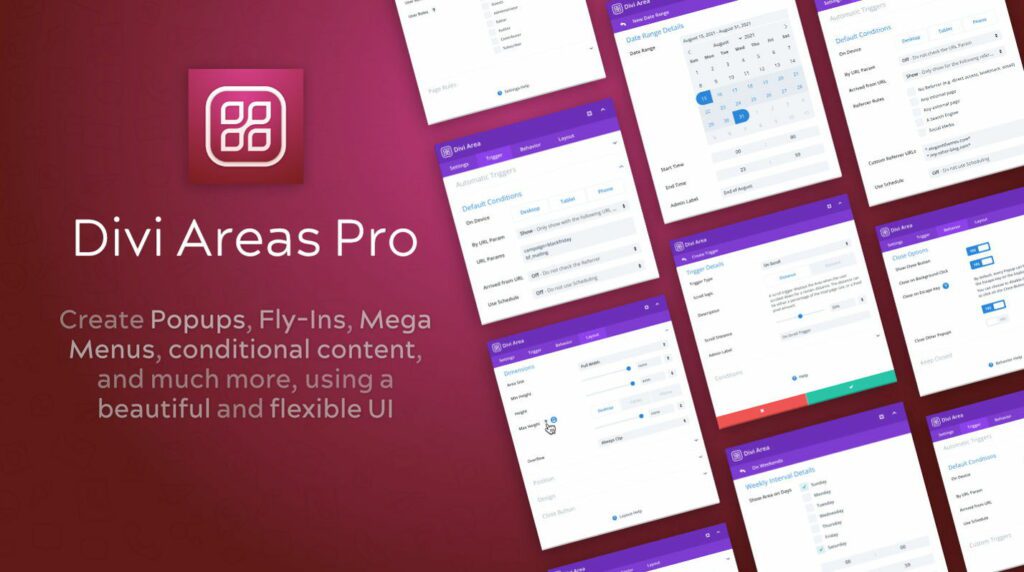
That’s what the Divi Areas Pro plugin can give you! It’s a conversion-focused plugin that uses time-tested features that can help you convince users to take action on your website.
You have all the features necessary to bring conversions and more sales, from using well-timed triggers to the layout library with ready-made designs and a UX that limits users’ distractions.
In this blog post, we will cover the Divi Areas Pro features every web designer should use if they want to implement a conversion-driven web design for their Divi websites. Let’s begin!
Table of Contents
- Divi Areas Pro: A Conversion-Driven Plugin for Divi
- Divi Areas Pro Features for Conversion-Driven Web Design
- 3. Plethora of Triggers
- 4. Targeting Devices and Pages
- 5. Form Integrations
- 6. Mobile Responsiveness
Divi Areas Pro: A Conversion-Driven Plugin for Divi
For those of you who haven’t used Divi Areas Pro before and know little about it, let’s make a quick introduction to the plugin.
Divi Areas Pro is a premium WordPress plugin that can supercharge your Divi website with professional and smart conversion-related popup marketing features.
Once you’ve signed up with Divi Areas Pro, you can create interacting Popups, opt-in forms, Fly-ins, and then decide when and where to display them on your website.
The following are just some of the main Divi Areas Pro features to be highlighted:
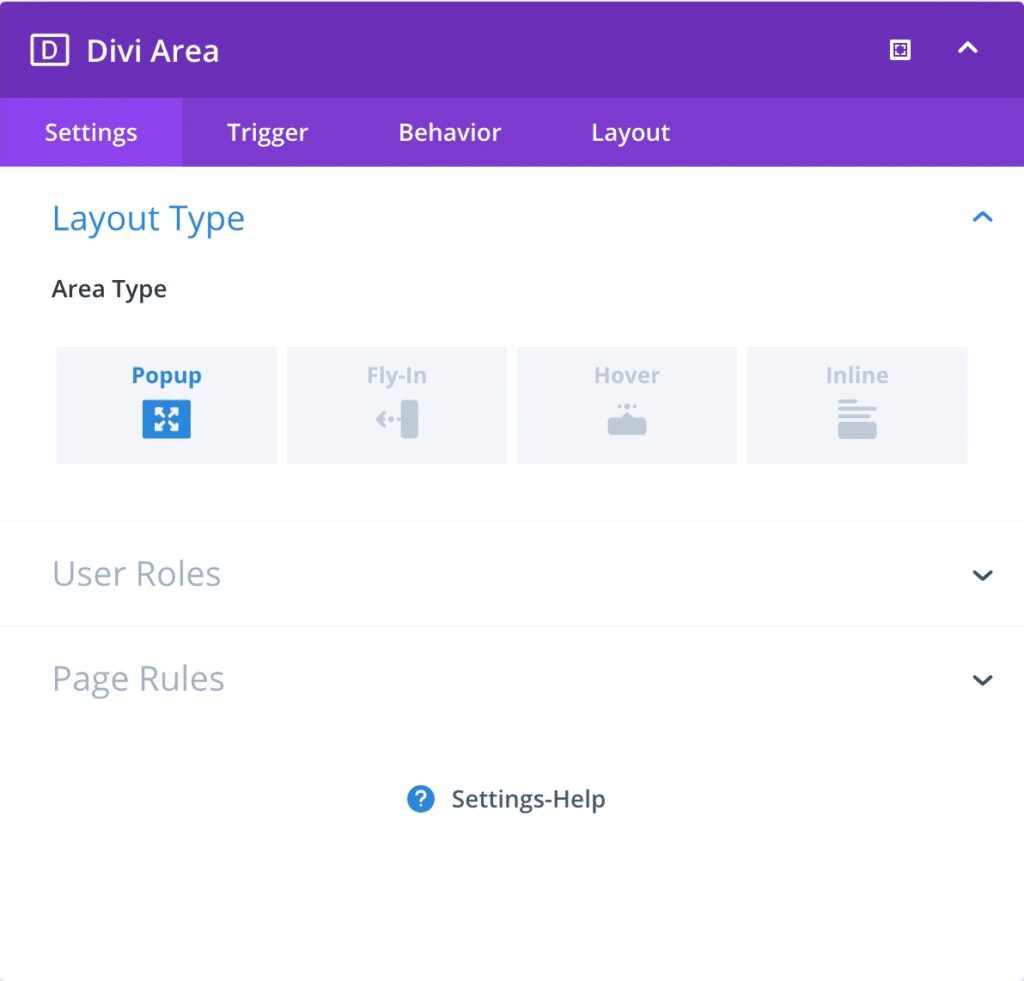
- Individual Popups: Turning any Divi Section into a Popup inside the Visual Builder. Really straightforward.
- Global Popups: Preparing advanced Popups in a new Admin Area, while automatically inserting the Popups on the pages that need them.
- Unlimited Areas: Supporting multiple Popups, Fly-Ins, and other areas simultaneously.
- Fly-Ins: Sliding a Fly-in into the screen and keeping it visible without blocking the rest of the page.
- Hover Areas: Creating Mega-Menus or Tooltips using Hover Areas that are always attached to a visible element on the page.
- Inline Areas: Inserting or replacing content on any page, using Inline Areas. You could add a banner at the end of every blog post or insert a message to logged-out users.
- Time-based triggers: Creating Popups that are opened after a certain duration. You can even set the duration to “0.0” to show a Popup instantly when a page is loaded.
- Scroll-event triggers: Presenting a newsletter subscription form when the user scrolled down a particular % of the page. Defining a scroll-distance either in percent or pixel.
- Exit-Intent trigger: Displaying Popups right before a visitor leaves your page has never been easier. Enable the Exit-Intent behavior, and Divi Areas Pro will do the rest.
- Back-Button trigger: Intercepting the back-button click and displaying a Popup or Fly-In instead. Reliably works on every device.
- Target posts or pages: Selecting individual pages or posts that should show (or not show) a Popup.
- Target devices: Disabling an Area on a device-type via the familiar “Desktop,” “Tablet,” and “Mobile” options.
- User Role conditions: Displaying Areas based on any user role. That way, you can show different content to guests than to logged in members.
- URL and Referrer checks: Enabling Areas when a certain URL parameter is present, or when the visitor arrives from a specific referrer, like a search engine.
- Powerful Inline Conditions: You have the choice to display Inline Areas “Before,” “After,” or “Instead Of” any other Divi Section.
- Flexible Inline Locations: Replacing a section by CSS ID or Class, or by the position. You can also inject Inline Areas into Theme Locations, like “Header,” “Main Menu,” “Footer,” “Post Content,” or “Comment Form.
- Date Conditions: Displaying an Area during a date-range or defining a weekly schedule. Date conditions are verified with an Ajax request and are compatible with every caching plugin.
- Works with Divi Theme and Divi Builder Plugin: Initially built for the Divi theme, the plugin now works with all themes that use the Divi Builder plugin.
- Hooks, Filters, Debug-Mode: Hooking into the plugin core to customize options and features. Turning on the Debug Mode to output un-minified code and see what the JS API is doing.
- WooCommerce Integration: Displaying Popups inside WooCommerce product pages, the shopping cart, or during the checkout.
- JS API: A powerful JS API allowing you to use the plugin for anything you like, from creating dynamic Popups via JavaScript, loading Popup contents via Ajax request, to tracking Popup interactions in Google Analytics, and more.
It’s fair to say that Divi Areas Pro is an ultimate Divi extension that can be a valuable lead generation asset for your business website.
Try Divi Areas Pro today
Sounds interesting? Learn more about Divi Areas Pro and download your copy now!
Many pre-designed layouts. Automated triggers. No coding.
Click here for more details
Divi Areas Pro Features for Conversion-Driven Web Design
Here are some of the key features that you should look for when choosing a popup plugin for your website:
1. Complete Customization
The ability to design popups with custom colors, fonts, images, and layouts that match your website’s look and feel is critical.
A powerful popup plugin such as Divi Areas Pro that is merged with the Divi Builder’s customization features offers a wide range of customization options, including a library with ready-made Layouts.
If you don’t want to design the Popup from scratch, you have to enable the layout library, activate a layout, customize it, and you’re all set!

Luckily, the process for activating the Divi Areas Pro Layouts Library is very easy:
- Navigate to the Divi Areas Settings page in your wp-admin dashboard.
- On the Settings page, choose the “Layout Library” tab.
- Turn the flag “Enable the Layout Library” to “Yes”.
- Save the Settings and wait a minute or two while the templates are downloaded.

Once the Layout Library is enabled and each of the available templates are installed to your Divi website, you can go through the following steps to ensure that you’ll be able to use any template:
- Create a new Divi Area (or open an existing one)
- Click on the “Load From Library” button in the Visual Builder header (‘+’ icon)
- Once the Library modal has loaded, you will see the new tab “Divi Areas“. Switch to that tab.
- Now all available templates are visible to you. With a single click, any template can be imported to your Divi Area editor.
- Customize the template according to your needs, double-check that the Automatic Triggers are set, and publish the Area.
2. Conversion-Driven Content Types
Each piece of conversion-driven content is designed to convert website visitors into leads or customers by persuading them to take a specific action, such as making a purchase or filling out a form.
In other words, content types such as Popups, Fly-Ins, Hover Areas, and Inline Areas all use persuasive elements such as clear messaging, compelling visuals, and strong calls to action to encourage users to take the desired action.
The ultimate goal of Divi Areas Pro is to maximize your conversion rate with these types of content on your Divi website, and again, customizing and transforming one piece of content from Popup to Fly-In and Inline content is effortless.
Popups

The Divi Areas Pro Popup layout is our popular layout type, which means that most of our clients use popups to display important promotions and invite visitors to subscribe or opt for a similar CTA.
Fly-Ins

You can use a Fly-in to increase email sign-ups or promote your content. Fly-ins do not show an overlay on your entire page and do not block the page at all.
Instead, they stick to any side or corner of your screen, and Divi Areas Pro allows you to choose where you want to add the fly-in on your site. Better yet, users can still scroll through the page while the Fly-in is showing.
Creating a Fly-In is effortless. Start by creating a brand-new Divi Area, where in the Area Settings, you’ll choose the ‘Fly-In’ layout type:

Next up, you need to choose your automatic trigger in the ‘Trigger’ section of the settings, which can be either ‘On Click’ ‘Hover’, or a valid main menu CSS Selector:

In the Layout settings, you’ll also find the ‘Area Alignment’ feature as well. Here, you can choose which place on the screen the Fly-In area would appear:

Creating a Fly-In is that easy. All you have to do later is use the Divi Builder to set up the Fly-In design and text elements.
Hover Areas

Hover Areas are always positioned next to a trigger element. The Hover Areas layout is similar to a Tooltip, and they can be used, for example, to display mega menus.
To learn more about Hover Areas and how to use them with the Layout Library, read Introducing Hover Areas and Template Library Support.
Inline Areas

Inline Areas display content in a normal section but somewhere inside a page, and are an excellent type of content if you want to position ads or conditional content.
Try Divi Areas Pro today
Sounds interesting? Learn more about Divi Areas Pro and download your copy now!
Many pre-designed layouts. Automated triggers. No coding.
Click here for more details
3. Plethora of Triggers
As you may be aware by now, popups can be triggered in a number of ways, such as after a set amount of time, when a user scrolls down the page, or when they click on a specific element.
Divi Areas Pro offers a full range of triggering options, so you can determine the best way to display your popups on your Divi website.
There are many ways to trigger a Popup or Divi Area with Divi Areas Pro. You can choose a set of automatic triggers that can be configured directly in the Trigger tab, without having to edit your page or insert a code snippet.
Module Link
You can define a trigger by setting any Module Link to an Area ID #sample-area, which works great for every Divi Module, particularly Sections and Rows.

Exit Intent
When editing an on-page Popup, you can use the Enable Exit Intent flag to make that Popup appear when an intent to exit is detected.

When you edit a Divi Area, you can use the automatic Exit Intent trigger to do the same.
Automatic Triggers
Through the Divi Areas meta box, you can use any of the built-in automatic triggers: On Click, After Delay, On Scroll to element or position, Exit Intent, On Inactivity, On Browser Focus.

URL Hash
With Divi Areas Pro, you can trigger your Areas on a specific page by adding the Area ID to the URL, which can be ideal for triggering a Popup after completing a contact form.

Hover Triggers
A repeated hover trigger can display the Area every time the trigger event happens, such as clicking a button or hovering a menu item.

Dynamic Content URL
You can use the Divi Dynamic Content feature to insert a Divi Area trigger to any URL field of your website. When using this trigger, the Area will be automatically loaded on the page, regardless of your pre-defined “Page Rules” for the Area.

4. Targeting Devices and Pages
The ability to target specific pages, posts, or types of visitors based on location, device, or referral source is also an important factor that affects the conversion rate of your Divi website.

As a result, this allows you to deliver targeted messages to the right people at the right time, increasing the chances of a greater conversion rate. The Divi Areas Pro plugin offers the following targeting options:
- Target posts or pages: You can select individual pages or posts where you want to (or you don’t want to) display the Popup.
- Target devices: You can easily disable an Area on a device-type via the familiar “Desktop,” “Tablet,” and “Mobile” options.
5. Form Integrations
Adding a form to your popup is an excellent way to collect information from visitors, such as email addresses, names, or feedback.
Since it’s based on Divi, the Divi Areas Pro plugin allows you to include a form and login form module, so you can add those fields to your popup and collect valuable information from website visitors.
Let’s go over some quick steps to help you prepare a login form popup in Divi Areas Pro.
Head to the Divi Areas Pro dashboard, add a new Divi Area. Inside the row of your first section, once you locate the Login Module, add it to your page.

Once you add the module, you will be presented with a list of the options Content, Design, and Advanced that you can use to create a unique login form for your popup.
As soon as you enter the title and the description of the login form, make sure to enable the ‘Redirect to the Current Page’ button.

Within the Design options, set up the preferred colors and background that fit with the page’s context and your brand’s color themes.
The following is just a simple example of a login form:

Now, inside your Divi Area dashboard, scroll down to the settings, and designate the Area as a Popup.

Next, navigate to the ‘Trigger’ options and choose the desired trigger and designate on which user action you want the popup menu to appear.
In most cases with conditional and limited content, this trigger would be the On-Scroll trigger.
As soon as you click on the ‘Publish’ button, you can immediately test the login form popup on your Divi pages.

All you have to do is customize the content and the popup settings within the plugin further, and you’re good to go. It’s that easy, with Divi and Divi Areas Pro!
Try Divi Areas Pro today
Sounds interesting? Learn more about Divi Areas Pro and download your copy now!
Many pre-designed layouts. Automated triggers. No coding.
Click here for more details
6. Mobile Responsiveness
The ability of the popup to adjust its size and layout to different screen sizes and devices is critical, as more and more visitors are accessing websites from mobile devices.
Divi Areas Pro produces fully responsive popups, making sure that you’ll be able to convert visitors when they’re on the move.
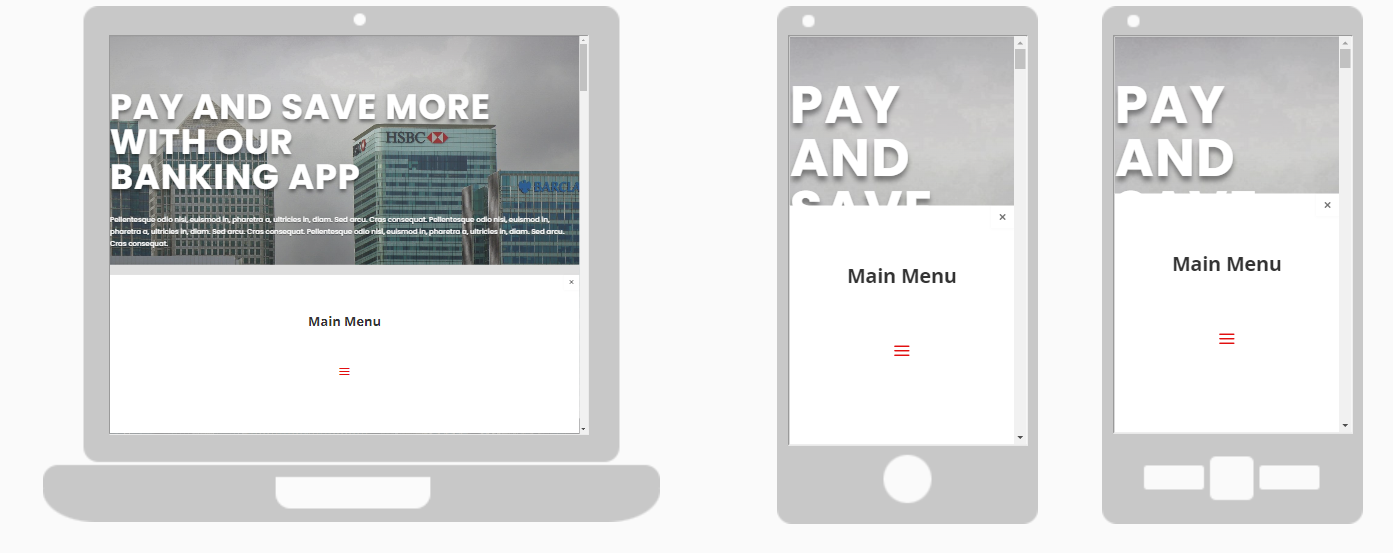
For example, let’s say that you want to use Divi Areas Pro to create a responsive Divi Fly-In menu. Again, let’s go over some quick steps on how to do this with the plugin.
First, set the background and the box shadow for your Divi Area, as well as the related background color, graphic, or image.

Next, add content to your popup menu. Begin with the menu’s name/headline that highlights the items.

Then, add a new row, set the content position to the middle, and insert the Divi Menu module.

By default, the menu has a white background, but if you want to use a different color, you can choose it with the color picker.
Within the design tab, you can change how each aspect of the menu looks, starting from the layout, then the spacing, text, icons, logo, border, filters, and animation.

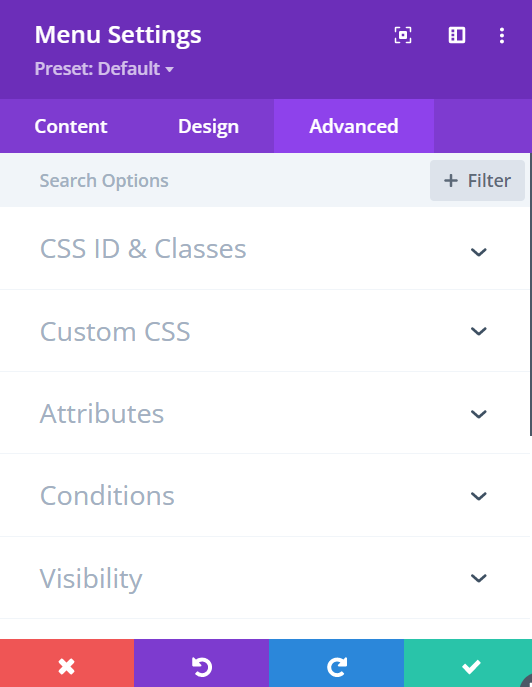
In the Advanced tab options, you will find the CSS & HTML features, which can be extremely beneficial if you want to take things to another level, especially for more experienced web designers.
Inside your Divi Area dashboard, scroll down to the settings, and designate the Area as a Popup, Fly-In, Hover, or Inline.

Next, navigate to the ‘Trigger’ options and navigate to ‘Automatic Triggers’, choose the desired trigger, and designate on which user action you want the menu to appear.
As soon as you click on the ‘Publish’ button, you can immediately test the popup on your Divi pages.

Of course, make sure to open the page on a mobile screen to confirm that the menu is responsive as well.
Wrapping Up
In conclusion, the Divi Areas Pro plugin offers a wealth of features for creating effective popups and any type of conversion-driven content on your Divi website.
With its user-friendly interface and a wide range of customization options, it is a great choice for web designers looking to increase conversions, build email lists, and create a better user experience for their Divi websites.
Whether you are a beginner or experienced with Divi, this plugin provides an easy and efficient way to create engaging content that will help drive results for your website.
P.S. A POPUP MASTERCLASS COURSE AS A BONUS – When you purchase a Divi Areas Pro license, you don’t just get an amazing tool; you unlock a world of expertise. As a special bonus, gain exclusive access to our Popup Master Class course, led by none other than our founder, Philipp Stracker.
This course isn’t just an add-on; it’s a game-changer. Learn directly from a master and apply groundbreaking strategies to your website. Make your purchase today and start your journey to becoming a popup expert today!
Try Divi Areas Pro today
Sounds interesting? Learn more about Divi Areas Pro and download your copy now!
Many pre-designed layouts. Automated triggers. No coding.
Click here for more details
More Articles You Will Like


