
A simple name and email form is your single most powerful tool for turning casual website visitors into loyal leads. Think of it as the digital handshake that starts a real conversation, letting you build relationships, nurture prospects, and ultimately, grow your business.
Why Your Name and Email Form Is a Conversion Powerhouse

It’s easy to overlook the humble name and email form. We see them everywhere—blog subscription boxes, webinar sign-ups, lead magnet downloads. But if you're thinking of it as just a data collection box, you're missing the bigger picture.
This small element is the bridge between anonymous traffic and a tangible, valuable audience you can speak with directly. For Divi users, this is especially true. The Divi Builder gives you a solid foundation with its native Contact Form module, but the real magic happens when you move beyond the defaults. By combining smart design with powerful plugins, you can transform that passive box into an active conversion asset.
The Data-Backed Impact of Forms
The impact of a well-executed form isn't just theory; the numbers prove it. An incredible 74% of businesses use web forms for lead capture. Even more telling, nearly half of them—a staggering 49.7%—rank forms as their single most effective conversion tool.
These stats highlight a clear truth: your ability to grow an email list and customer base is directly tied to how effective your forms are.
A simple, well-placed form is a non-negotiable part of building a killer website for a service business that actually wins clients. It’s not just an add-on; it's a core component.
To give you a better sense of where the opportunities lie, here's a look at how different form types tend to perform. Shorter forms almost always win.
Form Type Conversion Potential
| Form Type | Average Start-to-Complete Rate |
|---|---|
| Contact Form | 23% |
| Registration Form | 21% |
| Lead Generation Form | 17% |
| Order/Payment Form | 15% |
| Survey Form | 14% |
As you can see, the simpler the ask, the higher the completion rate. This is why a basic name and email form is such a high-leverage starting point.
Your name and email form isn't just a feature on your website—it’s the start of every customer relationship. Optimizing it is one of the most impactful things you can do.
From Static to Strategic
This guide will show you how to move beyond Divi’s default settings. We'll start by building and styling a foundational form, but more importantly, we’ll make it smarter. Using a tool like Divi Areas Pro, you can trigger your form to appear at the exact moment a user is most likely to convert.
This includes common high-impact placements like:
- Exit-Intent Popups: Catching visitors just before they bounce.
- Scroll-Triggered Fly-ins: Engaging readers who are deep into your content.
- Inline Forms: Seamlessly integrating subscription opportunities right inside your blog posts.
By the end of this tutorial, you’ll have a complete blueprint for creating a high-performing name and email form that works tirelessly to build your audience.
Building Your Foundational Form in the Divi Builder
Alright, enough with the theory—it's time to jump into the Divi Builder and get our hands dirty. The starting point for any good lead capture form is Divi’s own Contact Form module. It’s a workhorse that handles all the fundamentals we need for a solid name and email form. Adding it to your page is just like adding any other module you're already familiar with.
Once you pop it onto your page, you’ll see the default fields: Name, Email Address, and Message. Since our goal is a quick and easy lead capture, the first thing I almost always do is simplify. Just click the little trash icon next to the "Message" field in the module settings to delete it. This laser-focuses the user on giving you just the two things you really need.
Configuring Your Core Fields
When it comes to form fields, clarity is everything. I've seen so many forms abandoned simply because the labels were vague or the placeholders were confusing. Don't let that be you. Inside the settings for each field (just click the gear icon), you have total control over how it looks and acts.
The Field ID is just an internal name for you, so something clean like first_name is perfect. The Title, however, is what your visitors see. Make it crystal clear—"First Name" is all you need.
You'll notice each field is its own block in the settings panel. This makes it super easy to drag and drop them into a logical order. My go-to is always Name, then Email. It just feels natural.
Now, click into a specific field’s options and find the Field Options tab. This is where you'll set the field type (like Input Field or Email Field) and, most importantly, mark it as Required. Making both name and email required is a non-negotiable for me. It ensures you’re not collecting incomplete or useless data. It’s a simple toggle that adds a crucial layer of validation.
A successful form submission should feel like a confirmation, not a question mark. I always customize the success message. Instead of a generic "Success!", change it to something like "Thanks! We've sent the guide to your inbox." It reassures the user and tells them exactly what to do next.
Setting Up a Clear Success Action
So, what happens after someone hits "Submit"? By default, Divi just flashes that success message. That’s okay, but redirecting to a dedicated "thank you" page is so much better. You can set this up under the Redirect toggle in the main module settings.
A thank-you page is a massive upgrade for a few key reasons:
- Conversion Tracking: It’s the simplest way to track your form submissions with tools like Google Analytics.
- Next Steps: You can guide the user somewhere else—maybe to a popular blog post, a featured product, or your social media channels.
- Reinforce Value: It's your chance to confirm what they just signed up for and properly thank them for their trust.
If you're looking to really dig into what Divi's forms can do, we've got a great guide on how to create a lead generation page using Divi's contact form module that builds on these basics. Think of this initial setup as the launchpad for all the advanced styling, automation, and popup magic we'll get into next.
Advanced Styling and User Experience Optimization
A default form gets the job done, but let's be honest—it rarely inspires anyone to fill it out. This is where we go beyond the basics and transform that functional foundation into something that’s both visually compelling and a breeze to use.
The goal is to make your name and email form look like a deliberate, integrated part of your website, not just a generic module you dropped onto a page. To really get this right, you’ll want to borrow from modern user experience innovations that focus on reducing friction and encouraging people to hit "submit."

Thankfully, Divi’s design controls give you the power to customize every single pixel. Jump into the Design tab of your Contact Form module, where you’ll find toggles for Fields, Text, and the Button. Think of this as your command center for styling. Don't be afraid to experiment.
Aligning Your Form with Your Brand
Your form absolutely has to feel cohesive with the rest of your site. That means matching your established fonts, colors, and button styles. A jarring, out-of-place form can create subconscious distrust and tank your conversion rates before you even know what's happening.
Here are a few high-impact adjustments you can knock out right away:
- Field Customization: Play with the field background color, text color, and border-radius. Even a subtle change, like an off-white background and slightly rounded corners, can make a form feel much softer and more modern than the default sharp-edged boxes.
- Button Styling: The submit button is your main call to action, so make it count. Use your brand’s primary accent color to make it pop. I also like to increase the font size just a touch and add a simple hover effect—like a slight color change or shadow—to give users clear feedback that it’s clickable.
- Spacing and Layout: Don't neglect the Spacing options. Adding a little custom padding inside your fields and some margin around the entire form module makes a huge difference. Good spacing prevents the form from feeling cramped and drastically improves readability, especially on mobile.
A well-designed form does more than just look good—it communicates professionalism and trustworthiness. When a form feels thoughtfully designed, users are more likely to believe their data will be handled with the same level of care.
Enhancing the User Experience
Great styling is only half the battle. If the form is a pain to use, you've already lost. A frustrating experience is the fastest way to lose a potential subscriber or customer. The good news is the Divi Builder gives you all the tools you need to fine-tune the interaction.
One of the most critical things is providing clear feedback. For instance, Divi lets you style the error messages. Instead of the plain default text, why not use a bold color and a more helpful message? Something like, “Oops! Please enter a valid email address” is much friendlier and helps users fix mistakes without getting annoyed.
Think about how the context changes the design. Here are a couple of real-world scenarios:
- Minimalist Inline Form: Imagine a form embedded within a blog post. Here, you'd want a subtle design. You could use a transparent background for the fields and a simple one-pixel border that matches your body text color. The button could be understated, maybe just text with a color-change on hover.
- High-Contrast Landing Page Form: On a dedicated landing page, your form needs to demand attention. Use a contrasting background color for the entire section it sits in. Make the fonts for the field labels larger and give the button a bold, vibrant color with a prominent shadow. It should be the undeniable focal point of the page.
By investing a little time in both the look and the usability, you create a name and email form that not only captures leads but also strengthens your brand and shows respect for your user's time.
Connecting Your Form and Automating Your Workflow
A beautifully styled name and email form is a great start, but its real power is unlocked only when you connect it to your other marketing systems. A standalone form that just sends you an email notification is a massive missed opportunity. The goal is to create a seamless flow where a new submission instantly and automatically kicks off your entire marketing and sales process.
This is where the magic of automation comes in. When a user hands over their details, you want that data to flow directly into your email marketing platform, like Mailchimp or ActiveCampaign, or even your CRM. This crucial step eliminates tedious manual work and ensures every new lead is nurtured from the moment they sign up.
Native Integrations vs Dedicated Plugins
Divi’s built-in Contact Form module offers some basic integrations, but for robust, flexible automation, you'll almost always need more. While you can connect to a few services right out of the box, a dedicated solution gives you far greater control over the whole workflow. This is especially true when you need to do more than just add a name to a list.
For instance, a powerful setup lets you apply specific tags to subscribers based on which form they used. Someone who downloaded a beginner's guide could be tagged "New User," while another who signed up for a webinar on advanced features could get the "Power User" tag. This kind of segmentation is the foundation of personalized marketing that actually resonates.
Automating Your Welcome Sequence
The most immediate win from connecting your form is triggering an automated welcome email sequence. The moment a new subscriber is synced to your email service, your pre-built automation can take over. It can send a warm welcome, deliver their promised lead magnet, and start introducing them to your brand. That immediate engagement is absolutely vital for building a strong relationship from day one.
For anyone in e-commerce, mastering these automated flows is a complete game-changer. Benchmarks consistently show that while typical email campaigns might see a 2% to 5% conversion rate, automated emails perform exceptionally well. Triggered emails average a whopping 42.1% open rate and a 5.4% click rate, with one in three of those clicks leading directly to a purchase.
Your form isn't just a data collection tool; it’s the trigger for your entire customer journey. A successful submission should be the starting pistol for a race to build a loyal, engaged customer.
Practical Scenarios for WooCommerce
If you're running a WooCommerce store with Divi, the integration possibilities get even more powerful. Capturing a name and email doesn't have to be limited to a boring newsletter signup in your footer.
Think about these high-impact automation opportunities:
- Post-Purchase Lead Capture: Use a Divi Areas Pro popup to offer a special discount on a future purchase right after a customer completes checkout. This is the perfect time to capture their consent for marketing emails, right at a moment of high engagement.
- Checkout Opt-In: Add a simple checkbox to your checkout form that subscribes customers to your mailing list. This can sync them directly to a "Customers" segment in your email platform, ready for targeted campaigns.
- Targeted Offers: Display a fly-in form offering a 10% discount, but only to visitors viewing a specific product category. You can tag these subscribers so you can send them relevant follow-up offers down the road.
By connecting your form directly to your sales and marketing machine, you create a unified system that works around the clock to grow your business. If you're still deciding on a platform, check out our guide on the best email marketing automation tools to find the right fit for your needs.
Supercharging Conversions with Divi Areas Pro Triggers
A static name and email form sitting in your website's footer is a bit like a wallflower at a party—it's there, but it’s waiting to be noticed. A dynamic form, on the other hand, actively joins the conversation at just the right moment. This is the whole idea behind using a powerhouse tool like Divi Areas Pro to intelligently control when and where your forms appear.
When you shift from a passive to an active strategy, you can completely change your lead capture game. Instead of just hoping a visitor happens to stumble upon your subscription box, you can present it when their engagement is at its peak. This simple switch can be the difference between a slow trickle of subscribers and a steady, growing list. It all comes down to timing.
Matching the Trigger to the User's Intent
The real magic of Divi Areas Pro is its huge library of display triggers. This lets you move beyond the one-size-fits-all approach and tailor the experience to a user’s specific behavior on your site. When your call to action is context-aware, it feels genuinely helpful instead of intrusive.
Here are a few of the most effective triggers I use all the time:
- Exit-Intent: Think of this as your safety net. The moment a user's cursor moves toward the browser's close button, a popup appears with one last, compelling offer. It's the perfect way to catch abandoning visitors with a last-minute discount or a can't-miss lead magnet.
- Scroll-Depth: Someone who has scrolled 70% down your latest blog post is clearly hooked. A subtle fly-in form at this point feels perfectly natural because they’ve already found value in what you have to say.
- Time-Delayed: Hitting a new visitor with a popup the second they land is jarring and a surefire way to get them to leave. A time-delayed trigger lets you wait 10-15 seconds before showing your form, giving them a moment to get their bearings.
The most successful forms don’t interrupt the user experience—they enhance it. By triggering your form based on user actions, you're meeting them where they are, making the request to subscribe feel like a natural next step.
Once you capture that lead, automation can take over. The workflow diagram below shows how you can instantly process new submissions, sending them to your CRM and triggering a welcome sequence without lifting a finger.
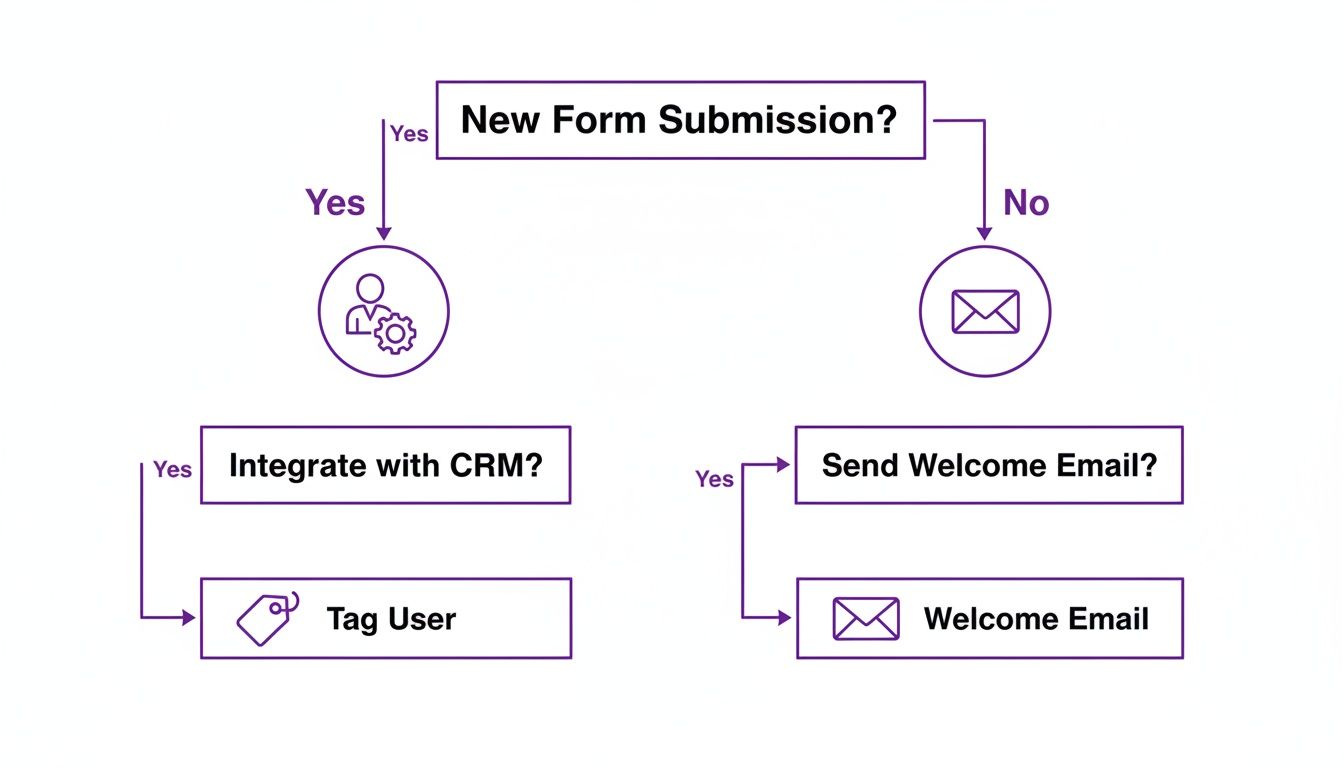
This kind of automation is a game-changer. Once the form is submitted, your systems can segment new contacts and kick off the nurturing process immediately.
Advanced Targeting for Maximum Impact
Beyond simple triggers, you can get incredibly granular by layering on advanced targeting rules. Imagine showing a unique form that offers a special guide, but only to first-time visitors. Or maybe you display a slick, mobile-optimized version exclusively for users on smartphones. This level of precision ensures your message always lands perfectly.
For a deep dive into mobile-specific strategies, check out our guide on how to create a mobile opt-in form with Divi Areas Pro.
The table below breaks down a few common scenarios where different triggers shine.
Divi Areas Pro Trigger Scenarios
| Trigger Type | Best For | Conversion Goal |
|---|---|---|
| On Click | Lead magnets, content upgrades, webinar signups | Capture high-intent leads who actively request more info. |
| Exit-Intent | E-commerce sites, landing pages | Reduce cart abandonment or capture leads before they leave. |
| Scroll Depth | Long-form blog posts, case studies | Engage readers who are already invested in your content. |
| Time Delay | Homepage, high-traffic pages | Welcome new visitors without being intrusive. |
| On Hover | Product grids, portfolio items, mega menus | Provide extra details or a CTA without a click. |
Choosing the right trigger for the right context is key to turning a passive visitor into an engaged subscriber.
The data speaks for itself. Standard, embedded name-and-email forms typically convert a meager 0.3% to 1.5% of unique site visitors. However, by using clever popups and triggers, that conversion rate can jump to between 1.5% and 5%. That's a potential 3x to 10x increase in performance. For anyone building WooCommerce stores or content marketing funnels, this boost is massive.
By implementing these smart triggers, you transform your form from a simple data field into a strategic conversion machine.
It’s All About Trust and Compliance
We’ve covered the mechanics, but now it’s time for what might be the most critical piece of the puzzle: trust. A slick form that triggers at the perfect moment is completely useless if your visitors don't feel safe handing over their information. Getting this right isn’t just about ticking legal boxes; it’s about building the confidence that turns a hesitant visitor into an eager subscriber.
At the bare minimum, every single form needs a crystal-clear link to your privacy policy. It’s a simple move, but it signals to users that you take their data seriously and have a transparent process for handling it. This small detail can make a massive difference in someone’s decision to opt-in.
Getting Explicit Consent
The days of automatically signing people up for a mailing list are long gone. Regulations like GDPR require explicit, informed consent, which means your form needs an unchecked checkbox that users must actively click.
And please, no vague language. Be direct.
- Weak: "Subscribe to our newsletter."
- Strong: "Yes, I'd like to receive marketing emails and weekly tips from your team. I understand I can unsubscribe at any time."
This kind of clarity removes any doubt about what they’re agreeing to, building a solid foundation of trust from the very first interaction.
When you treat a user's data with respect, you're not just complying with the law—you're demonstrating your brand's integrity. That respect is what turns a one-time subscriber into a long-term, loyal customer.
Practical Spam Protection Without the Headaches
You absolutely need to protect your form from spam to keep your email list clean and your server happy. While Google reCAPTCHA is a common go-to, it can add friction and sometimes frustrate legitimate users.
For a simple name-and-email form, a honeypot field is a much more elegant solution. A honeypot is a hidden field that’s invisible to human users but looks like a tasty snack to spam bots. Since bots are programmed to fill out every field they see, you can simply auto-reject any submission that has an entry in that hidden field.
It's a surprisingly effective and user-friendly way to filter out junk without making real visitors solve a puzzle. By focusing on these trust-building details, you ensure your form is not just compliant, but genuinely effective.
Ready to transform your static forms into dynamic conversion powerhouses? With Divimode, you can build intelligent popups, fly-ins, and targeted content that captures leads at the perfect moment. Explore Divi Areas Pro and start building smarter forms today!
More Articles You Will Like