Pairing WooCommerce with Divi is a game-changer. It gives you incredible design control over your online store, letting you build completely custom product pages, checkout experiences, and shop layouts without ever having to write a single line of code. You're getting Divi's visual drag-and-drop builder fused with WooCommerce's powerhouse e-commerce engine—a combination that gives you total creative freedom. For anyone serious about building a unique, brand-aligned shopping experience on WordPress, this is the go-to solution.
Why Divi and WooCommerce Are a Perfect Match
If you've ever installed WooCommerce on a standard WordPress theme, you know the feeling. You're often stuck with a generic, rigid layout that looks like a hundred other stores. Customizing anything significant, like the product page or checkout flow, usually means diving into complex code or juggling a handful of extra plugins. This is exactly the headache that Divi solves.
Instead of being boxed in, you get a full suite of dedicated WooCommerce modules right inside the Divi Builder. This is huge. It means you can treat every part of your store—product titles, images, prices, "add to cart" buttons—as an individual building block. You can drag them, drop them, and style them with Divi's deep design settings to build a store that actually looks and feels like your brand.
Unleashing Creative Control Over Your Store
Let’s get practical. Imagine you're running an online boutique selling handmade jewelry. A standard theme might give you a plain, uninspiring product page. But with Divi, you can craft a custom template with a gorgeous two-column layout, featuring a large, beautiful product gallery on one side and elegantly styled descriptions, prices, and purchase options on the other.
This level of control isn't just for product pages. It extends to every corner of your store. You can:
- Design Custom Shop Pages: Break free from the default grid. Create unique layouts for your main shop page, add custom filters, and drop in promotional banners to highlight a sale.
- Craft High-Converting Product Layouts: Want to boost sales? Add video galleries, customer testimonials, and related product sliders directly onto your product pages to drive engagement.
- Optimize the Checkout Experience: Redesign your cart and checkout pages from the ground up. Add trust badges, FAQs, and a streamlined form design to cut down on cart abandonment.
Before we dive deeper, let's quickly compare what you get with Divi versus a more traditional approach.
Divi vs Standard WooCommerce Themes
This table breaks down the key differences, showing just how much more flexibility Divi brings to the table for store owners.
| Feature | Standard WooCommerce Theme | Divi Theme |
|---|---|---|
| Product Page Layout | Usually a fixed, single template with limited options. | Fully customizable with the Divi Builder. Place elements anywhere. |
| Shop/Archive Pages | Basic grid layout. Customization often requires code or plugins. | Build custom grids, lists, or unique layouts. Add banners and filters visually. |
| Cart & Checkout Design | Typically rigid and difficult to style without custom CSS. | Full control over layout, styling, and content to optimize the user experience. |
| Design Process | Relies on theme options panels and customizer settings. | Visual, real-time drag-and-drop building directly on the front end. |
| Ease of Customization | Requires coding knowledge (PHP, CSS) for significant changes. | No code required. Anyone can create a professional, unique design. |
| Module Integration | Limited to WooCommerce's default elements. | Access to 20+ dedicated WooCommerce modules for granular control. |
As you can see, it's not just a minor difference. Divi fundamentally changes how you approach building an online store, putting the design power back in your hands.
A Powerful and Growing Ecosystem
The synergy between these two platforms is no accident; it’s backed by a massive and growing community of users who rely on this combination every day.
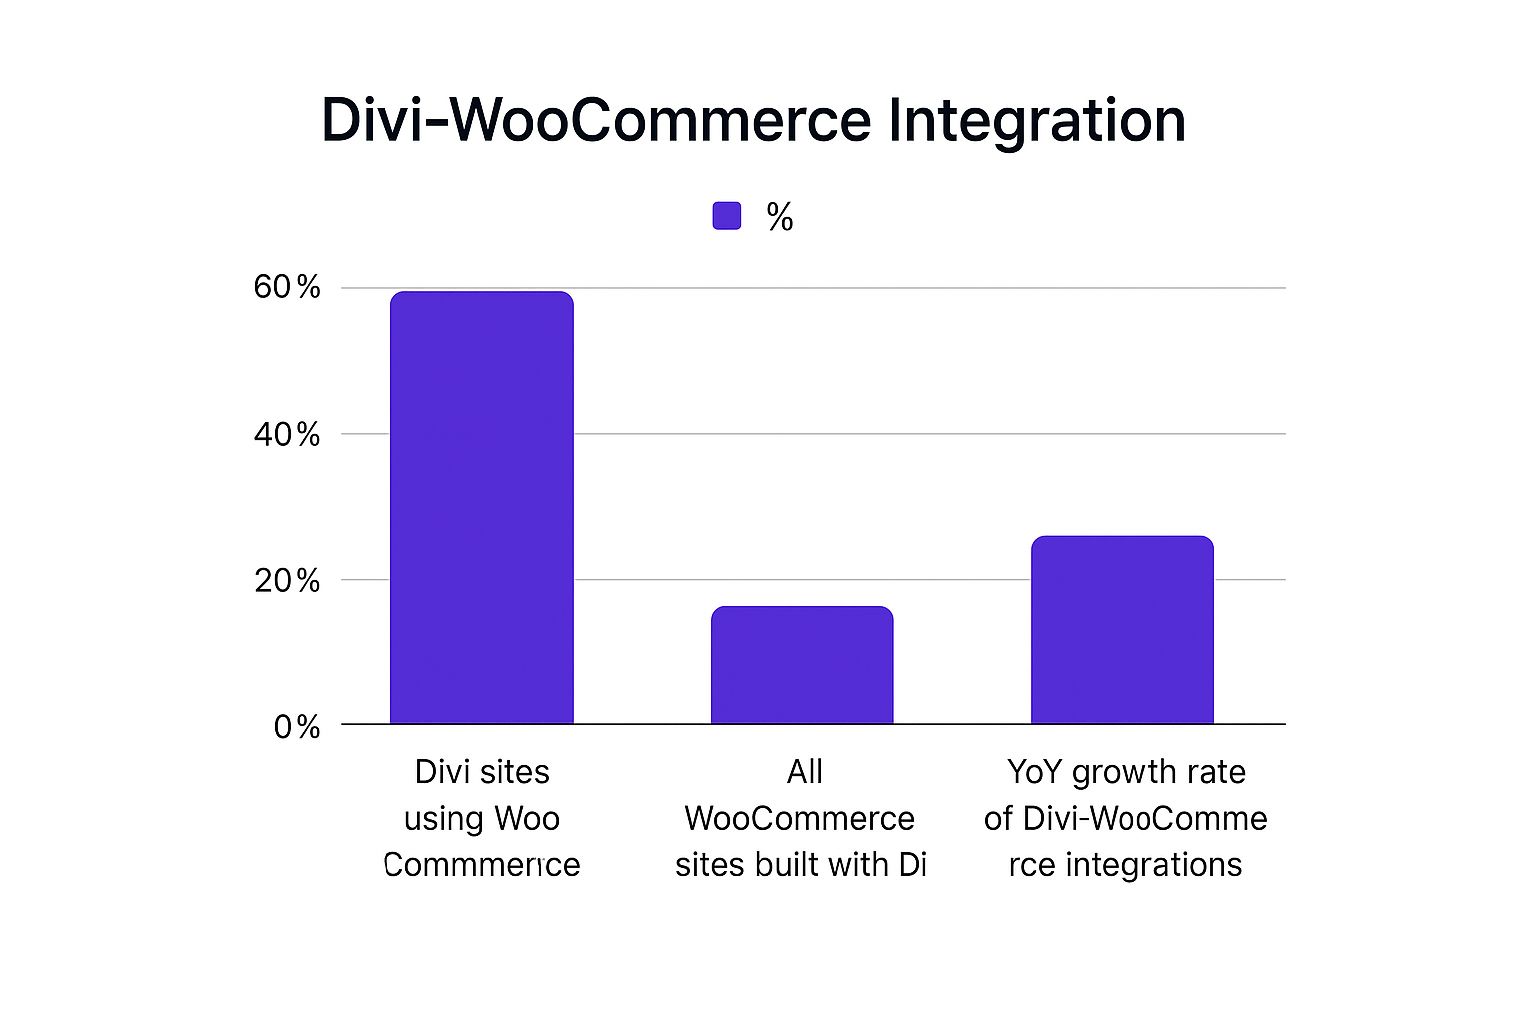
The data clearly shows that a huge portion of Divi users trust WooCommerce for their stores, and that trend is only heading up.
The numbers back this up even further. As of late 2023, there were approximately 343,421 WooCommerce websites built with Divi, making up nearly 15% of all sites powered by Divi. This isn't a niche pairing; it's a mainstream, reliable, and incredibly effective way to build an online store. If you're curious, you can find more detailed Divi statistics and see the data behind its growth for yourself.
The real advantage of using Divi for WooCommerce is moving beyond templates. You're not just filling in the blanks; you're architecting the entire customer journey from the first click to the final purchase.
Ultimately, this combination empowers entrepreneurs and designers to build professional, custom-branded stores without needing to be a developer. It perfectly bridges the gap between powerful e-commerce functionality and limitless design possibilities.
Setting Up Your Store for a Seamless Launch
With Divi active on your site, plugging in WooCommerce is your next major milestone. But this is way more than a simple "Install and Activate" job. The initial setup wizard and all the settings panels that follow are where you lay the concrete foundation for your entire online store. Nail these details now, and you'll save yourself from massive logistical headaches down the road.

Once you install and activate the WooCommerce plugin from your WordPress dashboard, you’ll be greeted by a handy setup wizard. It’s a pretty straightforward guided process that asks for basic info—your store's address, industry, what you're selling, and so on. It’s tempting to just click through it, but take your time here. The answers you give help WooCommerce configure default settings that actually make sense for your business.
After the wizard wraps up, the real work begins in the main WooCommerce settings dashboard. This is your command center for fine-tuning the core mechanics of your entire operation.
Dialing in Your General Settings
Your first stop should be the General settings tab. This area controls the absolute fundamentals of your store, impacting everything from the prices customers see to where you can legally ship.
- Store Address: Make sure this is the actual physical address of your business. WooCommerce uses it for tax calculations and shipping origins.
- Selling Location(s): This is where you decide who you'll sell to. You can open your store to all countries, block a few specific ones, or only sell to a select list. This is a critical step for managing shipping logistics and staying compliant.
- Currency Options: Set your store's default currency here. You can also tweak things like the currency position, thousand separator, and the number of decimals to match local standards.
These might seem like minor details, but they have a huge impact on the customer experience. Imagine a shopper in the UK seeing prices in USD with the dollar sign on the wrong side—it's an instant red flag that can kill trust. For a deeper look at the whole process, our comprehensive guide on https://divimode.com/how-to-setup-an-online-shop-with-divi/ offers some great extra tips.
Configuring Taxes and Shipping Zones
Let’s be honest, taxes and shipping are usually the most painful parts of setting up an e-commerce store. WooCommerce does a lot to simplify this, but you still need to configure it carefully. Under the Tax tab, you have the option to enable automated tax calculations, which is an absolute lifesaver for most store owners. You can also just input standard rates manually if your needs are simple.
Shipping is all managed through Shipping Zones. A shipping zone is just a geographic region where a specific set of shipping rules applies.
Think of shipping zones as custom rules for different regions. For example, you can create one zone for "United States (Domestic)" with a simple $5 flat-rate shipping method, and another zone for "Europe" with rates calculated by weight.
This granular control is incredibly powerful. You can add multiple shipping methods to each zone, like Free Shipping (which you can tie to a minimum order amount), Flat Rate, or Local Pickup. Getting this right from the start ensures you don’t lose money on shipping or accidentally overcharge your customers—a super common reason people abandon their carts.
Integrating Your Payment Gateways
Your store isn't a real business until you can get paid. As you wrap up your WooCommerce setup, picking the right payment gateway is a make-or-break decision. Luckily, WooCommerce supports major players like Stripe and PayPal right out of the box, and getting them connected is pretty painless.
Just head over to the Payments tab in your WooCommerce settings. You can enable and configure your preferred methods here. For Stripe and PayPal, it's usually just a matter of connecting your accounts by pasting in some API keys, which you can find in your respective gateway dashboards.
From experience, it’s always a good idea to offer more than one payment option. While Stripe is fantastic for credit card processing, a lot of customers feel safer using the familiar PayPal checkout. Offering both can give your conversion rate a nice little bump by catering to different preferences. To explore your options further, this helpful guide to payment gateways for WordPress gives an excellent overview of what's out there.
Building Custom Product Pages with the Divi Builder
Let's be honest, the default WooCommerce product page is functional, but it's rarely inspiring. It’s a generic, one-size-fits-all layout that does very little to showcase your products or inject any of your brand's personality. This is exactly where the combination of WooCommerce for Divi really starts to shine. By firing up the Divi Theme Builder, you can completely tear down that standard layout and build a custom product page from scratch, piece by piece.

Think of the Theme Builder as your digital workshop. Instead of being stuck with a pre-built frame, you get a blank canvas and a full set of specialized tools—in this case, Divi’s dedicated WooCommerce modules. This isn't just about tweaking colors and fonts; it's about fundamentally rethinking how your customers see and interact with your products online.
Starting Your Custom Product Template
First things first, head over to Divi > Theme Builder in your WordPress dashboard. This is the command center for all your sitewide templates. From here, you'll click "Add New Template" and assign it to "All Products." This simple step tells Divi that whatever you design here should replace the default view for every single product in your store. It’s the key to ensuring a consistent, branded experience for your shoppers.
Once that's set up, click on "Add Custom Body" and choose "Build Custom Body." This will launch the familiar Divi Builder, but with a critical difference: you now have access to a whole library of WooCommerce-specific modules designed to pull in your product data dynamically.
Adding Dynamic WooCommerce Modules
Inside the builder, it's time to start adding the essential parts of a product page. You won't be using static text or image modules. Instead, you'll grab Divi’s "Woo" modules, which are smart enough to automatically fetch and display the correct information for whichever product a visitor is viewing.
These are the core modules you'll be working with:
- Woo Product Title: Automatically displays the name of the product. Simple, but essential.
- Woo Images: This pulls in your main product image and its gallery, instantly creating an interactive slider.
- Woo Price: Shows the current price, and it'll even handle sale pricing for you.
- Woo Add to Cart: This is the most important interactive element, bundling the quantity selector and the "Add to Cart" button.
- Woo Tabs: A tidy way to organize the product description, additional info (like weight and dimensions), and customer reviews into a tabbed layout.
By dragging and dropping these modules onto your layout, you’re rebuilding the product page piece by piece, but this time with total control over the positioning, spacing, and styling of every single element.
Designing a Visually Engaging Layout
A classic and highly effective design is a two-column layout. It just works. Create a new row with two columns, then place the Woo Images module in the left column and your key purchasing details—Woo Product Title, Woo Price, and Woo Add to Cart—in the right. This arrangement is intuitive for shoppers and creates a clean, balanced look right off the bat.
The real magic happens when you start styling these modules. You can change the font and size of the product title, customize the button style for your "Add to Cart" module to match your brand's call-to-action, and even add a custom border around the product image gallery.
Below your main product section, you can add a new full-width row to house the Woo Tabs and Woo Related Products modules. That related products section is huge for increasing your average order value, so don't just drop it in and forget it. Use Divi’s design settings to adjust the column count, style the product titles, and make sure the entire section feels like an integrated part of the page, not just an afterthought.
The ability to create these attractive, functional e-commerce sites is what makes WooCommerce and Divi such a powerful duo, especially for smaller businesses. In fact, WooCommerce holds a commanding 38.76% of the e-commerce platform market share, and a huge chunk of its users—around 27.4%—are selling fewer than 10 products. This just goes to show the massive market of entrepreneurs who need powerful, yet accessible, tools to build professional stores. You can learn more about WooCommerce's market position and trends to get the full picture.
Once you’re happy with your design, just save the layout in the Divi Builder and then click "Save Changes" back in the Theme Builder dashboard. Now, go visit any product page on your live site. You'll see your brand-new, custom-designed layout instead of the boring old WooCommerce default. It's that simple, and it's one of the biggest wins of using WooCommerce for Divi.
Designing a High-Converting Cart and Checkout Experience
Once a customer adds a product to their cart, you've hit the most critical stage of their journey. This is where sales are won or lost. A clunky, untrustworthy, or just plain confusing cart and checkout process is the number one reason for abandoned carts.
It's a staggering number, but research consistently shows that the average cart abandonment rate hovers around 70%. Think about that—for every ten potential sales, seven walk away at the last minute. This is where so much revenue is left on the table, often due to poor design.
This is precisely why pairing WooCommerce with Divi gives you such a massive competitive advantage. You're no longer stuck with WooCommerce's default, one-size-fits-all pages. Instead, you can use the Divi Theme Builder to craft a fully branded, optimized, and conversion-focused experience from the ground up.
Taking Control with the Divi Theme Builder
Just like we did with the product pages, the process kicks off in your Divi > Theme Builder dashboard. Your goal here is to create two new templates: one for your Cart page and another for your Checkout page.
You'll need to assign them to the right spots. Find the "Other Pages" section in the template settings and assign one template to "Cart" and the other to "Checkout." Simple enough.
After assigning them, you’ll build a custom body for each. Now, this is where it differs from the product page template. Instead of using dynamic "Woo" modules, the cart and checkout pages rely on a couple of simple but powerful WooCommerce shortcodes.
Inside your Divi layout for the cart page, drop in a Code module and insert [woocommerce_cart]. Do the same thing for the checkout page template, but this time use the [woocommerce_checkout] shortcode. This little snippet tells WooCommerce to render all the core cart and checkout functionality right inside your custom Divi design.
Essential Elements for a Trustworthy Checkout
With the technical part sorted, you can now focus on the design elements that actually build trust and drive conversions. Your main goal is to eliminate friction and inspire confidence. A blank, sterile checkout page just feels impersonal and can make customers second-guess entering their payment details.
Here’s how to immediately enhance your design:
- Add Trust Badges: Prominently display icons for secure payments (SSL seals, credit card logos). These are quick visual cues that tell customers their data is safe.
- Display Testimonials: A small, glowing customer review placed near the final purchase button can be incredibly persuasive. Social proof is a powerful motivator at this final hurdle.
- Include a Clear Order Summary: Make sure the layout keeps the order summary visible. Customers need to see exactly what they're paying for without having to scroll around.
- Provide Contact Information: A visible support email or phone number shows that a real business stands behind the website, which helps reduce any last-minute anxiety.
A well-designed checkout page is more than just a form; it's the final handshake. It's your last chance to reassure the customer they are making a great decision. Every element should build confidence and make the process feel effortless.
Styling Forms and Buttons to Match Your Brand
Out of the box, the default WooCommerce form fields and buttons will likely clash with your Divi site's carefully crafted aesthetic. Luckily, you can style these elements directly within Divi's settings or with a touch of custom CSS.
To keep your branding consistent, a good starting point is to navigate to Divi > Theme Customizer > General Settings > Layout Settings and adjust your theme accent color. This will often update the primary checkout buttons automatically.
For more granular control over form fields, borders, and button hover effects, you might need to add some custom CSS. You can do this in the Theme Customizer or within the page's settings. Our detailed guide on how to customize the checkout page in WooCommerce dives deep into this, providing specific code snippets and techniques to get that polished, on-brand look.
By replacing the default layouts with thoughtfully designed templates, you transform the most vulnerable part of your sales funnel into a powerful conversion tool. This level of control is exactly why so many store owners turn to the Divi and WooCommerce combination.
Go Beyond the Basics with Divi’s WooCommerce Modules
Once you've got your product, cart, and checkout pages looking sharp, it’s time to really start selling. This is where you can move beyond the standard storefront and use Divi's dedicated WooCommerce modules to create custom product displays, feature sections, and dynamic archive pages that most themes can only dream of.
Instead of being stuck with a single, rigid shop page, you can now build multiple, targeted showcases. Think about it: a special "On Sale Now" section right on your homepage or a dedicated page just for your best-selling category. This is all doable with Divi's native modules—no extra plugins required.
Building Custom Shop and Archive Pages
The Divi Shop Module is your go-to tool for this. It’s an incredibly flexible module that lets you pull in products from your store and display them exactly how you want. You can drop this module onto any page, post, or—even better—into a Theme Builder template to completely redesign your product archives.
When you add the Shop module, you get instant control over what it displays. You can easily set it up to:
- Show specific categories: Perfect for creating curated collections by selecting one or more product categories.
- Highlight items on sale: Just toggle a switch to display only products with a sale price.
- Feature your best products: Hand-pick specific items to create a "Featured Products" grid.
- Control the layout: Tweak the number of columns, maybe switching from a standard four-column grid to a more spacious two-column layout to match your design.
This flexibility unlocks a ton of strategic merchandising possibilities. For instance, a clothing store could build a "Summer Collection" page by filtering the Shop module to only pull products from the "Dresses" and "Sandals" categories. They could then set the Product Count to 12 and change the Column Layout to three for a clean, boutique vibe.
Taking It Further with Third-Party Plugins
While Divi’s built-in modules are fantastic, sometimes you need to push the envelope. The WooCommerce ecosystem is massive—powering over 6 million active stores globally—a testament to its popularity and reliability. This huge user base has sparked the creation of some incredible third-party plugins that extend what Divi can do in really exciting ways.
Plugins like Divi BodyCommerce add a whole new set of modules and features designed specifically for advanced e-commerce sites. They can help you build custom login pages, design unique customer account areas, and roll out complex product filtering systems that go way beyond Divi’s out-of-the-box capabilities.
The real magic of these third-party tools is their knack for solving very specific problems. If you've ever found yourself saying, "I just wish I could…", there's a good chance a specialized plugin can make it happen.
Before you dive into third-party options, it’s a good idea to master the core building blocks Divi provides. Check out our deep dive into the key Divi WooCommerce modules and their features to get a solid handle on the native tools. It’ll help you spot exactly where an extra plugin can fill a gap.
A Practical Example: The Interactive Promotional Popup
Let's walk through a high-impact example that combines Divi's design muscle with the smart triggers from a plugin like our own Divi Areas Pro. We’ll create a promotional popup that appears the second a customer adds an item to their cart, offering a discount to nudge them toward completing the purchase.
This kind of immediate, relevant interaction is a proven way to boost conversions, catching customers at a key moment of buying intent.
Here's the basic rundown:
- Design the Popup: First, head to the Divi Library and create a new layout for your popup. Design it with a killer headline like "Wait! Get 10% Off Your Order," a text module with the coupon code, and a button that links straight to the checkout page.
- Create a Divi Area: Next, go to
Divi Areas Proin your dashboard and create a new "Area." Set its content source to the layout you just saved in the library and configure it to behave as a "Popup." - Set the Trigger: This is where the magic happens. In the trigger settings for your Area, you’ll select an "On Add to Cart" or a similar JavaScript-based trigger. This tells Divi Areas Pro to show the popup only when WooCommerce fires its
added_to_cartevent.
With this simple setup, you’ve just created a powerful, automated marketing tool right inside Divi. You’ve turned a standard shopping action into a chance to delight your customer and lock in the sale. It’s a perfect illustration of how blending Divi’s visual builder with advanced triggers lets you create a truly dynamic and responsive shop that really stands out.
Got Questions About Divi and WooCommerce? We Have Answers
When you're trying to get two powerful tools like Divi and WooCommerce to play nicely together, a few questions are bound to come up. From my experience, most people hit the same handful of snags when they're first getting started.
So, I've put together the most common pain points I see and some clear, practical answers to help you get past them. Think of this as your cheat sheet for smoothing out the bumps in the road.
Can I Use the Divi Builder on Default WooCommerce Pages?
This is easily one of the most common points of confusion, and the short answer is no—not directly. If you try to open the default /shop or /product pages that WooCommerce creates, you'll just see a shortcode. It’s a dead end.
The right way to handle this is with the Divi Theme Builder. Instead of editing the default pages, you create a brand-new, custom template from the ground up. Then, you simply tell Divi to use that template for your Product pages, Shop archive, Cart, or Checkout. This is how you unlock full design freedom and build a truly custom shopping experience with WooCommerce for Divi.
Will My Divi Store Be Fast Enough for Good SEO?
Absolutely, but you have to be intentional about it. A slow store is a guaranteed conversion killer and a red flag for search engines. Divi is incredibly flexible, but that same flexibility means you need to be mindful of performance as you build.
To make sure your store is snappy and responsive, focus on these non-negotiables:
- Optimize Your Images: This is huge. Always compress your product and marketing images before you upload them. Bloated image files are probably the #1 cause of slow load times I see in the wild.
- Invest in Quality Hosting: Don't cut corners here. A cheap, shared hosting plan just won't cut it for an active e-commerce site. It will buckle under the pressure.
- Get a Caching Plugin: A solid caching plugin like WP Rocket isn't optional; it's a must. It dramatically speeds up how your site is delivered to visitors.
- Use Divi's Performance Settings: Head into your Divi Theme Options and click the 'Performance' tab. Make sure you enable options like "Dynamic CSS" and "Critical CSS." These can give you a significant speed boost right away.
Performance isn't something you bolt on at the end; it's a fundamental part of a good user experience. A fast Divi and WooCommerce store doesn't just rank better—it keeps customers happy and clicking that "buy now" button.
Do I Need Extra Plugins to Make Them Work Together?
For the core setup? Nope. The Divi theme comes loaded with a complete set of dedicated WooCommerce modules right out of the box. These modules give you everything you need to design custom product pages, shop archives, and all the other essentials.
Now, if you want to get into really advanced territory, third-party plugins can be a fantastic investment. Tools like Divi BodyCommerce or Divi Machine can add powerful features like custom product filters, unique customer account pages, and other complex store elements if your project calls for them.
How Do I Create a Custom Shop Page Layout?
Building a custom Shop page is actually one of the most rewarding parts of using the Divi Theme Builder. It’s a pretty straightforward process.
You'll start by creating a new template and assigning it to your "All Products" or "Shop Page" archive. Once you're in the builder, you're no longer stuck with the default grid. You can drop in the Divi Shop module to display your products, and then surround it with anything you want—custom sidebars, promotional banners, or even a slick section for featured product categories. You have total control over the layout, styling, and content, letting you craft a shopping experience that’s uniquely yours.
Ready to create dynamic, high-converting experiences for your store? With Divimode, you can build advanced popups, fly-ins, and triggered content that grab attention and drive sales. Get started with Divi Areas Pro and unlock the full potential of your Divi and WooCommerce store.
More Articles You Will Like