The Trigger tab allows you to customize Area triggers.
🤓 What is a trigger?
A trigger is an event that makes the Area visible. The most common trigger is a click-trigger, which displays a Popup when the user clicks on a certain button or element. Also, the timed-trigger is very popular and will display an Area a certain time after the page loaded.
In Divi Areas Pro you can choose between a set of automatic triggers that can be configured directly in the Trigger tab. There is no need to edit any other page or insert code anywhere.
However, there are times when you cannot use (or do not want to use) an automatic trigger. For those cases, you find additional details in the custom triggers section. More info on this is found below.
_Btw, the built-in Automatic Triggers are one way to trigger your Areas. Here are all options on how you can trigger an Area ._
Automatic Triggers
Only for: Popup, Fly-In, Inline Areas
This section offers an easy and flexible way to create triggers.

Options
Trigger Rules
Allows you to define when the Area should be displayed. If you specify multiple rules, the Area will be displayed whenever one rule is true. For example: If you add a timed trigger and an exit-intent trigger, the Area will be displayed either after the delay, or when an exit-intent is detected, whichever happens first.
Read more about automatic triggers and available trigger types →
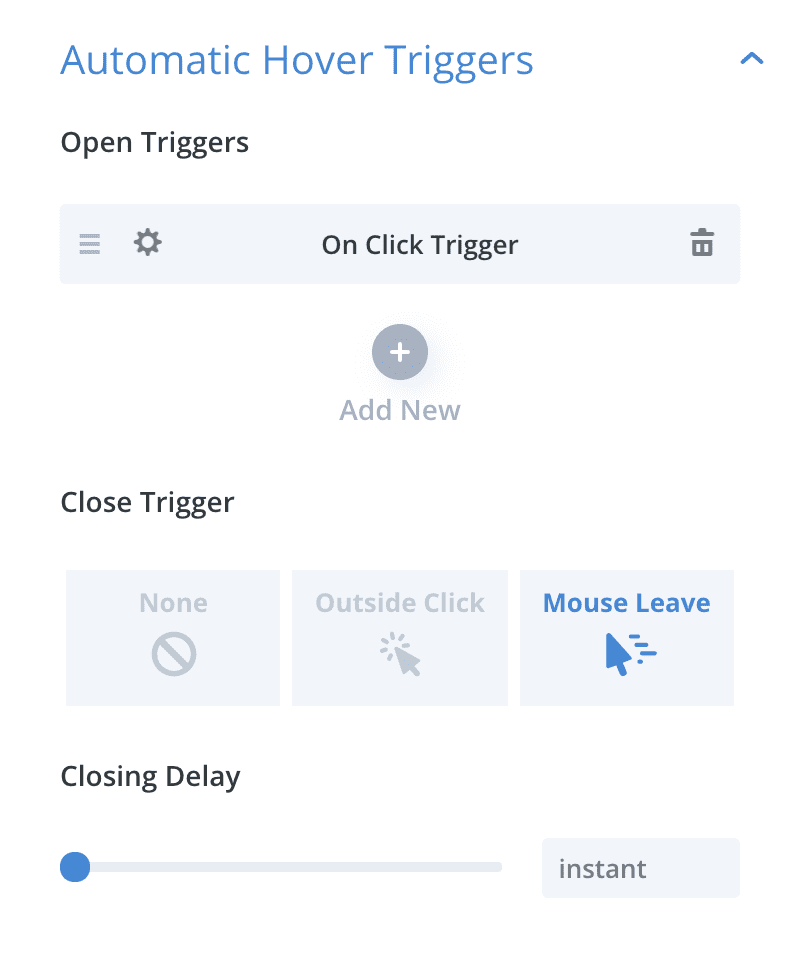
Automatic Hover Triggers
Only for: Hover Areas
Similar to the section “Automatic Triggers”, but offers special options that are only available for Hover Areas.
Options
Open Triggers
Define, when the Hover Area should be displayed. Hover Areas have fewer trigger options than other layout types.
Read more about automatic hover triggers and available trigger types →
Close Trigger
Choose the event that needs to happen to close the Area again.
Options:
None– The Area stays open until the user clicks a close button or the Area is hidden via the JS API.Outside Click– Hide the Area when the user clicks anywhere outside the Area.Mouse Leave– Hide the Area when the mouse is moved outside the Area or the trigger element.
Closing Delay
For Close Trigger: Outside Click, Mouse Leave
The closing delay allows you to add a delay between the closing trigger and actually closing the Area. When the user moves the mouse back into the Area before this delay is reached, the Hover Area will stay open.
Notes
Hover Areas can be only triggered by a user interaction, like a click or mouse-enter.
🤓 Order and Label
The order of the trigger rules has no effect. Also, the trigger label (e.g., “Exit Intent Trigger”) is ignored on the front-end. Both, the order and the label are provided for organizational purposes.
Default Conditions
For all Areas
The default conditions can deactivate (or activate) all Automatic Triggers of your Area and allow you to create highly personalized experiences.

Options
On Device
Disable the Area on certain viewports. The available options are identical with the built-in responsive viewport options of Divi and also behave the same: They examine the windows width to determine which “device-type” is active.
By URL Param
Display the Area only when a certain URL parameter is present or absent.
Options
Off- Do not check any URL parameters
Show- Display the Area when at least one of the specified URL parameters is found
Hide- Only show the Area when none of the specified URL parameters is found
When activated, you can enter multiple parameters. Each parameter is separated with a newline and can contain a parameter name, or a parameter-value pair. For example:
discount .. This handles URLs like ?discount=1 or ?discount=mytext
utm_campaign=blackfriday .. This handles every URL that contains the given parmeter and value (exact match)
Arrived from URL
This rule examines the referrer URL to display the Area only for certain visitors. There’s a number of built-in referrer rules, but you can also define a custom list of referring URLs to handle.
Options
Off- Do not check the Referrer
Show- Display the Area when the visitor arrived from one of the defined referrers
Hide- Only show the Area when the visitor arrived from none of the specified referrers
Any internal page- Handles all visits that arrived from an internal link, i.e., a link from your own website.
Any external page- Handles all visits that arrived from a website that is not your domain.
A Search Engines- Handles all visits that come from any of the following search engines: Google, Bing, Yahoo, Baidu, Yandex, Ask.com, Duck Duck Go.
Social Media- Handles all visits that come from any of the following social media websites: Instagram, Facebook, Twitter, Pinterest, YouTube, LinkedIn.
*.elegantthemes.com/marketplace*- Handles all visitors that arrive from the Divi Marketplace.
Use Schedule
Define either a list of date-ranges or a weekly recurring schedule for your Area. This condition uses your servers timezone and date settings (and not the local time of the visitor).
Options
Off- Do not use any scheduling
Enable on Dates- Display the Area during the defined date range (or ranges)
Disable on Dates- Always show the Area, except during the defined date range (or ranges)
Weekly Schedule- Define time ranges that repeat every week to activate the Area
Caching
When a schedule is set, then the JS API will make an ajax request to your website during page load to check which Areas are enabled right now. This solution is perfectly compatible with caching plugins and also super reliable, as there is no JavaScript date/time conversion.
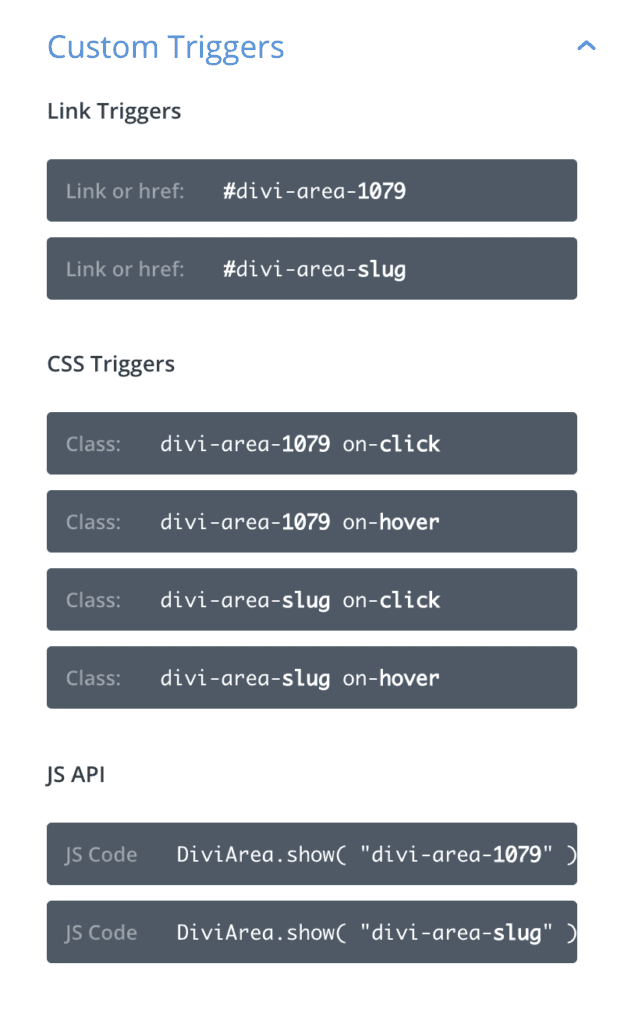
Custom Triggers
For all Areas
This section provides some details about custom trigger implementations.
Options
Link Triggers
Link triggers are special URLs which you can use in any Divi Module to trigger this Area.
CSS Triggers
This section displays different CSS classes that can be used in any Divi Module to trigger the Area either on click or on hover.
JS API
When using the JS API you can use any of the displayed commands to open the current Area.
Note, that Hover Areas might not display correctly when they are triggered via the JS API .