The automatic triggers can be defined in the Trigger Tab of Divi Areas.
🤓 Repeated Trigger vs One-Time Trigger
Some automatic triggers are repeated triggers, while others are one-time triggers.
A one-time trigger stops working after the Area was opened once (regardless of how it was opened). A repeat trigger will open the Area every time the event happens.
For example, Exit-Intent and After Delay are one-time triggers. When you use both triggers, the Area will be displayed only once, even if both conditions are met (the user waits for the delay and then moves the mouse outside the window).
Trigger Editor
Only for: Popup, Fly-In, Inline Areas
A trigger dialog lets you create or edit automatic triggers in an easy and intuitive way.
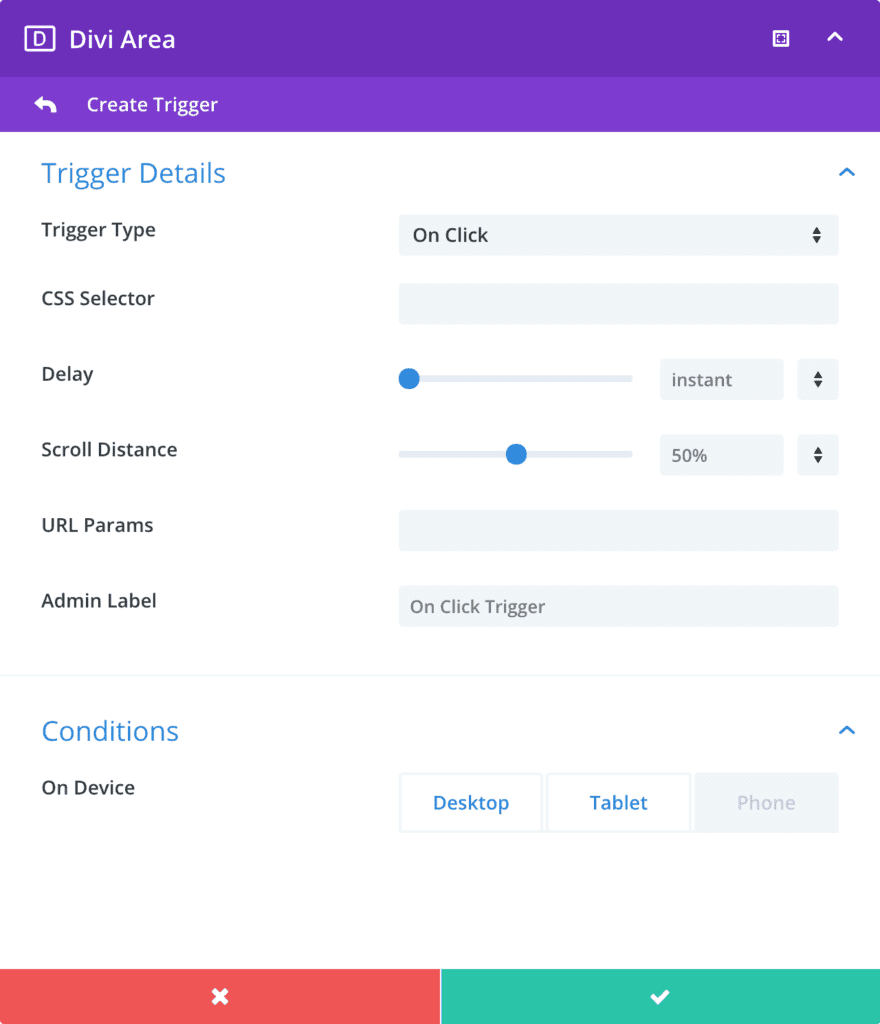
Trigger Details
Trigger Type
Choose the event that triggers the Area. Any Popup, Fly-In or Inline Area can use all automatic triggers (only Hover Areas have a different set of triggers).
Options:
On Click- Triggers the Area when a specific CSS selector is clicked.
– Additional options: CSS Selector
– This is a repeated trigger On Hover- Triggers the Area when the mouse enters a specific CSS selector.
– Additional options: CSS Selector
– This is a repeated trigger After Delay- Triggers the Area at a particular time after the page loaded. This option also allows you to trigger an Area instantly on page load.
– Additional options: Delay
– This is a one-time trigger On Scroll- Triggers the Area when the user scrolled down a certain distance from the top edge of the page. You can choose between a variety of distance units, including pixel (px), percentage (%) or relative viewport height (vh).
– Additional options: Scroll Distance
– This is a one-time trigger Exit Intent- Triggers the Area, when the user is about to navigate away from the page. This event uses some internal logic to decide if the user intends to leave the page.
– No additional options
– This is a one-time trigger On Inactivity- Triggers the Area when the user did not interact with the website for a particular duration. Interaction is any mouse or keyboard action (click, mouse move, mouse-wheel usage, key-press, window resize, touch events …).
– Additional options: Delay
– This is a one-time trigger On Browser Focus- Triggers the Area when the browser tab becomes visible. This happens when the user either moves to a different browser tab and comes back to your website or when he minimizes the browser and then opens it again.
– No additional options
– This is a one-time trigger
CSS Selector
Define the element that triggers the Area. You can specify multiple selectors that are separated by a line break (or comma).
Most common selectors are the class selector (prefixed with .) and the ID selector (prefixed with #), but you can use any valid selector.
Basic samples:
.section1→ Class selector. Matches an element with the CSS class “section1”#cta-button→ ID selector. Matches an element with the CSS ID “cta-button”
Advanced samples:
a[href*="#"]→ matches all links that have an anchor tag in the href URL.menu-item-25 > a→ matches the link of the menu item for post_id 25#footer img:first-child→ matches the first image tag in the page footer
Delay
For Trigger Type: After Delay, On Inactivity
Define the duration of the timeout that triggers the Area.
After Delay– The timeout starts at page load.On Inactivity– The timeout starts at page load and is restarted after every user activity.
Scroll Distance
For Trigger Type: On Scroll
Set the vertical distance that needs to be scrolled down before the Area is triggered.
Admin Label
Here you can enter a custom label for the trigger. It has no function other than helping you organize and recognize your triggers.
Conditions
On Device
With this toggle control you can disable a trigger on certain device types. By default a new trigger is enabled on all device sizes.
🤓 How it works
Device detection is handled by the JS API (in the browser) and applies the same logic as Divi uses to toggle between responsive layouts:
The API measures the width of the viewport and categorizes the device as a Desktop (981 pixel or larger), Tablet (less than 981 pixel), or Phone (less than 768 pixel).