A universal wishlist button is exactly what it sounds like: a feature that lets shoppers save items they're interested in for later, right from your product pages. This single addition can transform casual browsing into a personalized shopping journey, making it an incredibly powerful tool for any Divi and WooCommerce store. It’s a simple concept, but the impact on user engagement and sales is massive.
Why a Universal Wishlist Button Is a Game Changer for Your Store
Let's be clear: this is far more than a simple "save for later" feature. When implemented correctly, a wishlist button becomes a core strategic asset for your business. It directly tackles cart abandonment by giving potential customers a low-commitment way to show interest without having to pull out their credit card.
Think about it. The path from browsing to buying is full of distractions. A universal wishlist button acts as a bridge, capturing a shopper's intent at its peak. This simple action creates a crucial touchpoint, encouraging them to return and turning your product pages into interactive hubs where shoppers build their own curated collections.
Boosting Engagement and Conversions
This isn't just theory; adding this feature is a proven strategy to improve ecommerce conversion rates. By letting users save items, you're essentially helping them create a personalized shopping list that they're motivated to come back to. This simple act of saving an item keeps them engaged and brings them back to your site, often leading to a purchase down the line.
The data backs this up. Studies have shown that wishlist saves can boost conversions by as much as 20%, making these buttons an essential tool for serious retailers. This effect is even more pronounced during peak shopping seasons like the holidays, where a universal wishlist becomes a central hub for gift planning and helps slash cart abandonment rates.
Before we dive into the "how," it's worth thinking about which path is right for you. This decision tree lays out the different ways you can build your button, from quick plugin integrations to more advanced custom solutions.
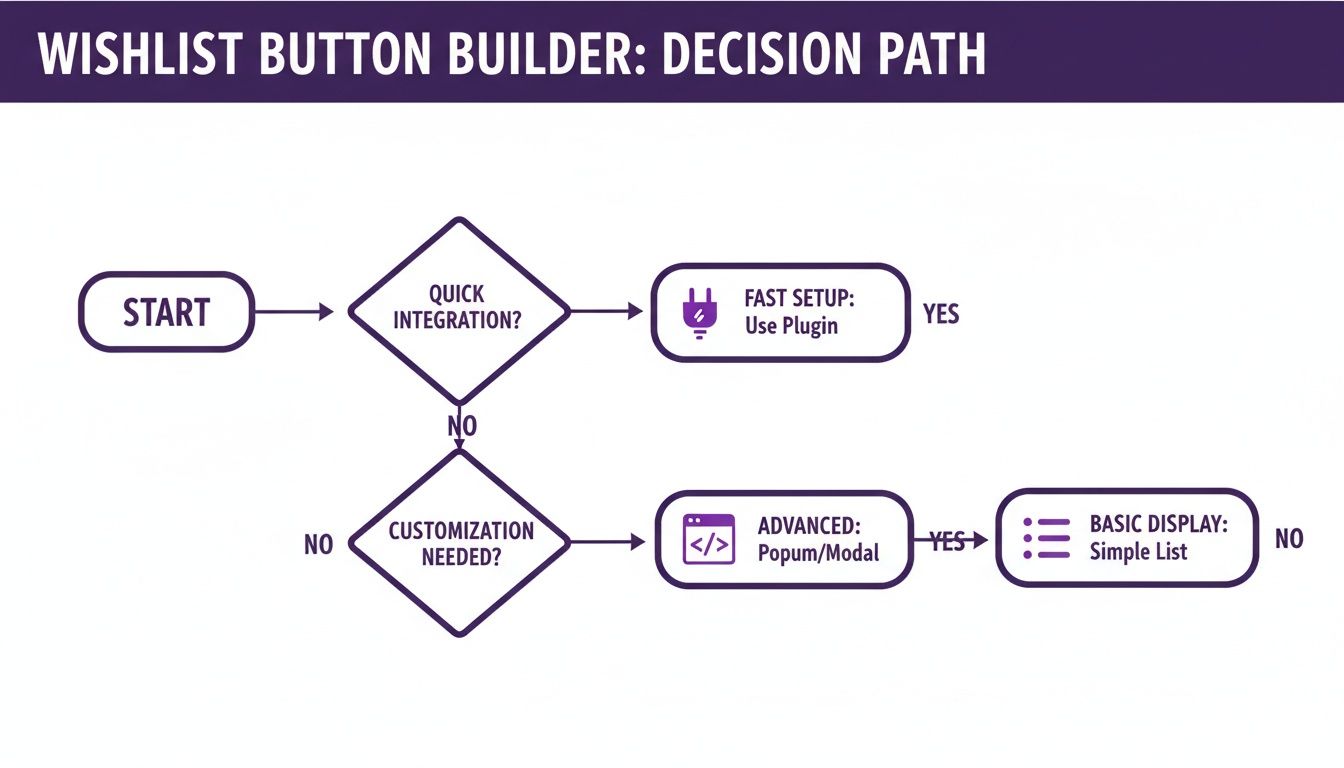
Ultimately, your choice comes down to your technical comfort zone and how much control you want. The good news is there's a solid option for every type of Divi user.
Turning Shoppers Into Loyal Customers
A universal wishlist button does more than just drive sales—it also gives you invaluable data about what your customers actually want. By analyzing which products are saved most often, you get direct insight into popular items and emerging trends. This is gold for informing your marketing campaigns, managing inventory, and even guiding future product development.
A wishlist is more than a feature; it's a direct line of communication with your customers. It tells you exactly what they desire, giving you the power to turn that interest into a sale.
In the end, this single button creates a stickier, more personalized user experience. It gives shoppers a real reason to create an account and return to your store, fostering a cycle of engagement that builds long-term loyalty and drives measurable growth for your business.
The Plugin Approach for a Fast and Easy Setup
Let's be honest, diving into custom code isn't always the best use of your time, especially when you need a powerful feature up and running now. For most folks, a dedicated WooCommerce plugin is the fastest and most reliable way to add a universal wishlist button to a Divi store. You can get from zero to fully functional in minutes, not days.
This path is perfect for store owners and designers who want a robust, battle-tested solution without touching a single line of PHP or JavaScript.
The real magic here is simplicity. The best plugins are built from the ground up to integrate with WooCommerce and themes like Divi. They handle all the tricky backend logic—user sessions, database entries, AJAX requests—so you can focus on what you do best: crafting a great user experience.
Choosing the Right Wishlist Plugin
A quick search on the WordPress repository will show you a ton of options, but they are definitely not all created equal. Picking the wrong plugin can lead to a world of hurt, from theme conflicts and slow performance to a clunky interface that just frustrates shoppers.
When you're vetting options, here are the absolute must-haves:
- Divi and WooCommerce Compatibility: This one is non-negotiable. The plugin’s page should explicitly state that it's tested and compatible with the latest versions of both. If it doesn't, move on.
- Guest Wishlist Functionality: A huge number of your visitors won't create an account on their first visit. A plugin that lets guests create temporary wishlists (usually with browser cookies) is a massive win for capturing their interest without friction.
- Variable Product Support: Your button has to work perfectly for products with multiple variations, like different sizes or colors. The plugin must be smart enough to let a user save a specific variant to their list.
- Customization Options: You need control. Look for settings that let you change the button's text, icon, and colors. The best ones also provide shortcodes or hooks, giving you the flexibility to place the button anywhere with the Divi Builder.
Many high-quality plugins offer this right out of the box. Some premium theme frameworks, like Shoptimizer's CommerceKit, even bundle a wishlist module, which can be a more integrated and performant alternative to a separate plugin like the popular YITH Wishlist.
Installation and Basic Configuration
Once you've made your choice, getting it installed is the easy part. If you're new to this, there's a complete guide on how to add a plugin to WordPress that covers all the basics.
After activating the plugin, you'll usually see a new menu item in your WordPress dashboard. The very first thing you need to do is create a dedicated "Wishlist" page. This is where the plugin will display a user's saved items.
Just create a new page, call it "Wishlist," and paste in the plugin's shortcode (it'll look something like [my_wishlist_plugin]). Then, hop back over to the plugin's settings and tell it to use that new page.
Pro Tip: Make sure to exclude your new Wishlist page from any caching plugins. This content is dynamic and unique for every single user, and caching it will cause chaos—people might see someone else's list or be unable to update their own.
Styling Your Button with Divi
Now for the fun part: making that button look like it truly belongs on your site. Most plugins will automatically add a button to your product pages, but the default style might not vibe with your brand. With Divi, you've got plenty of power to fix that.
- Start with the Plugin Settings: Always check here first. Good plugins will give you built-in color pickers, icon choices, and text fields. You can often tweak the button's "add" and "remove" states right from the dashboard.
- Use Divi's Custom CSS: If the plugin's options are too limited, your next stop is the Divi > Theme Options > Custom CSS panel. Use your browser's inspect tool to find the button's CSS class (something like
.add-to-wishlist-button). From there, you can write your own CSS to override the default styles and get it looking pixel-perfect. - Go for Full Divi Builder Integration: For the ultimate control, see if your plugin supports shortcodes. If it does, you can drop that shortcode into any Divi module—a Code module, or even a Button module—and use Divi's massive library of design settings to style it exactly how you want.
By blending a solid plugin's functionality with Divi's design muscle, you get the best of both worlds: a fast, reliable setup and a beautifully integrated final product.
For those who want absolute control over every pixel and function, bypassing plugins and building your wishlist from the ground up is the ultimate path. This approach isn't for the faint of heart, but if you're comfortable with a bit of code, it unlocks a level of customization that no off-the-shelf solution can match.
When you go this route, you’re in the driver’s seat. You’ll dictate how data is stored, how the front-end behaves, and how the feature integrates with other custom parts of your Divi and WooCommerce store. This means no bloated code, no features you don't need, and no compromises. You get to create a truly unique universal wishlist button experience tailored precisely to your brand.
Laying the Foundation with a Custom Table
First things first: where are you going to store all that wishlist data? While you could technically piggyback on post meta or user meta, creating a dedicated custom database table is a much cleaner and more scalable approach.
It keeps your wishlist data neatly organized and prevents it from cluttering up core WordPress tables, which is a big win for performance in the long run.
A simple, effective table structure might look something like this:
id: An auto-incrementing primary key.user_id: To link the item to a logged-in WordPress user.session_id: A unique identifier for guest users.product_id: The ID of the WooCommerce product.date_added: A timestamp to track when the item was saved.
This structure provides a solid foundation for managing wishlists for both registered customers and anonymous shoppers, ensuring a persistent experience for everyone.
Crafting the Backend Logic with PHP
With your database table ready, the next move is to write the PHP functions that will power the entire system. These functions—typically placed in your child theme's functions.php file or a custom plugin—will handle the core logic of adding, removing, and retrieving wishlist items.
You'll need to tap into the WordPress and WooCommerce APIs to build these out. This usually involves creating custom REST API endpoints or using admin-ajax.php to handle requests from the front end. The goal is to create a seamless interaction where a user can click the button, and your PHP code securely updates the database in the background without a full page reload.
This is where you can build in some really cool business logic. For example, you could add a function that sends an automated email to a user when a product on their wishlist goes on sale. That’s a powerful, personalized marketing touchpoint you just can't get from a generic plugin.
This custom logic is what sets a bespoke solution apart. You could also create a function to count the number of items in a user's wishlist, which is perfect for displaying a dynamic counter in the site header.
Creating a Dynamic Front-End Experience
A custom-built wishlist should feel fast and modern. The key to this is using AJAX (Asynchronous JavaScript and XML) to communicate between the user's browser and your server. When a shopper clicks your universal wishlist button, a JavaScript snippet will send a request to your PHP handler without interrupting their browsing.
This instantly elevates the user experience. Instead of a jarring page refresh, the button's state can change immediately—perhaps showing a checkmark or changing color—while the database updates silently in the background. It's a small detail that makes the feature feel truly integrated and professional.
For a Divi site, this also means you can place your button anywhere. You can use a Divi Code Module to insert the button's HTML and then enqueue your custom JavaScript file to handle the AJAX calls. This gives you full control over placement and styling directly within the Divi Builder. If you want even more granular control, you can programmatically inject the button into specific locations, a topic we cover in-depth in our guide on how to modify the WooCommerce product page.
Designing the My Wishlist Page in Divi
Finally, your users need a place to view and manage all their saved items. This is where you create a dedicated "My Wishlist" page. A good way to start is by creating a new page in WordPress and assigning it a custom page template.
This template will contain the PHP logic to:
- Check if the user is logged in or a guest.
- Query your custom database table for their saved items.
- Loop through the results and display each product.
Using the Divi Builder on this template, you can design a beautiful and functional layout. For each item, you can display the product image, title, price, and an "Add to Cart" button. Most importantly, you should include a "Remove" button next to each item, which will trigger another AJAX call to your backend PHP function to delete that specific entry from the database.
This complete, custom-coded approach offers unparalleled flexibility. It’s a significant undertaking, for sure, but the reward is a high-performance, perfectly integrated universal wishlist button that does exactly what you want it to—nothing more and nothing less.
Taking Your Global Button to the Next Level with Popups
A static "Add to Wishlist" button gets the job done, but what if we could make the experience smarter and more interactive? This is exactly where dynamic popups and fly-ins come in. When you pair your wishlist functionality with a tool like Divi Areas Pro, you can build a far more engaging system that actually responds to how a user shops.
Instead of just adding an item and moving on, a click can now trigger a slick, well-designed confirmation popup. This gives the shopper immediate visual feedback, reassuring them their item has been saved. More importantly, it opens up a new channel for engagement, turning a simple click into a powerful opportunity.
Why Bother Integrating Popups with Your Wishlist?
The real magic of this method is connecting the wishlist action to another goal. A confirmation popup isn't just there to say "Item saved!" It's the perfect moment to guide your user's next step.
For guest users, this is your golden ticket to encourage account creation. One study found that 54% of shoppers are likely to buy something if they find it again on a return visit. By prompting them to save their list permanently with an account, you dramatically increase the chances they'll come back and complete the purchase.
Here are a few real-world scenarios where this approach really shines:
- Guest User Conversion: A guest adds an item, and a popup appears saying, "Great choice! Create a free account to save your wishlist for later."
- Promotional Nudges: The popup could show a related product or a special offer, like "Save two more items to unlock 10% off your first wishlist purchase!"
- Social Sharing Prompts: After saving an item, the popup can include buttons to easily share their new favorite find on social media, giving your brand some free exposure.
This strategy transforms a simple utility into a proactive marketing tool, woven seamlessly into the shopping experience.
Designing the Confirmation Popup in Divi
When you use a plugin like Divi Areas Pro, you design your popup directly inside the Divi Builder you already know and love. This means you have total creative freedom over every single element—layout, fonts, animations, colors, you name it. You're not stuck with some other plugin's rigid, pre-styled templates.
When you're building your popup, keep the design clean, focused, and on-brand. The goal is to provide helpful info without overwhelming the user. A solid confirmation popup should include:
- A Clear Confirmation Message: Something simple and direct like "Added to your Wishlist!"
- Product Thumbnail: A small image of the item they just added. This visual cue reinforces their action.
- A Primary Call-to-Action (CTA): This is your main objective. For guests, it might be a "Create an Account" button. For logged-in users, it could be "View My Wishlist."
- A Secondary Action: Always give them an easy way out. A "Continue Shopping" link or a visible 'X' to close the popup is crucial for a good user experience.
Design Tip: Use Divi's animation settings to make your popup appear with a subtle fade or slide-in effect. This feels much smoother and more professional than an abrupt, jarring appearance.
For a deeper dive into the technical side, you can check out our detailed tutorial on how to create a global popup using these very tools. That guide will walk you through the nitty-gritty of building and triggering your popup from the ground up.
Configuring Smart Triggers and Targeting
The true power of a popup-based system is in its intelligent triggers. You don't want the popup to feel random or annoying. Instead, you can set it up to appear at the perfect moment based on specific user actions or conditions.
A Click Trigger is the most straightforward method. You can assign a unique CSS ID or class to your universal wishlist button. Then, in your popup's settings, you just tell it to appear whenever an element with that selector is clicked. This creates a direct, intuitive link between the button and the confirmation.
But you can get even more creative. Imagine these scenarios:
- Exit-Intent Trigger: A user adds an item to their wishlist but then moves their cursor to leave the site. An exit-intent popup could appear with a message like, "Don't forget your items! Save your wishlist and we'll email you a reminder."
- Time-on-Page Trigger: For someone who's been browsing for a few minutes without saving anything, a subtle fly-in could slide out from the corner, reminding them they can save items for later with the wishlist feature.
By combining a well-designed popup with smart, context-aware triggers, you create an experience that feels genuinely helpful, not intrusive. This advanced approach turns your universal wishlist button from a passive feature into an active part of your sales and marketing funnel, driving engagement and encouraging conversions at every turn.
Styling, Accessibility, and Persistence: The Final Polish
Okay, so you've got a functional button. That's a great start, but we're not done yet. A truly effective universal wishlist button needs to be intuitive, look great, and work reliably for everyone—whether they're a loyal customer or a first-time visitor just browsing.
Getting these final details right is what separates a clunky feature from a seamless part of the shopping experience.
We need to focus on three critical areas: how the button looks (styling), how it works for people with disabilities (accessibility), and how it remembers what users have saved (persistence). Each piece is essential for building trust and encouraging shoppers to come back.
Designing a Button That Actually Converts
Your button's design has to walk a fine line. It needs to be noticeable enough to get clicks, but it can't stick out like a sore thumb and clash with your site's branding.
The Divi Builder gives you a ton of control here. If you're using a shortcode, you can style it with the Button module. For buttons added by plugins or custom code, you can apply custom CSS to get it just right.
Here are a few styling tips I've learned from experience:
- Use an Icon and Text: Don't make people guess. A simple heart or star icon next to clear text like "Add to Wishlist" is universally understood. It’s far more effective than just an icon.
- Give Visual Feedback with Hover and Active States: The button needs to react. When a user hovers over it, change the color or add a subtle animation. After it's clicked, change the state to "Added" or switch to a filled-in icon to confirm the action was successful.
- Keep it On-Brand: Stick to your brand’s primary or secondary colors. This makes the button feel like a core part of your store, not some random third-party add-on.
Ensuring Your Button Is Accessible to Everyone
Web accessibility isn’t some optional checkbox; it's a non-negotiable part of good design. If your button isn't accessible, you're shutting the door on a significant group of potential customers, including those who use screen readers or navigate with a keyboard.
Making your universal wishlist button accessible ensures that every shopper, regardless of ability, can fully engage with your store. It’s not just about compliance—it's good for business and, frankly, the right thing to do.
To do this properly, you have to think beyond just the visuals. The underlying code matters. Our comprehensive guide on website accessibility best practices dives deep into these principles, but here are the must-haves for your button:
- Sufficient Color Contrast: The text and icon must stand out clearly against the button's background. Use a tool like the WebAIM Contrast Checker to make sure your colors pass the test.
- Descriptive
aria-label: A screen reader needs to know what the button does. Anaria-labellike "Add Green Hoodie to your wishlist" provides critical context that a generic "Add" button just doesn't have. - Keyboard Navigability: Can someone reach and activate the button using only the Tab and Enter keys? This is absolutely essential for users who can't use a mouse.
Making Wishlists Stick for Guests and Logged-In Users
So, what happens when a shopper adds a few items to their wishlist and then leaves your site? A persistent wishlist makes sure their selections are still there when they return, which is a massive step toward turning that initial interest into a future sale.
For logged-in users, this is pretty straightforward. You simply save their wishlist data to their user account in the WordPress database. When they log back in—on any device—their list is waiting for them.
Things get a little trickier for guest users. Since they don't have an account, you have to store their wishlist data locally in their browser. There are two main ways to pull this off:
- Cookies: These are small text files stored by the browser. They're easy to implement but have size limits and can be easily cleared by the user, wiping out their list.
- Local Storage: This is the modern, more robust solution. It lets you store much larger amounts of data (up to 5MB) persistently without dragging down site performance. The data sticks around until it’s explicitly cleared.
The demand for this kind of connected, persistent shopping experience is undeniable. You just have to look at the success of platforms like GoWish, which show a clear trend in how shoppers in the U.S., U.K., and Europe plan their purchases across different stores. By offering a persistent wishlist for all visitors, you're aligning your store with what modern shoppers expect.
Got Questions About Wishlist Buttons?
Building a universal wishlist button brings up a lot of practical questions. How will it affect performance? What about caching? Let's tackle some of the most common ones I hear from developers and store owners working in the Divi and WooCommerce ecosystem.
Will a Wishlist Button Slow Down My Site?
This is a totally valid concern—site speed is everything. A poorly coded plugin or a clunky custom solution can definitely add bloat, but a well-built one will barely make a dent.
The best tools are built with performance in mind. For example, the wishlist module in CommerceKit for Shoptimizer uses vanilla JS and only loads assets when they're actually needed. If you're going the custom route, make sure you’re using efficient database queries and asynchronous JavaScript (AJAX) so the feature doesn’t block the rest of the page from rendering.
The key is to choose lightweight tools and optimize your code. A properly implemented universal wishlist button should not noticeably affect your site’s performance or Core Web Vitals.
How Should I Handle Caching on a Wishlist Page?
This is a critical detail that's so easy to miss. Your main "My Wishlist" page is dynamic by nature; its content is unique to each user. That means it should never be cached.
If you cache this page, you risk showing one user another person's wishlist or preventing them from updating their own—a real nightmare for user experience.
You have to go into your caching plugin, whether it's WP Rocket or SiteGround Optimizer, and explicitly add your wishlist page's URL to the "exclude" list. This ensures every visitor gets their correct, up-to-date list of saved items every single time.
What Happens When Someone Adds a Variable Product to Their Wishlist?
Any good wishlist solution should handle product variations seamlessly. When a user saves a variable product, the system needs to be smart enough to capture their specific choices, like size, color, or material.
This way, when they come back to their wishlist, they'll see the exact variant they picked, complete with the right image and price. It completely removes any guesswork and makes it easy for them to add the correct item directly to their cart later.
Ready to create interactive and high-converting experiences on your Divi site? With Divimode, you can build advanced popups, fly-ins, and other dynamic content with Divi Areas Pro, turning simple features into powerful marketing tools. Explore Divimode's powerful plugins and tutorials today!
More Articles You Will Like