Making a Divi child theme is surprisingly simple. At its core, it's just a new folder containing two essential files: style.css and functions.php. This simple setup acts as a protective bubble, letting you add all the custom code you want without ever touching the core Divi files. This way, your hard work is safe and sound through every single update.
Why You Absolutely Need a Divi Child Theme
Before we jump into the how, let's nail down the why. A child theme isn't just some "best practice" that developers talk about; it's a fundamental insurance policy for your website. Think of it like this: you wouldn't knock down a load-bearing wall to make a cosmetic change to your house. You'd build an extension instead.
Editing the main Divi theme directly is just asking for trouble. The second you hit "update," every single customization you've made—every CSS tweak, every PHP function—is instantly and permanently wiped out. Poof. Gone forever.
The Real Risks of Skipping a Child Theme
Working without a child theme isn't a gamble; it's a certainty that something will eventually go wrong. It's not a matter of if, but when. You're exposing your site to some serious, and completely avoidable, headaches:
Permanent Loss of Customizations: Any changes you make to files like style.css or functions.php in the parent Divi theme will be completely overwritten the next time you update.
Update Hesitation: You’ll find yourself avoiding crucial security patches and feature updates just to protect your code. This leaves your site vulnerable and out-of-date.
Debugging Nightmares: When something breaks, good luck figuring out why. You won't know if the issue is coming from your code or a bug in the parent theme itself.
A child theme solves all of this beautifully. It creates a separate, safe space for your modifications. WordPress loads the parent Divi theme first, then layers your child theme’s styles and functions right on top. This hierarchy is the bedrock of professional WordPress development.
A child theme isolates your work. It guarantees that when Divi releases an update—whether it's a small bug fix or a massive new feature—your unique customizations stay exactly where they are, untouched and working perfectly.
The Professional Standard for Divi Customization
This whole concept is essential for anyone who wants to customize a site without messing with the original theme files. WordPress powers over 43% of all websites, and this massive ecosystem thrives on methods that keep updates safe and predictable. For a deeper dive into what makes Divi tick as a parent theme, our guide on what the Divi theme is is a great starting point.
If you're getting into more advanced customizations, especially for e-commerce, mastering child themes is non-negotiable. They are the foundation of any reliable and scalable expert WordPress and WooCommerce development. By taking a few minutes to create a child theme, you're adopting a sustainable workflow that protects your investment of time and effort for years to come.
Building Your Child Theme Files From Scratch
Alright, it's time to get our hands dirty and build the core of your child theme. Taking the manual route might seem like extra work, but it gives you complete control and, more importantly, a solid understanding of how everything fits together. We're going to create the main folder and the two essential files that make the magic happen.
First things first, create a new folder on your computer. Keep the name simple and descriptive, like divi-child. It's a good practice to avoid spaces or funky characters to prevent any weird issues down the line. This folder is where all your custom work will live before you upload it to your WordPress site.
Inside that folder, you'll need to create two blank text files. These are the absolute bare minimum for a child theme to even function.
style.css: This one is non-negotiable. It does more than just hold your custom CSS tweaks; it contains a special header that tells WordPress, "Hey, I'm a child theme, and my parent is Divi."
functions.php: This is where your custom PHP code will go. Its most critical job, right out of the gate, is to properly load—or "enqueue"—the stylesheets from the parent Divi theme. If you skip this, your site will look completely broken.
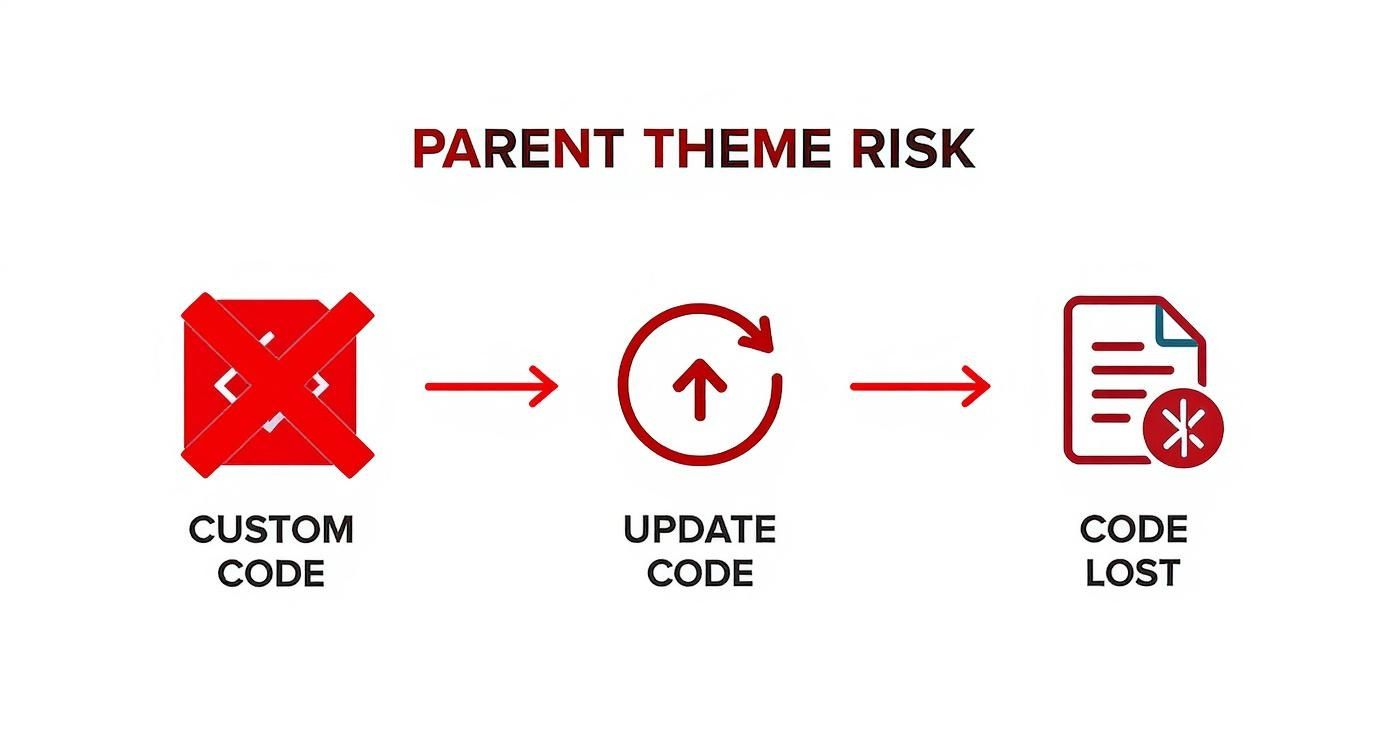
This simple two-file setup is the foundation for protecting all your hard work from being wiped out during theme updates. The diagram below perfectly illustrates the risk you're sidestepping with this approach.
As you can see, editing the parent theme directly is a recipe for disaster. A child theme creates a safe, permanent home for your customizations that survives any and all updates.
Let's break down what these two core files do.
| Required Child Theme File Breakdown | | :— | :— | :— | | File Name | Required? | Primary Function | | style.css | Yes | Contains the theme header that identifies it to WordPress and links it to the parent Divi theme. This is also where you'll add your custom CSS overrides. | | functions.php | Yes | Used to add custom PHP functions. Its initial, crucial role is to properly enqueue the parent theme's stylesheet so your site inherits all of Divi's styling. |
With these two files in place, you have a solid, update-proof foundation for any Divi customizations you can dream up.
Crafting the Essential style.css File
Go ahead and open that blank style.css file in your favorite text editor. The very first thing you need to add is a special commented-out block of text. This is the "stylesheet header," and it's what WordPress reads to identify your theme and its relationship to Divi.
Pay close attention to the Template: Divi line. This is the single most important declaration here. It’s what officially tells WordPress that this is a child of the Divi theme. If you mess this up or leave it out, the whole thing fails. The Theme Name is simply what you'll see in your WordPress dashboard, so pick something you'll recognize.
This isn't just a suggestion; it's a core WordPress development standard. That 'Template' declaration is a required directive that ensures WordPress correctly links the child to its parent, a system used across millions of the 63.4 million active WordPress sites worldwide. For more insights on this, check out the latest WordPress trends at DiviCake.com.
Enqueuing Styles with functions.php
Next up, open your functions.php file. You'll need to add a small but vital snippet of PHP to make sure your site loads the main stylesheet from the parent Divi theme. Without this, your site won't inherit any of Divi's default styling and will look like a plain, unstyled document.
Drop the following code into your functions.php file:
Themes**. From there, click the **”Add New Theme”** button at the top, followed by **”Upload Theme.”** Just choose the `.zip` file you just created and hit **”Install Now.”**
After WordPress does its thing, you’ll get a success message. Don’t stop there! The final, most important step is to click the **”Activate”** link. And just like that, your child theme is officially running your website.
### Verifying a Successful Activation
Activating the theme is one thing, but you need to make sure it actually *works*. The first thing you’ll notice is that your site should look completely unchanged—identical to how it looked with the parent Divi theme active.
If things look broken or totally unstyled, that’s a big red flag. Nine times out of ten, it means something went wrong when you enqueued the parent stylesheet in your `functions.php` file.
The best way to be sure everything is loading as it should is to peek under the hood with your browser’s developer tools. Here’s a quick rundown:
1. Right-click anywhere on your website’s frontend and choose **”Inspect”** or **”Inspect Element.”**
2. In the panel that opens, find the **”Sources”** or **”Styles”** tab (the name varies a bit between browsers).
3. Look through the list of loaded stylesheets. You need to see both the parent `Divi/style.css` and your child theme’s stylesheet (e.g., `divi-child/style.css`).
If both of those files are in the list, you’re golden. It confirms your child theme is correctly pulling in all of Divi’s styles and is ready for your own custom CSS.
### Checking for Errors and Conflicts
Sometimes, problems aren’t so obvious. A silent PHP error or a pesky JavaScript conflict could be hiding in the background, waiting to cause trouble with your plugins or certain Divi modules down the line.
That’s why checking your browser’s console is an essential last step. The console is where your browser logs any errors that don’t necessarily break the visual layout but can definitely impact functionality. A simple typo in your `functions.php` could stop a script from loading, and this is where you’d find out.
We have a complete guide that walks you through how to [check the console for errors on your Divi website](https://divimode.com/how-to-check-the-console-for-errors-on-your-divi-website/) if you want a more detailed look.
> **Pro Tip:** I can’t stress this enough: *never* build or test a new child theme directly on a live site. Always, always use a staging environment or a local development setup. This gives you a safe sandbox to catch and squash any bugs without your visitors ever knowing something’s amiss.
## Making Practical Customizations with Your Child Theme
Okay, with your child theme active and working, we get to the fun part—actually *using* it. This is where the theory ends and you start making real, tangible changes to your Divi website, all while keeping your work completely safe from future updates.
We’ll kick things off with the most common customization: CSS. Then, we’ll dive a little deeper into PHP functions and wrap up with template overrides.
Once your child theme is set up, you can start implementing powerful [website design strategies for small businesses](https://sharpetools.com/blog/website-design-for-small-businesses/) to enhance both looks and functionality. Think of these customizations as the building blocks for creating a truly unique user experience.
This is a pretty typical workflow. You can safely tweak a site’s appearance without ever touching the core theme files. That separation is the whole reason we’re learning how to make a child theme in the first place.
### Adding Custom CSS to Your Stylesheet
The most immediate and satisfying change you can make is with CSS. Go ahead and open your child theme’s `style.css` file. Remember that header block we created? Any CSS you write *below* that header loads after Divi’s main stylesheet, which means your rules will have the final say and can override the defaults.
Let’s try something simple. Say you want to change the default Divi button style to have a bold, red background. Just pop this snippet directly into your `style.css` file:
/* Custom Button Styles */
.et_pb_button {
background-color: #ff0000 !important;
border-radius: 10px !important;
font-weight: bold !important;
}
Now, save the file and refresh your website. You should see any standard Divi buttons instantly adopt this new, vibrant style. This simple tweak perfectly demonstrates the power of a child theme—your custom styles are neatly contained and prioritized.
> Child themes aren’t just a good idea; they’re a cornerstone of WordPress security and maintenance. With WordPress powering **43.4%** of all websites and an ecosystem of over 91,000 themes and plugins, the risk of conflicts and bugs is very real. Isolating your code in a child theme is the official, recommended way to keep your site both customized and secure.
### Modifying Behavior with functions.php
Your `functions.php` file is for more than just loading stylesheets. It’s your gateway to modifying your site’s behavior with PHP. You can add snippets to remove Divi features you don’t need, add new ones, or integrate third-party scripts.
For instance, maybe you never use the “Projects” custom post type that Divi enables by default. Adding this small function to your `functions.php` will clean up your admin dashboard nicely:
function divimode_remove_projects_cpt() {
remove_action( ‘init’, ‘et_builder_post_types_builder’ );
}
add_action( ‘wp_loaded’, ‘divimode_remove_projects_cpt’ );
This little piece of code hooks into WordPress and cleanly unregisters the post type. You never have to edit a single line of the parent Divi theme. It just works.
### Overriding Template Files
For deeper structural changes, you can override Divi’s core template files. This is perfect for altering things like your site’s header, footer, or the layout of your blog posts.
The process is surprisingly straightforward. You just need to copy Divi’s folder structure inside your child theme. For example, if you wanted to modify the main `footer.php`:
1. Find the `footer.php` file in the parent `Divi` theme folder.
2. Copy that file.
3. Paste it directly into your `divi-child` folder.
That’s it. Now you can open the copied `footer.php` in your child theme and edit it however you like. WordPress will automatically use *your* version instead of the parent’s. You could add a custom copyright notice or an analytics script, and your changes will stick around through every Divi update.
## Solving Common Child Theme Problems
No matter how carefully you follow the steps, things can still go sideways. It happens to everyone. A single misplaced semicolon or a sneaky typo can cause headaches you weren’t planning on. Think of this section as your field guide for squashing the most common bugs you’ll hit when working with a child theme.
One of the most alarming problems is the infamous “White Screen of Death” (WSOD). If your site suddenly goes completely blank right after you activate your new child theme, take a deep breath. It’s almost certainly a PHP error in your `functions.php` file, and the fix is usually pretty straightforward.
### Diagnosing PHP and CSS Conflicts
To hunt down the culprit, you’ll want to turn on WordPress’s built-in debugging tool. All you have to do is add `define( ‘WP_DEBUG’, true );` to your site’s `wp-config.php` file. Once you do that, WordPress will stop hiding the error and instead display a clear message on the screen, pointing you to the exact line of code that’s causing all the trouble.
Another frequent frustration is when your custom styles just don’t show up. You’ve written your CSS, reloaded the page a dozen times, but nothing has changed. This is typically a **CSS specificity** issue, where Divi’s default styles are simply stronger than yours and are overriding them.
> **Key Takeaway:** The “White Screen of Death” is scary, but it’s not fatal. It’s just your website’s way of shouting that there’s a critical PHP error. Enabling `WP_DEBUG` is the fastest way to get it to tell you exactly which line in `functions.php` needs fixing.
When your styles aren’t applying, your browser’s “Inspect” tool is your best friend. Right-click on the element in question and see what CSS rules are actually being applied to it. If you see a Divi style winning the battle, you’ll need to make your CSS selector more specific. For example, instead of `.my-button`, you might try `.et_pb_section_1 .my-button`. As a last resort, you can use the `!important` declaration, but use it sparingly—it can make future troubleshooting a lot harder.
Here’s a quick cheat sheet for diagnosing and fixing the most common child theme headaches.
### Child Theme Problem vs Solution
| Symptom | Likely Cause | Solution |
| :— | :— | :— |
| Site is unstyled (no Divi CSS) | Parent stylesheet not enqueued | Double-check your `functions.php` for typos in the enqueue function. |
| Custom CSS isn’t working | CSS specificity conflict | Make your CSS selectors more specific or, if necessary, use `!important`. |
| White Screen of Death (WSOD) | PHP error in `functions.php` | Enable `WP_DEBUG` to locate and fix the specific syntax error. |
Finally, don’t forget that keeping your parent Divi theme updated is essential for security and compatibility. If you run into strange issues after an update, our guide on [how to update the Divi theme](https://divimode.com/knowledge-base/how-to-update-the-divi-theme/) walks you through a safe process. Once you get the hang of troubleshooting these common problems, you’ll be much more confident in tackling any customization that comes your way.
## A Few Common Questions About Divi Child Themes
Even after you get the hang of the basics, some specific questions almost always come up. I’ve been asked these countless times, so let’s get you some quick, clear answers to handle these real-world scenarios.
### Can I Create a Child Theme on a Live Site?
Technically, yes, you absolutely can. But should you? That’s a different story. It’s a risky move, and I strongly recommend against it.
The professional workflow is to build and test your child theme on a **staging site** first. A staging site is just a private copy of your live website where you can break things without any real-world consequences. This gives you a safe sandbox to iron out any kinks and make sure everything is perfect.
Once you’ve confirmed the child theme works flawlessly on your staging environment, you can push it to the live site. My advice? Do it during a low-traffic period, like late at night or on a weekend. Just upload and activate the child theme, and you’re good to go.
### What’s the Difference Between a Child Theme and the Divi Customizer for CSS?
This is a great question, and it’s all about choosing the right tool for the job.
The Divi Theme Customizer (found under **Appearance > Customize > Additional CSS**) is fantastic for quick, minor CSS tweaks. If you just need to change a color or adjust some padding on one element, it’s convenient because you can see your changes happen in real-time.
However, for anything more substantial, a child theme’s `style.css` file is the way to go. Here’s why it’s a more powerful and organized approach for any serious project:
* **Organization:** It keeps all your custom CSS in one dedicated file. This is so much easier to manage, comment, and debug than cramming hundreds of lines of code into that tiny “Additional CSS” box in the dashboard.
* **Scope:** Child themes are for so much more than just CSS. They’re your gateway to adding custom PHP functions and even overriding Divi’s core template files—something the Customizer simply can’t do.
* **Portability:** Your child theme is a neat little folder. You can zip it up and move it to another website in seconds. Try doing that with the Customizer CSS; you’ll be stuck with a tedious copy-and-paste job.
> **My rule of thumb:** If it’s more than a handful of simple CSS rules, or if you even *think* you might need PHP or template edits down the road, learning **how to make a child theme** is the professional and scalable path.
### Do I Need to Update My Child Theme When Divi Gets an Update?
Generally, no. In fact, that’s the whole reason we use them! The entire point of a child theme is to create a protective bubble for your customizations so they don’t get wiped out by parent theme updates. When you update Divi, your child theme’s files are left completely untouched.
The only time you might need to revisit your child theme is if a major Divi update changes a core function or template file that you’ve overridden. For example, if you’ve customized `header.php` and Divi releases a huge update that restructures how headers work, you might need to adjust your custom file. This is pretty rare, but it’s another solid reason why testing updates on a staging site first is a non-negotiable habit.
—
Ready to unlock even more power within the Divi Builder? With **Divimode**, you can inject dynamic content anywhere on your site. Imagine building popups, fly-ins, and mega menus without ever leaving the visual builder. Check out [Divi Areas Pro](https://divimode.com) to see how you can create powerful, interactive user experiences with ease.
Join thousands of like-minded people, and subscribe to our weekly blog roundup. You'll be among the first to know about upcoming deals and product releases.
We keep your data private, and do not spam. You can unsubscribe anytime.
Join us on social media for more interesting, funny, and motivational content: