Welcome to the latest article of our ‘Divi Popup Triggers Explained’ series, where we review all the major popup triggers that you can set to construct profitable popup marketing campaigns for your Divi website.
This time we want to talk about time. Not in a philosophical sense, but more in a sense of using time as your ally, a beneficial factor that can work to your advantage when it comes to triggering popups.
Of course, when you create a popup, you want to present a great look and convincing copy. But still, what about timing the popup when users are at the consideration stage of the journey?
If you present the popup too soon, you might annoy your target customers. And if you present the popup too late, you might miss a great opportunity to convert page visitors on the spot.
In effect, considering time on page is a critical conversion rate aspect that you need to consider when triggering popups on your Divi website!
This is why in this article, we want to talk about the ‘After Delay’ trigger, and the secret behind determining the right time delay before using it on your Divi website.
Table of Contents
- FAQs About the Time-Based Popup Trigger
- The Time-Based Trigger Secret
- How Long Should the Delay Be?
- Using Divi Areas Pro to Create an After Delay Popup Trigger
- Over to You
FAQs About the Time-Based Popup Trigger
How can using a time-based trigger benefit my website and marketing efforts?
Using a time-based trigger offers several benefits:
- Engagement Control: You can time the appearance of popups to avoid interrupting visitors’ initial browsing experience, presenting the popup when they are more likely to be receptive.
- Lead Generation: Capturing visitors’ attention after they’ve spent some time on your site increases the likelihood of them engaging with your popup’s content, leading to higher conversion rates.
- Reduced Intrusiveness: Compared to immediate triggers, time-based triggers feel less intrusive and give users a chance to explore your website before encountering the popup.
Are there any best practices to follow when using time-based triggers for popups?
While time-based triggers can be effective, consider these best practices to optimize their impact:
- Relevance: Ensure the popup content is relevant to the page the visitor is on and aligns with their interests.
- Frequency: Avoid bombarding visitors with multiple time-based popups during their session; it may lead to frustration and site abandonment.
- Value-Offer: Provide valuable incentives, such as exclusive discounts or content, to encourage visitors to interact with the popup.
Will using time-based triggers negatively impact my website’s user experience?
When used thoughtfully and sparingly, time-based triggers should not negatively impact user experience. The key is to set an appropriate delay to avoid interrupting visitors during critical browsing moments. Focus on offering value through your popups to enhance, rather than hinder, the overall user experience.
Can I use multiple time-based triggers on different pages of my website?
Absolutely! With Divi, you can create and customize multiple popups with unique time-based triggers and display them on specific pages or sections of your website. This allows you to target different audiences and tailor your messages for maximum effectiveness.
The Time-Based Trigger Secret
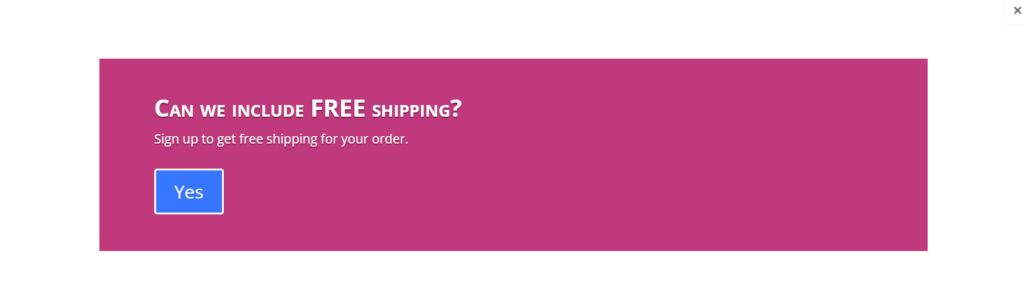
An after-delay-triggered popup appears after a certain amount of time has passed since the user has landed on your website, or a specific page of it. This popup doesn’t appear immediately as soon as the user lands on the page. The following is an example of how these popups looks in practice:
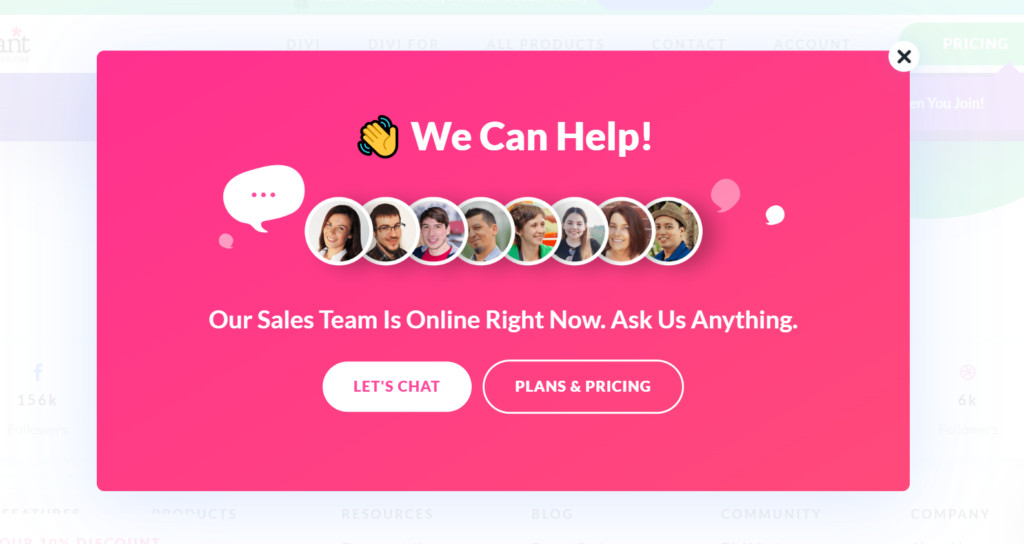
The example from Elegant Themes implies that the website visitor is browsing their website but stops from time to time to think about their offer. Maybe this person needs help, and luckily, a popup is here to offer team support and make it happen.
This is the power of patience, of time delay that triggers popups that improve the overall UX, but also, help you generate more conversions as a result.
Try Divi Areas Pro today
Sounds interesting? Learn more about Divi Areas Pro and download your copy now!
Many pre-designed layouts. Automated triggers. No coding.
Click here for more details
How Long Should the Delay Be?
It’s a question that is on the mind on every website creator. How long should the delay be?
Unfortunately, there’s no universal answer to this. Presenting a popup before someone is ready to purchase or sign up can result in an increased bounce rate and less conversions. Waiting too long and you will miss out on potential conversions.
The secret answer lies in your Divi website’s analytics! In general, you need to delay your popups according to users’ average time on site, for global website popups, and average time on page individual-page popups.
If you set up an after-delay popup that shows up right about when the average page visit ends, you’re balancing out exit-intent with users’ consideration for your offer. As a result, the popup appears at approximately the best time for the users to consider clicking on it.
Using Divi Areas Pro to Create an After Delay Popup Trigger
Divi Areas Pro makes it easy to trigger after-delay popups and allows your target users to browse your website before presenting them with the popup.
The after-delay trigger enables you to display your popups based on your estimate of how much time visitors will spend on the website or the specific page before they want to see a popup.
In essence, when a given page loads on the screen, the Divi Areas Pro, after delay trigger starts calculating whether the time on page has reached the seconds that you’ve defined in the settings.
Thus, when you want to use the after-delay trigger in Divi Areas Pro, follow these steps:
Step 1 – After you’ve downloaded and installed Divi Areas Pro, the first step would be to create the content of your after-delay popup with the Divi Builder. For this purpose, open a new Area and start inserting your content.
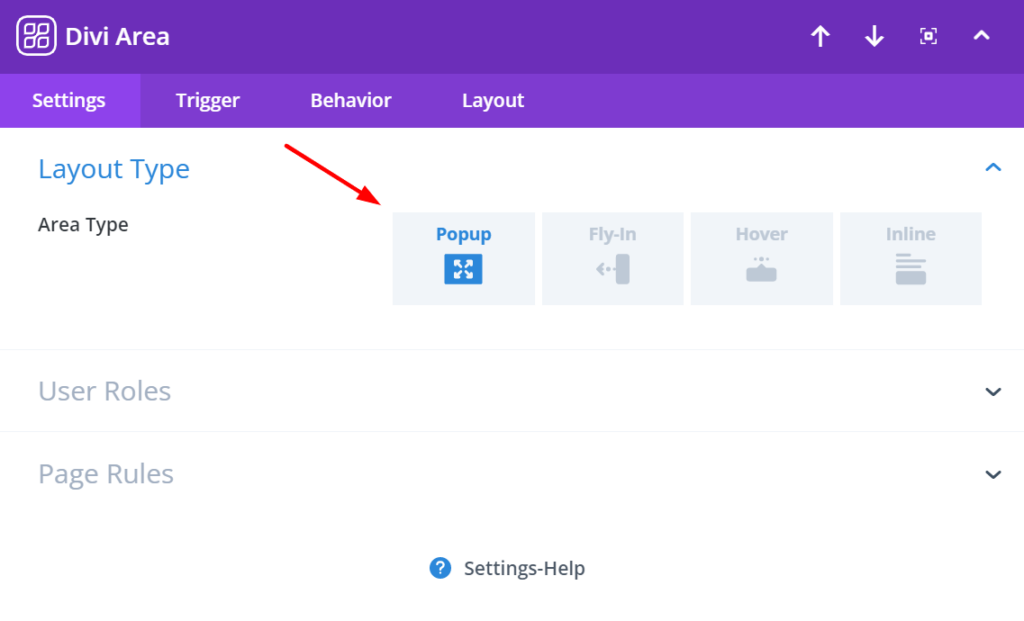
Step 2 – Once that’s ready, you need to navigate to the Divi Area Settings, and choose the Area Type ‘Popup’.
Step 3 – The next thing you would need to do is configure the popup’s automatic after-delay trigger that would display the popup after it senses that the user is about to leave.
Click on the ‘Trigger’ options, choose ‘Add New’, and choose the ‘After-Delay’ option.
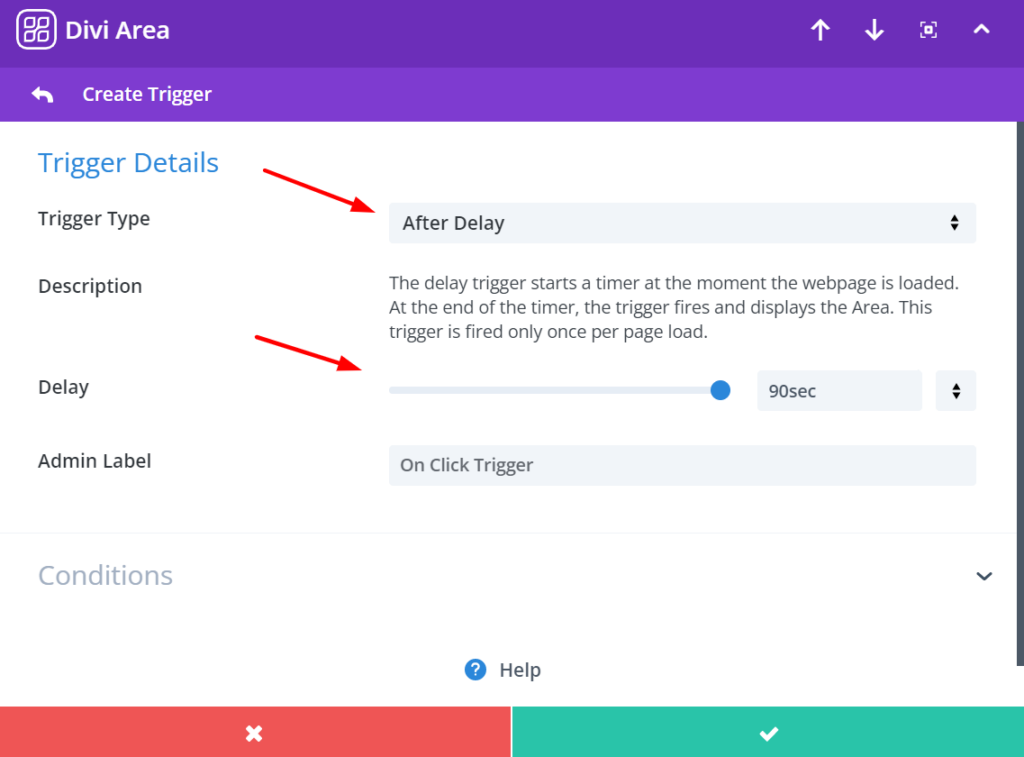
Step 4 – After confirming the trigger settings, Save the Area and test it. The time-delay popup should appear on your Divi website automatically according to the after-delay trigger.
And that’s all it takes! Working with Divi Areas Pro is super easy, and the power of your creativity is unlimited. The simplest and most effective steps to create a great popup for your Divi website.
With an easy-to-use and intuitive interface that is in line with the Divi Builder, Divi Areas Pro can help you retain more visitors and potential leads on your Divi website, growing your subscriber list and conversion rates in the process.
Try Divi Areas Pro today
Sounds interesting? Learn more about Divi Areas Pro and download your copy now!
Many pre-designed layouts. Automated triggers. No coding.
Click here for more details
Over to You
A well-timed after-delay popup is a powerful asset for any Divi website. It is a best practice to utilize average time on website and page as your allies when considering the after-delay popup at any stage of the customer journey process on your Divi website.
No matter what type of popup layout you’ll choose, using time delays will help you boost your Divi website’s conversion rate.
Interested in creating effective popup marketing campaigns with our Divi Areas Pro plugin?
Contact our partner agency team Everklick today for more information about using the Divi Areas Pro triggers!
More Articles You Will Like