WordPress custom fields are, at their core, just little bits of metadata you can attach to your posts, pages, or any other content type. Think of them as custom-labeled slots for specific data like 'Event Date' or 'Product Price.' This simple concept is what turns a basic website into a dynamic, organized powerhouse instead of just a collection of articles.
What Are Custom Fields in WordPress and Why Should You Care
Imagine your website is a high-tech filing cabinet. A standard WordPress post is like a basic manila folder—it holds a title and a big block of content. It’s simple, and it works great for a blog. But what happens when you need to store more specific, organized information?
This is exactly where custom fields in WordPress come into play. They act like custom-labeled slots and dividers inside that folder, letting you store distinct pieces of information—known as metadata—in a clean, structured way. So instead of cramming an event date, venue name, and ticket price into your main text, you create dedicated fields for each one.
Transforming Your Website Into a Database
When you start using custom fields, you're effectively transforming your WordPress site from a simple content publisher into a manageable, powerful database. Each piece of structured data is stored separately, which makes it incredibly easy to update, manage, and display dynamically anywhere on your site.
This approach is a total game-changer for anyone building more than just a blog. It’s the foundational concept behind creating things like:
- Real Estate Listings: With fields for price, square footage, number of bedrooms, and location.
- Event Calendars: Using fields for the event date, start time, venue, and a link to buy tickets.
- Product Catalogs: Storing data like SKU, price, dimensions, and technical specs.
- Business Directories: With fields for an address, phone number, and opening hours.
By separating your content from its presentation, custom fields give you complete control. You can redesign your entire site without ever touching the underlying data, ensuring consistency and making large-scale updates a breeze.
The Power of Custom Fields for Divi Users
For those of us building with Divi, mastering custom fields is the key to unlocking the true potential of the Divi Builder. When you pair a plugin like Advanced Custom Fields (ACF) with Divi’s Dynamic Content feature, you can build incredibly sophisticated layouts that automatically pull data from your custom fields. This means your clients can update critical info—like a product price or an event date—from a simple form on the backend, and the changes will pop up instantly across the site, styled exactly as you designed them.
This skill is essential in a platform that powers a huge chunk of the internet. WordPress has cemented its place as the dominant content management system, with over 43% of all websites running on it. This massive adoption has fueled the need for tools that extend its core functionality, making custom fields a vital skill for anyone building professional, data-driven websites. You can find more details on these numbers over at Search Logistics.
Choosing The Right Tools for Your Custom Fields

When you dive into the world of custom fields in WordPress, you hit a fork in the road almost immediately: stick with the built-in tools or grab a specialized plugin? This isn't just a technical choice; it's a decision that shapes your entire workflow, how easily your site can grow, and how you manage complex information down the line.
Think of it like this: the native WordPress custom fields are a basic, no-frills toolkit. It gets the job done for simple, straightforward tasks, like adding a single line of text to a post. But the moment your project gets more ambitious, you'll find yourself wishing for more powerful instruments.
The Native WordPress Method
Straight out of the box, WordPress has a core feature for adding custom fields, though it's usually hidden away in the editor's options panel. The system is a simple key-value setup. The "key" is just the name of your field (like "Event_Venue"), and the "value" is the data itself (like "The Grand Hall").
While it works, this native method is notoriously clunky. It lacks a friendly interface, only gives you a basic text box, and forces you to jump into your theme's PHP files to actually display the data. For a quick, one-off piece of metadata, it's fine. But for any serious, structured project, it becomes a bottleneck fast.
Introducing Advanced Custom Fields (ACF)
This is where a plugin like Advanced Custom Fields (ACF) completely changes the game. There's a reason ACF is the industry standard—it wraps the whole process in a polished, intuitive interface that makes creating and managing custom fields a breeze. Instead of that barebones text box, ACF gives you a library of over 30 different field types.
You get specialized inputs that make content entry a dream for clients and developers alike, including:
- Date Pickers: For easily grabbing dates from a pop-up calendar.
- Image Uploaders: To attach specific images directly to a post.
- Relationship Fields: For connecting different posts, pages, or custom post types.
- Google Maps: To drop in an interactive map just by plugging in an address.
The real magic of a plugin like ACF is how it hides all the messy complexity. It lets you build out sophisticated data structures using a visual interface, so you can focus on the fun stuff—design and functionality—instead of wrestling with backend code.
Picking the right tools is a critical step in any project. It's also smart to think about the bigger picture, like how the best ecommerce platforms for small businesses handle custom data for products. A solid custom field setup is often what separates a generic site from a truly tailored user experience. Plugins like ACF are a huge part of what makes WordPress so flexible, and you can see other game-changers in our guide on the top 5 Divi plugins all site owners should use.
Comparing Native Fields vs ACF
To help you decide which path to take, let's put the two approaches side-by-side. The choice really boils down to balancing simplicity against power and whether you want to future-proof your development process from the start.
| Feature | Native Custom Fields | Advanced Custom Fields (ACF) |
|---|---|---|
| Ease of Use | Low. Requires digging into screen options and offers a minimal UI. | High. Features an intuitive, drag-and-drop field builder. |
| Field Types | Text only. All data is treated as a simple string. | 30+ field types including Image, Gallery, Date Picker, Repeater, etc. |
| Displaying Data | Requires writing custom PHP code directly into theme template files. | Can be displayed with simple PHP functions or through Divi Dynamic Content. |
| User Experience | Poor. Prone to typos and inconsistent data entry from users. | Excellent. Provides clear, guided inputs perfect for content editors. |
| Ideal Use Case | Quick, simple metadata for developers who are comfortable in code. | Virtually any project that needs structured data, from portfolios to complex apps. |
Ultimately, while the native option is there, the power, flexibility, and superior user experience of a plugin like ACF make it the clear winner for almost every scenario.
Let's Build Our First Custom Field Group with ACF
Alright, enough theory. Let's roll up our sleeves and put this into practice. In this walkthrough, we'll create our very first field group from scratch using Advanced Custom Fields (ACF). We're going to build a practical "Event Details" group, giving you a real, tangible result and the confidence to start building your own custom fields in WordPress.
To make this feel real, let's pretend we're building a website for a local community center. They host all sorts of events and need a simple, structured way to add details like the date, venue, and ticket link to their posts—without dumping everything into the main content box. Our mission is to create a dead-simple form on the backend for exactly this purpose.
Getting a Handle on Field Groups
The whole world of ACF revolves around one core concept: the Field Group. Just think of it as a neat container that holds a collection of related custom fields. You build this container once, and then you tell WordPress where to show it—on specific posts, pages, or even your own custom post types.
For our community center project, we'll create a single group called "Event Details." Inside, we’ll place three essential fields:
- Event Date: A slick, user-friendly date picker.
- Venue Name: A simple text field for the location.
- Ticket Link: A URL field to make sure nobody enters a broken link.
This setup guarantees that every single time someone adds a new event, they're prompted to fill out the exact same, consistent set of information. No more guesswork.
Step 1: Finding Your Way to the ACF Interface
First things first, make sure you have the Advanced Custom Fields plugin installed and activated. Once it's up and running, you'll spot a new "Custom Fields" menu item in your WordPress dashboard. This is your command center for everything ACF.
Go ahead and navigate to Custom Fields > Field Groups and hit the Add New button. This brings you to the field group editor, which is where all the magic happens. You’re now looking at a blank canvas, ready to go.
Step 2: Creating Your First Fields
Start by giving your field group a clear, descriptive name. We'll call ours "Event Details." This title is just for your reference in the admin area, so pick something you'll easily recognize down the road.
Now for the fun part. Click the big blue + Add Field button to create your first field. A panel will slide open with a bunch of settings, but we only need to worry about a few key options for now.
- Field Label: This is the human-friendly name your users will see. Let's type in "Event Date".
- Field Name: ACF is smart and will automatically generate this from the label (e.g.,
event_date). This is the unique ID you'll use in code or with page builders like Divi. Just leave it as is. - Field Type: This is the most important setting here. Click the dropdown menu and select Date Picker. This simple choice transforms a boring text box into an interactive calendar, which massively improves the user experience and prevents typos.
That’s it for field number one! Now, click + Add Field again and let's quickly create the other two.
- For the venue, set the Field Label to "Venue Name" and leave the Field Type as the default Text. Simple.
- For the ticket link, set the Field Label to "Ticket Link" and, importantly, change the Field Type to URL. This adds a bit of validation to ensure a proper web address is saved.
And just like that, you've successfully defined the structure for your event data.
A well-chosen Field Type does more than just collect information; it validates it. Using a URL field instead of a plain text field prevents users from entering "tickets dot com" instead of a functional link, saving you headaches down the road.
Step 3: Setting the Display Rules
The final—and arguably most crucial—step is telling ACF where to show this shiny new field group. If you skip this, your fields won't appear anywhere.
Look for the "Location" box. By default, it's usually set to "Post Type is equal to Post." This means our "Event Details" group will show up on every standard blog post on the site. If you had a custom post type specifically for "Events," you would choose that here instead. For this tutorial, the default setting works perfectly.
These rules are incredibly powerful. You can get super specific, showing fields based on the page template, the user's role, a post's category, and a whole lot more. It gives you complete control over the editing experience.
Once your rules are set, smash that Save Changes button in the top right corner. Congratulations! You've just built your first custom field group. Now, if you go to create a new post (or edit an existing one), you'll see your clean, organized "Event Details" panel waiting for you.
Connecting Custom Fields to Your Divi Designs
Okay, so you've created your custom fields. That's a huge step, but it's only half the battle. Right now, all that neatly structured data is just sitting in your WordPress database, completely invisible to your visitors. Now comes the fun part: bridging that gap and bringing your data to life on the front end.
For Divi users, this is where the real magic happens. Thanks to Divi’s built-in Dynamic Content feature, you can hook almost any Divi module directly into the data you've stored in a plugin like Advanced Custom Fields (ACF). Best of all? No code required. It just takes a few clicks to map your fields to your design.
Harnessing Divi Dynamic Content
Think of Dynamic Content as a set of smart instructions you give to Divi. Instead of telling a Text module, "The text here is 'The Grand Hall'," you're telling it, "Go find the 'Venue Name' custom field for this post and display whatever is in there."
This simple switch transforms your static layouts into powerful, reusable templates.
When a client needs to update an event’s location, they just change the value in the "Venue Name" field on the backend. Divi handles the rest, automatically updating the website without them ever having to open the Divi Builder. This creates a seamless, error-proof workflow that both you and your clients will love.
To see this in action, let's build out a template for our "Event" posts using the Divi Theme Builder. The goal is to create a single, consistent layout that automatically pulls in the unique details for every single event we publish.
Building an Event Template in the Divi Theme Builder
First, head over to Divi > Theme Builder in your WordPress dashboard. We'll create a new template and assign it to all "Posts." This tells Divi that any time someone views a blog post, it should use our custom layout instead of the default theme design.
Inside the template editor, you can start designing just like any other Divi page. For our event example, we’ll add a Text module to show the venue and a Button module for our ticket link.
Here’s how you connect them:
- Connecting the Venue Name: Add a Text module to your layout. Instead of typing anything in, hover over the content area and click the small "Dynamic Content" icon—it looks like a little database cylinder.
- Select the ACF Field: A list will pop up. Scroll down until you see "ACF Field" and click it. Another window will appear, asking you to pick the specific field you want to show. Just select "Venue Name" from the dropdown.
That's literally it! The module is now dynamically linked. It will automatically pull the venue information for whichever event post is being viewed.
Making Your Content Actionable with Buttons
Next up, let's connect our "Ticket Link" field to a Button module. The process is almost identical, but this time we'll apply it to the module’s link settings.
- Add a Button Module: Drag a Button module onto your layout and style it however you like.
- Link to a Dynamic URL: Go to the Button Settings > Link section. Hover over the "Button Link URL" field and click that same Dynamic Content icon.
- Map the URL Field: Once again, choose "ACF Field" and then select your "Ticket Link" field from the list.
Now, the button on each event page will point directly to the unique ticket URL you entered for that specific post. This synergy between Divi and ACF is the key to building manageable, data-driven websites. For a much deeper dive, check out our complete guide to using Divi dynamic content.
The concept map below gives you a great visual of how ACF field groups are structured, showing how the field types, display rules, and names all work together.
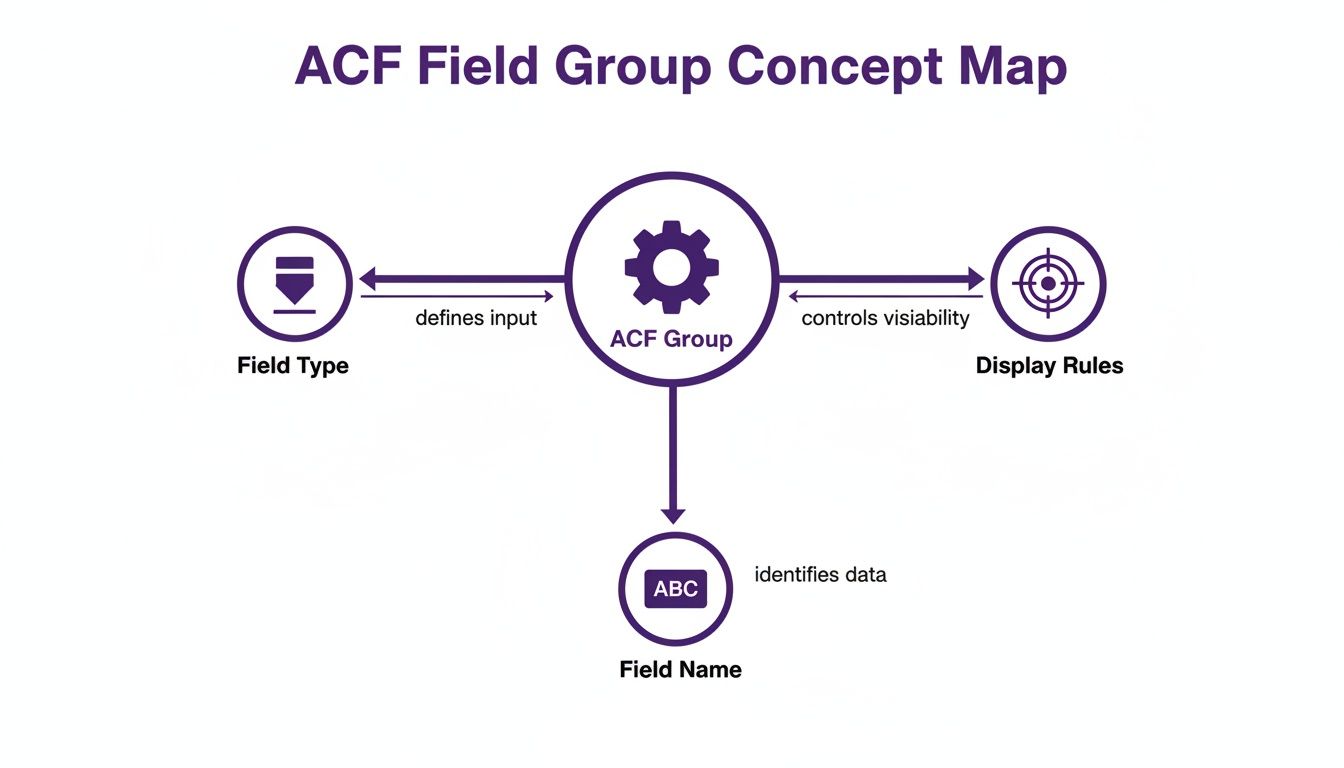
This visual really clarifies how a field group acts as a container where you define the kind of data you're storing (Field Type), what you'll call it (Field Name), and where it should show up in the WordPress admin (Display Rules).
Taking It Further with Interactive Popups
Displaying information directly on the page is great, but you can also use your custom field data to create more interactive experiences. For example, what if you wanted to show event details in a popup when a user clicks a button?
With a plugin like Divi Area Pro, this becomes incredibly easy.
You can design a popup layout (which the plugin calls an "Area") and use the exact same Dynamic Content methods to pull in your ACF data. Then, just set a button on your main page to trigger that specific popup on click.
By combining ACF, the Divi Builder, and a tool like Divi Areas Pro, you can move way beyond static pages. You can build interactive event listings, product quick-views, and detailed staff bios that appear on-demand—all powered by your cleanly organized custom fields.
This approach not only saves an enormous amount of development time but also empowers your clients to manage their own content with confidence. They get simple forms to fill out, and you maintain complete control over the design, ensuring everything stays perfectly on-brand across the entire site.
Advanced Strategies for Ecommerce and Interactive Content
Once you've got the hang of creating and displaying custom fields, you can start using them as strategic tools to solve some pretty complex business problems. This is where custom fields in WordPress really shine, transforming from simple data buckets into the engine behind powerful e-commerce features and dynamic user experiences.
It's time to move beyond just showing information and start using custom fields to drive action, creating smarter and more interactive websites.
Enhancing WooCommerce with Technical Specifications
Picture this: you're running an online store that sells electronics. A standard WooCommerce product page gives you a title, description, and price, but your customers need the nitty-gritty details. They want to see the technical specs laid out clearly, and cramming all that data into the main product description just creates a cluttered, hard-to-read mess.
This is a perfect job for custom fields. You can create a dedicated ACF field group called "Technical Specs" and assign it to your "Product" post type.
Inside this group, you might have fields like:
- Processor Speed: A simple text field for CPU details.
- Memory (RAM): A number field to lock in the gigabytes.
- Storage Type: A select dropdown with options like "SSD" or "HDD."
- Screen Size: Another number field for display dimensions.
From there, you can jump into the Divi Theme Builder to design a custom product layout. You could create a clean, visually appealing "Specifications" section with a two-column layout. In one column, you'd add Text modules for the labels ("Processor," "RAM"), and in the other, use Divi's Dynamic Content feature to pull in the values from your custom fields. Just like that, you have a consistent, professional-looking specs table on every single product page. For anyone building with Divi, our complete guide to optimizing WooCommerce for Divi is packed with even more ways to make your products stand out.
This approach doesn't just improve the user experience; it makes managing inventory a total breeze. Your client can update a product's RAM from a simple dropdown menu, and that change instantly populates across the site without them ever needing to touch the Divi Builder.
Triggering Popups with Conditional Logic
Now, let's get into a seriously powerful marketing tactic. What if you could trigger a special offer popup, but only for specific, featured products? With a simple custom field and a plugin like Divi Area Pro, you absolutely can.
First, you'll need a new custom field. A "True / False" field type is perfect for this. We'll just call it "Featured Deal."
When you go to edit a product, you'll now see a simple toggle switch. If you want to run a promotion on that particular item, you just flip the switch to "On." This sets the custom field's value to 'true' for that product and leaves all the others untouched.
Next, you design your promotional popup in Divi Area Pro. This could be anything—a special discount code, a limited-time offer, or even an invitation to a webinar related to the product. The magic happens in the plugin's settings, where you set a display rule to only show this popup when the "Featured Deal" custom field is set to 'true'. Your popup is now context-aware, appearing only on the exact products you've flagged for a promotion.
This method turns custom fields into a dynamic control panel for your marketing campaigns. The WordPress plugin ecosystem has exploded to support these kinds of advanced uses, with over 60,000 plugins now available. The wild popularity of tools like ACF for managing custom data in real estate, recipe, and e-commerce sites just goes to show how essential they've become for developers.
For those digging into advanced monetization strategies, it's worth exploring the details of integrating e-commerce solutions like WooCommerce. When you combine these powerful tools, you can build systems that don't just display information but actively drive conversions and engagement based on the specific data you're managing.
Got Questions About Custom Fields?
Once you start using custom fields in WordPress, a few questions are bound to pop up. It's totally normal. As you move from just setting things up to building out more complex sites, you’ll hit some common roadblocks. This section is here to give you clear, straight-to-the-point answers to the questions we hear most from Divi users.
Let's clear the air on these common points of confusion so you can get back to building.
What Is the Difference Between Custom Fields and Custom Post Types?
This is easily the question I get asked the most, and a simple analogy makes it click instantly. Imagine your WordPress site is a digital office.
A Custom Post Type (CPT) is like adding a completely new filing cabinet to your office, built specifically for one type of document. You might add a "Real Estate Listings" cabinet or a "Team Members" cabinet. It's a brand-new content category, totally separate from your standard "Posts" and "Pages."
Custom Fields, on the other hand, are the labeled dividers inside the folders in those cabinets. For your "Real Estate Listings" cabinet, the custom fields would be things like "Price," "Square Footage," and "Number of Bedrooms." For the "Team Members" cabinet, they might be "Job Title" and "Email Address."
In short: Custom Post Types create the big containers for your content, while custom fields define the specific pieces of data inside each entry. You need both to build a truly organized, dynamic website.
Can Custom Fields Slow Down My Website?
The short answer is: they can, but only if you're not careful. Every time a custom field's data is shown on your site, WordPress has to ping your database to grab it. On a typical page with just a handful of fields, the impact is so small you'd never notice it—we're talking milliseconds.
But, if you build a really complex page that's pulling dozens of custom fields for hundreds of posts at once (like a sophisticated archive page), those tiny database requests can start to add up and slow things down.
Here’s how to keep everything running fast:
- Use a well-coded plugin: Tools like Advanced Custom Fields are built for performance and know how to retrieve data efficiently.
- Use caching: A solid caching plugin is your best friend. It stores a static copy of your page, so those database queries only have to run for the very first visitor.
- Be strategic: Don't load data you don't need. Avoid querying fields on pages where they aren't even being displayed.
Honestly, with basic best practices in place, the performance hit from using custom fields is minimal, and the organizational payoff is absolutely massive.
Is Advanced Custom Fields My Only Option?
While Advanced Custom Fields (ACF) is the undisputed king of the hill and our top pick for Divi users, it’s definitely not the only game in town. The WordPress world is packed with great alternatives, each with its own flavor.
Other popular choices include:
- Meta Box: This is a super modular, developer-focused framework. It’s famous for its huge library of extensions and a code-first approach, which makes it a favorite for developers who need total control.
- Pods: As a free and very comprehensive solution, Pods handles custom fields, custom post types, and custom taxonomies all under one roof. It’s a powerful all-in-one toolkit for building custom content structures from scratch.
Even so, for most designers and site builders working with Divi, ACF just hits the sweet spot. Its friendly interface, combined with its flawless integration with Divi’s Dynamic Content feature, gives you the perfect mix of power, simplicity, and a smooth workflow.
How Can I Make My Custom Fields Searchable?
This is a fantastic question and one that usually comes up right after a site goes live. By default, the standard WordPress search only scans post titles and the main content area. It completely ignores all that rich, valuable data you’ve stored in your custom fields.
To fix this, you need a plugin that supercharges the WordPress search. Two of the best out there are Relevanssi and SearchWP. These tools will index everything on your site, including all your ACF and other custom field data. They even let you give different "weights" to your fields. This means you can tell the search engine that a match in a "Product SKU" field is more important than one in a general description, making sure your users always find exactly what they’re looking for.
Ready to build stunning, interactive popups and content areas driven by your custom fields? With Divimode, you can create dynamic experiences that pull your audience in and boost conversions, all inside the Divi Builder. Check out our powerful plugins and tutorials at https://divimode.com to see what you can build.
More Articles You Will Like