To really boost your website's loading speed, you'll want to zero in on a few key areas: optimizing your images, setting up browser caching, and minifying your site's code (HTML, CSS, JavaScript). Hitting these three targets is the fastest way to tackle the most common performance bottlenecks and deliver an immediate, noticeable speed boost for your visitors.
Why Website Speed Is a Game Changer for Growth
Let's be honest: a slow website is more than just a minor hiccup for visitors. It’s a direct hit to your bottom line. In a world where attention spans are shorter than ever, every millisecond is precious. A sluggish site doesn't just frustrate users; it chips away at your brand's credibility and actively pushes potential customers away before they even get a chance to see what you're offering.

This isn't just a hunch—the data is crystal clear. User expectations for speed are through the roof. Studies have shown that 47% of consumers expect a webpage to load in two seconds or less, and a whopping 40% will bail if a site takes more than three seconds to show up. This problem is even worse on mobile, where load times are often slower, creating a massive gap between what users expect and what they actually get. If you want to dig deeper, these website speed statistics tell the whole story.
Putting performance first is a direct investment in your business's growth. Faster load times translate into real, tangible results:
- Skyrocketing Conversion Rates: A joint study with Google found that even a tiny 0.1-second improvement in speed can lift e-commerce conversions by 8.4%.
- Deeper Engagement: When a site is fast, visitors stick around longer. They view more pages and spend more time interacting with your content.
- Improved SEO Rankings: Google is obsessed with user experience, and site speed is a major ranking factor. Faster websites get a direct visibility boost in search results.
Getting to Grips with Google's Core Web Vitals
To put a number on user experience, Google rolled out its Core Web Vitals (CWV). These aren't just technical terms for developers; they're metrics that measure the real-world experience a visitor has on your page.
Think of Core Web Vitals as your website's report card for user experience. Nailing these tells search engines that your site is fast, responsive, and stable, which is absolutely critical for climbing the rankings and keeping your visitors happy.
There are three main metrics to focus on:
- Largest Contentful Paint (LCP): This measures the time it takes for the largest piece of content—like an image or a big block of text—to become visible. A good LCP is under 2.5 seconds and signals to users that your page is loading quickly.
- Interaction to Next Paint (INP): This metric is all about responsiveness. It measures the delay between a user's action (like a click) and the page's visual response. A low INP score means your site feels snappy and fluid, not clunky or frozen.
- Cumulative Layout Shift (CLS): CLS tracks visual stability. It calculates how much unexpected movement happens as elements load on the page. A low score here means your layout is solid and won't cause users to accidentally click on the wrong thing.
By focusing on these vitals, you turn the vague goal of "making the site faster" into a clear, actionable strategy.
Diagnosing Your Website Performance Issues
You can’t fix what you don’t measure. Before you start tweaking code or compressing images, the first step is to get an honest, data-driven picture of your site’s current performance. Jumping straight into optimizations without a proper diagnosis is like trying to solve a puzzle in the dark—you might get lucky, but you’ll probably waste a lot of time.
To get started, we need a reliable tool. While there are a few out there, the industry standards are Google PageSpeed Insights and GTmetrix. Both are free and give you a ton of information, but for our purposes, we’ll stick with PageSpeed Insights. Its report is directly tied to the Core Web Vitals that Google uses as a ranking factor, so it’s the one that really matters for SEO.
Understanding Your Performance Report
When you run a test, it's so tempting to fixate on that big performance score at the top. While that number gives you a quick snapshot, the real gold is buried in the details. The full report breaks down your site's performance into specific metrics that tell a story about the user experience.
Here’s what a typical PageSpeed Insights report looks like. It immediately flags key performance metrics and opportunities for improvement.

This report shows you exactly which areas need attention, from loading performance (LCP) to interactivity (INP). Digging into these metrics is how you build a targeted optimization plan. Learning how to track your website performance like a pro is a foundational skill, and these tools make it accessible to everyone.
To make sense of it all, let's focus on a few of the most critical metrics:
- Time to First Byte (TTFB): This is all about server response time. It measures how long it takes for your server to send back the very first piece of information after a request is made. A high TTFB (anything over 600ms is a red flag) often points to server-side issues, like slow hosting or a bloated database.
- Largest Contentful Paint (LCP): As we covered earlier, this is the time it takes for the largest visual element to load on the screen. If your LCP is slow, the culprit is almost always a huge image, a hero video, or a massive block of text that’s taking forever to render.
- Total Blocking Time (TBT): This metric tells you how long the page is "blocked" by scripts and code, preventing the user from actually interacting with it. High TBT is a classic sign that you’re running too much heavy JavaScript.
Your goal isn't just to chase a perfect score. It's to identify the biggest bottlenecks that are having the most significant negative impact on your visitors' experience. Focusing your energy on the top two or three issues will yield far better results than trying to fix every minor warning.
Pinpointing the Main Culprits
Once you’ve got a handle on the key metrics, scroll down to the "Opportunities" and "Diagnostics" sections of your report. This is where Google hands you an actionable to-do list. It’s not vague advice; it tells you exactly which images are too big, which CSS files are blocking the page from rendering, and which JavaScript files are taking too long to execute.
For instance, you might see a recommendation to "Serve images in next-gen formats." If you click on that, it will reveal a list of specific JPEG or PNG files on your page that could be converted to a modern format like WebP to save a ton of file size.
Another common one is "Eliminate render-blocking resources," which will point to specific CSS or JavaScript files you can defer or load asynchronously. We'll cover how to do that later.
By using this detailed report, you can move from just guessing what’s slow to knowing exactly what to fix. This targeted approach is the key to making real, lasting improvements to your site's speed.
Mastering Image Optimization Without Losing Quality
If there's one single culprit behind slow websites, my money's almost always on large, unoptimized images. Media files are typically the heaviest assets on any given page, and getting them under control is one of the most impactful things you can do for your load times. The great news is you don't have to sacrifice beautiful visuals for a snappy site.
According to the Web Almanac, images can eat up over 1,000 KB on a typical desktop page. That’s a massive chunk of data your visitors have to download. Our goal is to shrink that number dramatically without turning your crisp photos into a pixelated mess.
Choose the Right Image Format for the Job
Not all image formats are created equal. Using the right one for each specific situation is the foundation of smart optimization. It's less about which format is "best" and more about which is the right tool for that particular image.
- JPEG (or JPG): This is your workhorse for most photographs and images with complex color gradients. It uses lossy compression, which cleverly discards some data to make the file size much smaller, often with no quality loss you can actually see.
- PNG: Reach for this format when you need a transparent background, like for logos or icons. PNGs use lossless compression, meaning they keep all their original data. The trade-off? They're often much larger than JPEGs.
- WebP: Developed by Google, this modern format is a total game-changer. It supports both lossy and lossless compression, handles transparency, and usually creates files that are 25-35% smaller than their JPEG or PNG counterparts. Serving WebP images is a huge win.
My rule of thumb is simple: use JPEG for photos, PNG for graphics needing transparency, and convert everything to WebP whenever you can. Modern browsers have excellent support for it, and the file size savings are just too good to ignore.
Compress Images Before You Upload
Once you've picked the right format, the next step is compression. This process shrinks the file size even further by stripping out unnecessary data. You should always, always compress your images before uploading them to your website.
There are fantastic free tools out there that make this ridiculously easy. Services like TinyPNG or Squoosh can shrink your image files in seconds, and you won't even notice a difference in quality. Making this a habit is a core part of properly optimizing images for WordPress.
Implement Lazy Loading for Below-the-Fold Media
Lazy loading is a brilliant trick that gives your initial page load times a serious boost. Instead of loading every single image and video on a page at once, it tells the browser to wait on loading any media that isn't currently visible on the user's screen.
This means that images in your footer or halfway down a long blog post won't even start to download until the user actually scrolls down to them. This has a massive positive impact on your Largest Contentful Paint (LCP) score because the browser can focus all its energy on rendering the critical content at the top of the page first.
Fortunately, modern versions of WordPress include native lazy loading for images by default. But you can get even more control with performance plugins that can also lazy-load videos and iframes—which are often even heavier than images.
Serve Perfectly Sized Responsive Images
Serving a massive, 2000-pixel-wide image to someone on a small mobile phone is a colossal waste of bandwidth. The user's screen can't even display all those extra pixels, yet their device is forced to download the oversized file. This is where responsive images save the day.
This more advanced technique uses HTML attributes (srcset and sizes) to give the browser a menu of different-sized versions of an image. The browser then intelligently picks and downloads the most appropriate version based on the user's screen size and resolution.
While setting this up can be a bit more technical, many modern themes and plugins handle it for you automatically. By making sure every user gets an image perfectly sized for their device, you eliminate wasted data and deliver a much faster experience for everyone—especially your mobile visitors.
Using Caching and CDNs to Deliver Instant Content
Once your images are lean and your code is clean, it's time to bring in the heavy hitters. Caching and Content Delivery Networks (CDNs) are two of the most powerful tools in your arsenal, working together to slash load times for your visitors.
Think of them as your website’s express lane.
Caching is like giving repeat visitors a VIP pass. The first time someone lands on your site, their browser has to download all your assets—images, CSS, JavaScript, the works. Browser caching tells their browser to hang onto those files locally for a while.
So, when they come back, their browser just pulls the saved files from its own memory instead of downloading everything all over again. The page loads in a flash.
How Caching Works in the Real World
Without caching, your server has to do all the heavy lifting for every single page view, even if it's the same person hitting refresh. This not only slows things down but also puts a ton of unnecessary strain on your hosting. Flip the switch on caching, and the server's workload drops dramatically.
This simple change can make a monumental difference in perceived performance and your Core Web Vitals scores. For anyone on WordPress, implementing a solid caching strategy isn't just a good idea—it's non-negotiable.
Thankfully, there are some incredible plugins that handle the entire process for you with just a few clicks. We've actually put together a guide on the most popular caching plugins if you want to see our top recommendations.
Shrinking the Globe with a Content Delivery Network
While browser caching is fantastic for repeat visitors, a Content Delivery Network (CDN) solves an entirely different problem: physical distance.
Let’s say your web server is located in Dallas. When a user from Sydney tries to visit your site, the data has to travel halfway around the world to reach them. That delay, known as latency, is an absolute speed killer.
A CDN tackles this by creating a global network of servers and storing copies of your site's static assets (like images, CSS, and JavaScript) on them. Now, when that user from Sydney visits, the CDN serves them the content from a server in Australia instead of one in Texas. By shortening the physical distance data has to travel, a CDN gives your global audience a massive speed boost.
A CDN doesn't just make your site faster; it also makes it more resilient. By distributing your content across multiple servers, it reduces the load on your origin server and can help keep your site online even during traffic spikes or hardware issues.
Choosing the Right CDN for Your Needs
There are plenty of CDN providers out there, but a couple of the most popular and user-friendly options are Cloudflare and BunnyCDN.
- Cloudflare: Known for its generous free plan, Cloudflare is often the go-to starting point. It offers a global CDN, robust security features like DDoS protection, and a simple setup that can be configured in minutes.
- BunnyCDN: A fantastic premium option that's known for its high performance and affordable, pay-as-you-go pricing. BunnyCDN gives you more granular control over your caching settings and is a favorite among performance enthusiasts.
Implementing a CDN is one of the single biggest improvements you can make to your website’s speed and stability. It works hand-in-hand with caching to create a powerful, two-pronged approach to performance.
Looking beyond these foundational techniques, advanced strategies are constantly evolving. For example, some platforms use prefetching to cache the HTML of links a user is likely to click before they even click them, creating an instant-load experience. Such forward-thinking optimizations are why 86% of B2C websites now load in 5 seconds or less—a clear sign that speed is a top priority in competitive markets. Dive deeper into the data and discover more page load time statistics that highlight these trends.
Cleaning Up Code and Streamlining Asset Delivery
A fast website is built on a foundation of clean, efficient code. Once your images are compressed and your caching is humming along, the next frontier is optimizing how your site’s actual HTML, CSS, and JavaScript files are delivered to your visitor’s browser.
This is where we get into the technical weeds a bit, but trust me, these steps can unlock some of the biggest performance gains you'll see. The core idea is simple: make your code files smaller and smarter.
Minifying Your HTML, CSS, and JavaScript
First up is minification. This is just a fancy term for stripping out all the unnecessary characters from your code without changing how it functions. Think of things like white space, code comments, and line breaks—all helpful for human developers, but totally useless to a browser.
Getting rid of them makes the files smaller and faster for a visitor to download. For sites with complex themes and multiple plugins, minifying CSS and JavaScript can often reduce file sizes by 20% or more. That's a direct cut in the data a user has to download, which is a huge win for speed, especially on mobile networks.
Thankfully, you don't have to do this by hand. Most good performance plugins, including the top caching solutions, can handle minification automatically. You just check a box, and the plugin does the heavy lifting.
Eliminating Render-Blocking Resources
Ever run a test in PageSpeed Insights and see a scary warning to "Eliminate render-blocking resources"? It sounds complicated, but the concept is pretty straightforward.
When a browser loads your site, it reads the HTML from top to bottom. If it hits a CSS or JavaScript file in the <head> section, it has to stop everything, download that file, and run it before it can continue building the rest of the page. These are render-blocking resources, and they're a major cause of that dreaded blank white screen a visitor sees before your content appears.
To fix this, we need to change how these files are loaded. The two main ways to tackle this are:
- Defer JavaScript: By adding a
deferattribute to a script, you're telling the browser to download it in the background while it keeps parsing the HTML. The script won't run until the main page is done loading. This is perfect for non-essential scripts like analytics trackers or social media widgets. - Load CSS Asynchronously: For CSS, the approach is to identify the "critical CSS"—the bare minimum styling needed to render what's immediately visible (the "above-the-fold" content). This tiny snippet of CSS gets placed directly in the HTML. The rest of the stylesheet is then loaded asynchronously, so it doesn’t block that crucial first paint.
Take a look at how much of an impact this can have. The number of files (or HTTP requests) your site makes has a direct, almost one-to-one correlation with its load time.
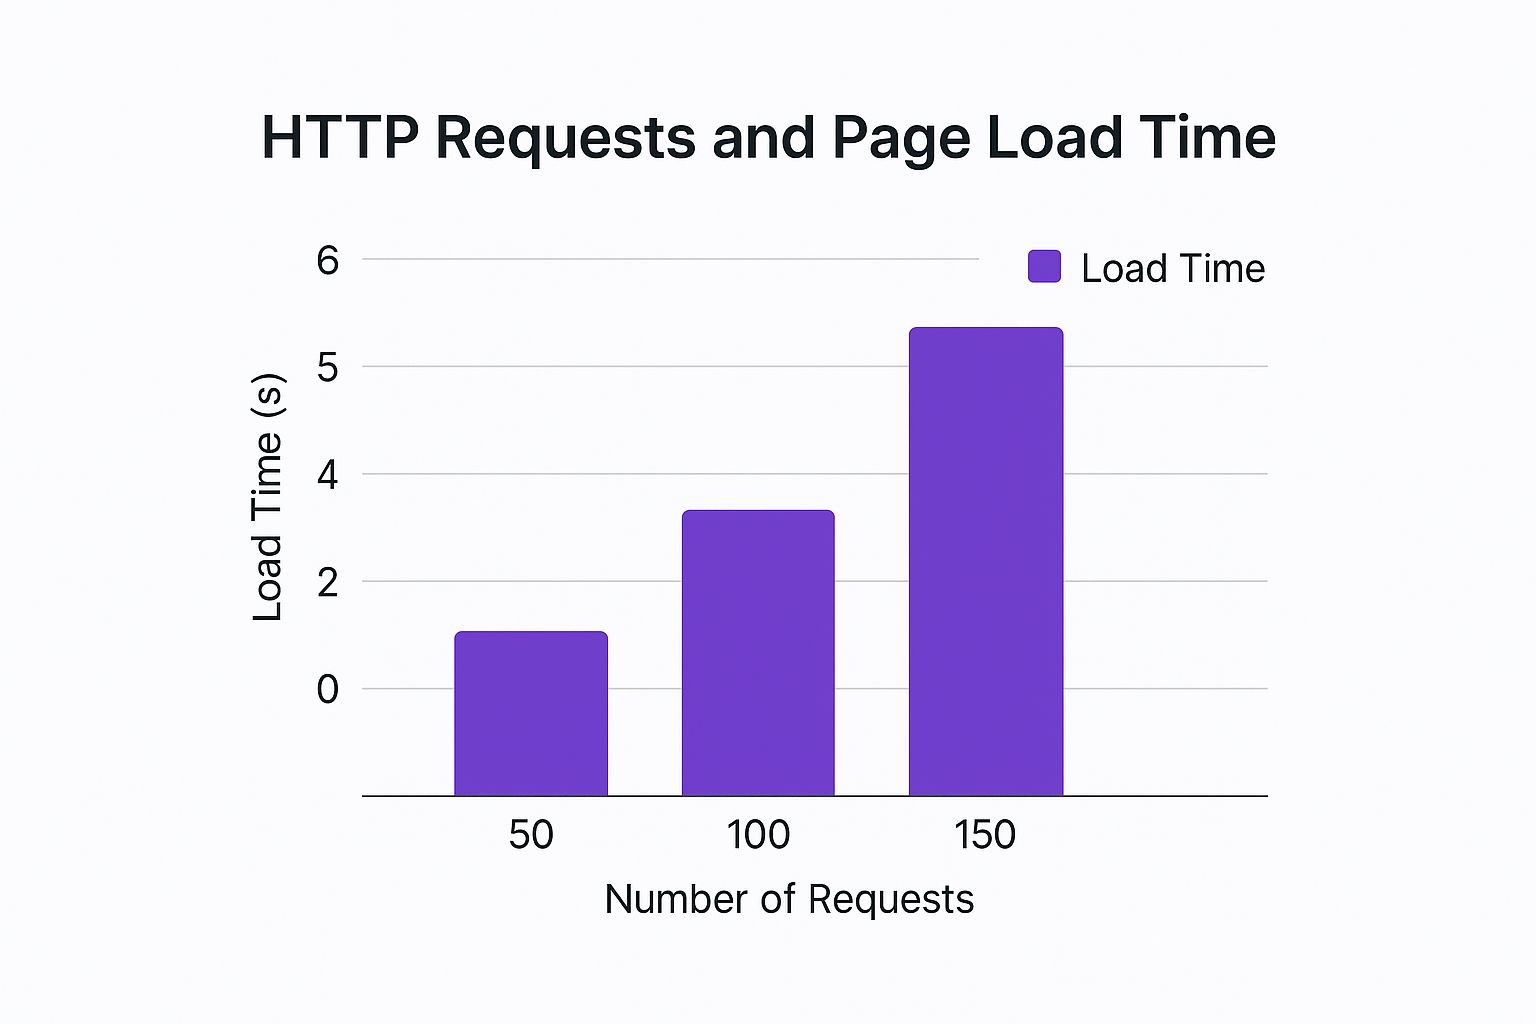
As the data shows, cutting your requests in half can literally cut your load time in half. That’s the power of streamlining your asset delivery. While you can do this manually, a good performance plugin can automate most of the process.
Knowing where to focus your efforts can be tough. The table below breaks down the impact you can typically expect from various speed optimizations, helping you prioritize what to tackle first.
Impact of Common Website Speed Optimizations
| Optimization Technique | Average Load Time Reduction | Effort Level |
|---|---|---|
| Image Compression & WebP | 20-50% | Low |
| Page Caching | 30-60% | Low |
| Minify CSS & JavaScript | 10-25% | Low |
| Defer JavaScript | 15-30% | Medium |
| Use a CDN | 20-40% | Low |
| Optimize Fonts | 5-15% | Medium |
As you can see, combining a few of these techniques is the key to unlocking major speed improvements. When you pair minification with smart asset delivery, you ensure your website not only loads faster but feels faster to your visitors.
Choosing Hosting That Accelerates Your Site
Let's talk about the engine of your website: your hosting. You can have the most streamlined design and lightweight code in the world, but if the engine is chugging along, you're not going anywhere fast. This is exactly why that super cheap shared hosting plan is often the single biggest bottleneck holding back your Divi site's performance.
Your choice of host directly impacts one of the most critical speed metrics out there: Time to First Byte (TTFB). This is simply the time it takes for your server to start sending back the first piece of data after someone requests your page. A slow TTFB leaves your visitors staring at a blank screen before your site even begins to load, creating a terrible first impression that no amount of on-page tweaking can fully fix.
Comparing Your Hosting Options
Not all hosting is built the same, and the plan you're on has a massive impact on both speed and how much traffic your site can handle before it starts to buckle.
- Shared Hosting: This is the entry-level, budget-friendly option where your website shares server resources with hundreds—or even thousands—of other sites. It's a fine starting point, but a sudden traffic spike on a neighboring site can easily slow yours to a crawl.
- VPS (Virtual Private Server): This is a serious step up. A VPS gives you a dedicated slice of a server's resources. While you're still on a shared physical server, your performance is walled off from everyone else, giving you more consistent power and reliability.
- Managed Hosting: Think of this as the white-glove service for WordPress. Platforms like Kinsta or WP Engine specialize in WordPress and handle all the tricky server management, security, and performance tuning for you. They often bundle in premium CDNs and have powerful caching systems built right in, making it a fantastic, hands-off option for serious businesses.
A mistake I see all the time is people investing in a premium theme and a dozen powerful plugins, only to run the whole operation on a $5-per-month shared hosting plan. It's like putting economy tires on a Ferrari—you're completely undermining all your other investments. Upgrading your hosting will almost always give you the single biggest performance boost.
Beyond the Plan: Server-Side Tweaks
Picking a great hosting provider is a huge step, but it's not the end of the story. You can squeeze out even more speed with a couple of crucial server-side adjustments.
First, make sure you're running on a recent version of PHP. Every new release brings major performance and security gains. Just upgrading from an old, unsupported version like PHP 7.4 to a modern one can make your site’s backend code execute dramatically faster, which directly lowers your TTFB.
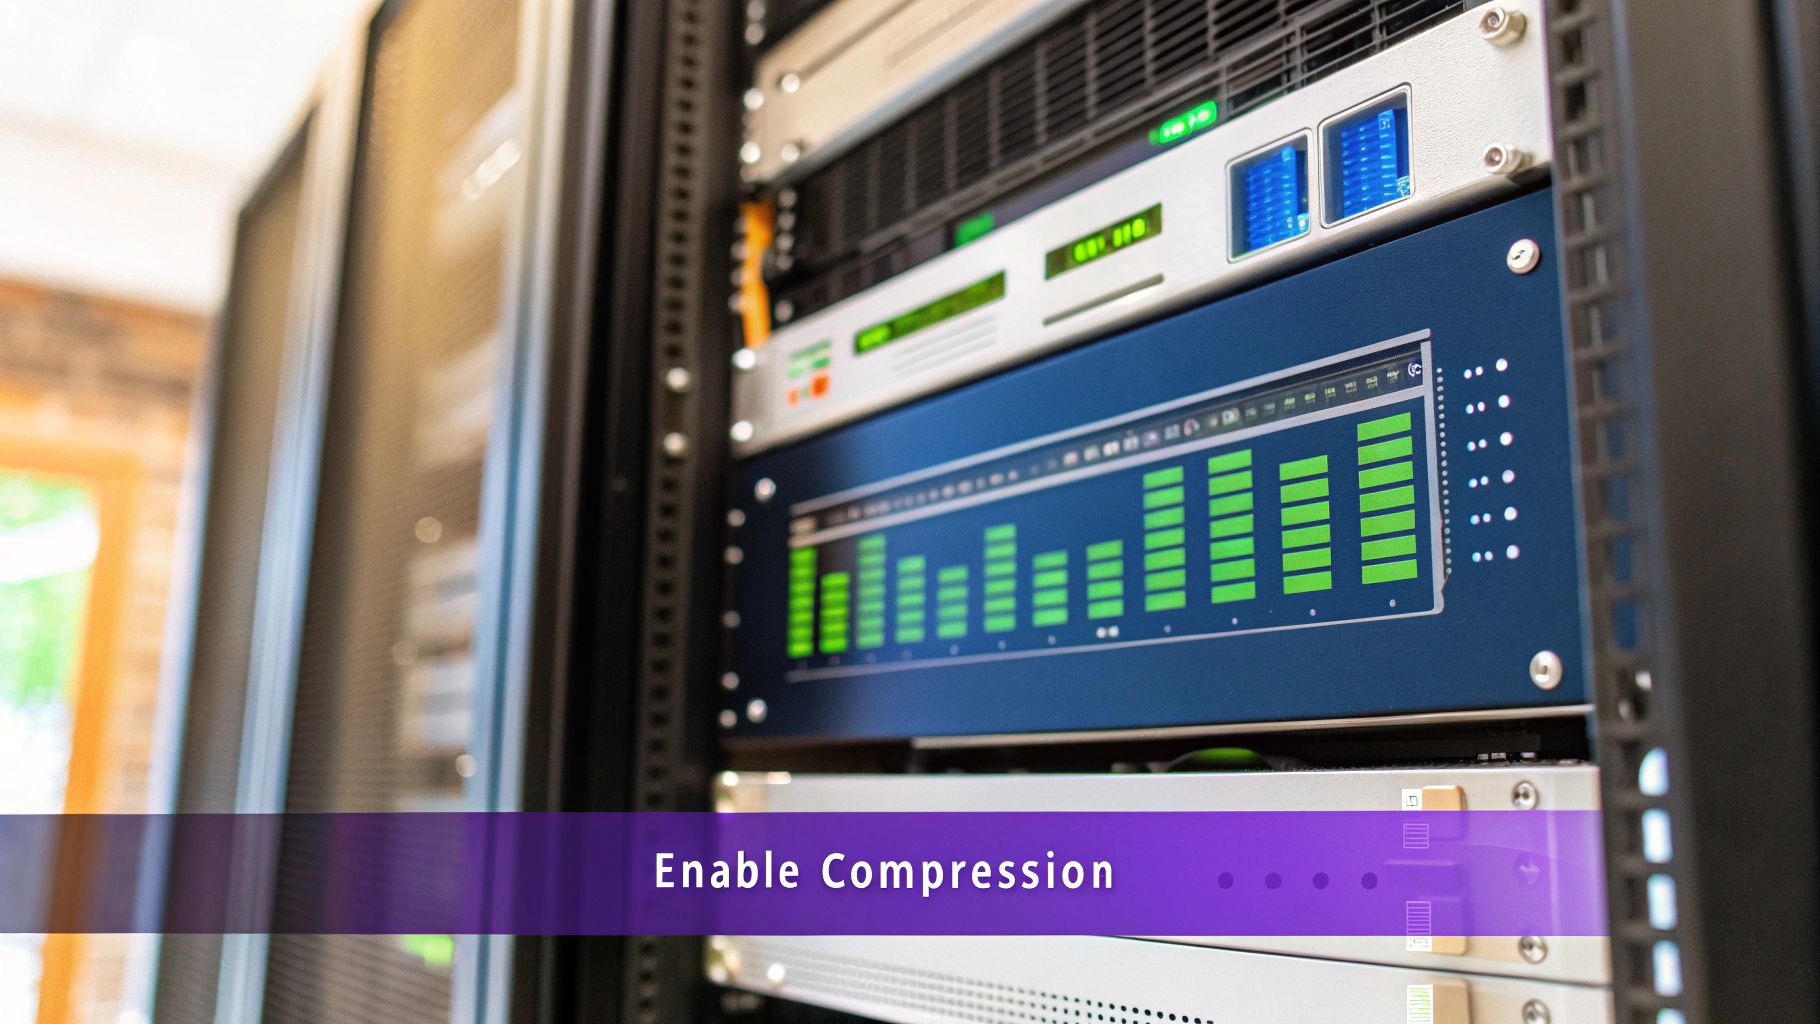
Next, you need to enable Gzip compression. This is a server-level feature that compresses your site's files—like HTML, CSS, and JavaScript—before sending them to your visitor's browser. The browser then quickly unzips them. It's a simple change that can shrink your file sizes by as much as 70%, resulting in a much faster download.
Ultimately, your server's responsiveness sets the absolute baseline for your entire site's speed. Fast loading times are non-negotiable, especially when you consider that the average TTFB in the US is 0.8 seconds on mobile and 0.6 seconds on desktop. Getting your server in order is the first step to beating those averages, particularly since mobile devices now drive over 68% of all web traffic. You can dig into more website speed statistics and their impact to see just how much is at stake.
Common Questions About Website Speed
Diving into the world of performance optimization can definitely bring up a lot of questions. I've put together this quick-reference section to give you clear, straightforward answers to the queries I hear most often. It’s all about helping you cut through the noise and stay focused on what really matters.
What Is a Good Page Load Time?
While there's no single magic number, the consensus in the industry is crystal clear: faster is always, always better.
Most studies I've seen show that users start getting antsy after just 3 seconds. Anything longer than that, and you'll see a sharp spike in your bounce rate as visitors lose patience and simply click away.
For the metrics that really count, you should be aiming for these Core Web Vitals targets:
- Largest Contentful Paint (LCP): Under 2.5 seconds. This is how long it takes for the main content to appear.
- Interaction to Next Paint (INP): Under 200 milliseconds. This measures how quickly your site responds to a click or tap.
- Cumulative Layout Shift (CLS): A score of 0.1 or less. This keeps your layout stable and prevents those annoying jumps.
Hitting these goals means your site doesn't just load quickly—it feels fast, responsive, and professional to your users.
Can Better Core Web Vitals Really Increase Conversions?
Absolutely. I've seen it firsthand, and the data backs it up. The link between good Core Web Vitals and actual business results is incredibly strong.
A collaborative study with Google, for instance, revealed that even a tiny 0.1-second improvement in speed can boost e-commerce conversions by 8.4%. For travel sites, that number jumps to a staggering 10.1%.
A faster site directly reduces friction in the user journey. When pages load instantly and interactions are smooth, visitors are more engaged, more likely to trust your brand, and far more likely to complete a purchase or sign-up.
Think about it—every millisecond you shave off is one less reason for a potential customer to leave.
How Does Page Speed Directly Affect My Conversion Rate?
Slow page speed is a conversion killer, plain and simple. It creates a poor user experience right from the very first click.
When a visitor has to wait, they become frustrated. That negative first impression means they're far more likely to abandon your site before they even see your amazing offer.
This directly increases bounce rates and shortens how long people stick around, which ultimately means fewer people ever make it through your sales funnel. When you focus on improving your website's loading speed, you're investing in a smoother, more effective path to conversion for every single person who lands on your site. In my experience, it's one of the highest-impact investments you can make.
Ready to create stunning, high-performing popups and interactive elements on your Divi site? Divimode offers the tools and expertise you need. Check out our premium plugin, Divi Areas Pro, to unlock advanced features that will engage your visitors and boost your conversions. Learn more at divimode.com.
More Articles You Will Like