Optimizing images for a WordPress site isn't just about shrinking a few pictures. It's a fundamental part of building a website that's fast, user-friendly, and actually ranks well in search engines. The whole process boils down to choosing the right format, resizing your images before you upload them, and then using smart compression to cut down the file size without trashing the quality. Get a good workflow down, and you’ll be golden.
Why Image Optimization Is a Big Deal for WordPress
Before we jump into the how, let's nail down the why. Honestly, unoptimized images are probably the single biggest reason a WordPress site feels slow and clunky. Every time you upload a huge, high-res photo straight from your camera, you're making your visitors download a massive file. That's not a minor inconvenience—it has real, negative effects.
The Hit on Performance and SEO
Heavy images are the primary cause of bloated page weight, and that directly impacts your site's performance scores. Google's Core Web Vitals, especially the Largest Contentful Paint (LCP), are super sensitive to how quickly your main images pop into view. A bad LCP score can tank your SEO rankings, making it that much harder for people to find you in the first place.
This goes way beyond search rankings, though. Picture an e-commerce store with gorgeous but oversized product photos. If those images take even a few extra seconds to load, a potential customer is going to get annoyed and click away. Just like that, you've lost a sale. The link between site speed and user patience is direct and unforgiving.
It's wild, but research shows that images often account for 50% to 60% of a website's total page weight. By just optimizing your images correctly, you can slash your load time by up to 30%. That's a huge win. If you want to dive deeper, teamupdraft.com has some great insights on how a mere one-second delay can cause a 7% drop in conversions.
It's More Than Just a Technical Chore
If you look at image optimization as just another boring task on your checklist, you're missing the point. It’s a core piece of creating a great user experience and hitting your business goals. Faster load times mean lower bounce rates, more people sticking around, and ultimately, better conversion rates. Every single image on your site is an opportunity to either impress or frustrate your visitors.
And this principle extends beyond just your own website's performance. For instance, think about the crucial role of professional real estate photography in driving sales. The logic is identical: beautiful, high-quality visuals get results, but they have to be delivered to the user quickly and efficiently.
So, let's reframe this. Image optimization isn't a chore; it's a strategy. It's how you build a faster, more effective website that serves both your audience and your business.
Choosing the Right Image Format and Dimensions
Getting your images right before you even think about uploading them to WordPress is probably the single most effective thing you can do for site speed. Think of it as prep work. Using a massive, uncompressed photo where a small, efficient graphic would do is a guaranteed way to slow your site down.
This isn't just a nerdy technical detail—it's about strategy. Each image format has a job to do, and matching your image to the right one is crucial for balancing beautiful quality with a small file size. After all, a stunning hero image that takes five seconds to load isn't very stunning to an impatient visitor.
Navigating the Core Image Formats
For the web, your main choices are usually JPEG, PNG, WebP, and SVG. Each one shines in different situations, and knowing when to use which is a total game-changer. It’s less of a competition and more like having a specialized toolkit.
Here’s a quick rundown of where each format fits best:
- JPEG (or JPG): This is your workhorse for photographs and images with lots of colors and gradients. JPEGs use "lossy" compression, which is a fancy way of saying they intelligently get rid of some data to make the file much smaller. For a vibrant product photo or a detailed landscape, JPEG hits that sweet spot between quality and size.
- PNG: Perfect for any graphic that needs a transparent background, like your logo, icons, or text overlays. PNGs use "lossless" compression, meaning they keep every single pixel of detail. That’s great for sharp lines, but it also means much larger file sizes, especially for photos.
- SVG: Scalable Vector Graphics are a different beast entirely. They aren't made of pixels; they're built with XML code. This means you can scale them up or down infinitely without any loss in quality. This makes SVGs the absolute best choice for logos, icons, and simple illustrations that need to look crisp on every screen.
- WebP: This is the modern powerhouse format developed by Google. WebP offers fantastic lossy and lossless compression, creating files that are way smaller than their JPEG or PNG counterparts while looking just as good.
The performance gains here are real. By choosing WebP over JPEG, you can often see a 25-34% reduction in file size with no quality difference you can actually see. That's a massive win for your loading speed and Core Web Vitals.
If you're serious about getting every last drop of performance out of your site, especially with the Divi theme, our comprehensive guide on how to speed up your Divi website is the perfect next step. It's packed with tips that work hand-in-hand with image optimization.
Image Format Comparison for WordPress
To make it even clearer, here's a quick reference guide to help you choose the best image format. Think of it as a cheat sheet for balancing quality and performance.
| Format | Best For | Key Feature | Performance Impact |
|---|---|---|---|
| JPEG | Photographs, complex images with gradients | Good balance of quality and file size | Medium |
| PNG | Logos, icons, images needing transparency | Lossless quality, supports transparency | High (larger files) |
| SVG | Logos, icons, simple illustrations | Infinitely scalable, very small files | Low |
| WebP | A modern replacement for JPEG and PNG | Superior compression, excellent quality | Very Low |
Ultimately, WebP is often the best all-around choice for modern websites, but knowing the strengths of each format lets you make the smartest decision for every single image you upload.
The Rise of WebP
WebP isn't some experimental new thing anymore; it's a modern standard that all major browsers support. Its smarter compression algorithms make it the top choice for anyone who truly cares about performance.
Just look at this comparison—it really shows how efficient WebP is.
The WebP image on the right is a fraction of the file size of the PNG on the left, but to the naked eye, the quality is identical. This is exactly why so many modern WordPress optimization plugins now automatically convert your images to WebP for you.
Sizing Your Images Before You Upload
Beyond the file format, the actual dimensions (width and height) of your image are a huge deal. One of the most common mistakes I see is people uploading a massive 4000-pixel wide photo straight from their camera for a blog post that only needs an 800-pixel image.
Sure, WordPress will create smaller versions for you, but that original, giant file is still sitting on your server, hogging space and resources.
Your workflow should always start with resizing. Before an image ever touches your WordPress media library, open it in a free tool like GIMP or an online editor like Photopea. Figure out the maximum width it will ever be displayed at on your site and resize it to those exact dimensions.
For a full-width hero image on a standard desktop, 1920 pixels is usually more than enough. For an image inside your blog content, it might be closer to 800 or 1200 pixels. This one simple step, done before you upload, can easily cut your file size by over 90%. No plugin can beat that.
How to Compress Images Without Losing Quality
Once you've got the right format and dimensions picked out, the next stop is compression. This is where the real magic happens for site speed. We're talking about huge drops in file size, often with zero noticeable difference in how the image actually looks. It's the secret sauce for making your website fly.
Compression is all about using clever algorithms to make your image files smaller. You'll mainly run into two types: lossless and lossy. Knowing when to use each is the key to getting this right.
Lossless vs Lossy Compression
Think of lossless compression like zipping up a file. It reorganizes the image data more efficiently to shrink the file, but when you "unzip" it, every single pixel is exactly as it was. This is perfect for technical diagrams, logos, or icons where every sharp line matters. The only catch? The file size reduction isn't that dramatic.
Lossy compression, on the other hand, gets a bit more aggressive. It strategically throws away bits of image data that the human eye isn't very good at seeing anyway. Even a little bit of lossy compression can slash a file size by 70% or more, and the result often looks identical to the original. This is the method you'll want for pretty much every photograph on your site.
The real art of modern image optimization is nailing that "lossy" sweet spot. You're aiming for the smallest possible file size with a level of quality loss so tiny that nobody will ever notice. It’s a massive performance win with basically no downside when you do it right.
The Best WordPress Image Optimization Plugins
Sure, you could manually compress every image before you upload it, but who has time for that? This is where a good WordPress plugin becomes your best friend, putting the whole process on autopilot. They'll compress new images as you upload them and can even go back and optimize your entire existing media library.
Here are a few of the top players I've used over the years:
- ShortPixel: This is a powerhouse and a very popular choice. Its compression algorithms are top-notch, and the free plan is quite generous. It gives you lossy, glossy (a smart middle-ground), and lossless options, and it handles WebP conversion automatically.
- Imagify: From the same people behind the WP Rocket caching plugin, Imagify is known for being incredibly simple and easy to use. It offers three straightforward compression levels (Normal, Aggressive, Ultra) and also converts to WebP without any fuss.
- Smush: A long-time favorite in the WordPress world, Smush's free version offers unlimited lossless compression. For lossy compression and more advanced features like CDN integration, you'll need to spring for the Pro version.
These plugins hook right into your WordPress media library, making image optimization practically effortless.
Here’s a peek at the ShortPixel plugin's dashboard. It gives you a really clean overview of what it's been doing.
I love this dashboard because it shows your average compression percentage and how much bandwidth you've saved. It’s tangible proof that the plugin is actually working and making a difference.
My Recommended Plugin Settings
Just installing one of these plugins isn't quite enough; you've got to dial in the settings to get the best results. The defaults are okay, but a couple of small tweaks can make a huge impact.
Based on my experience, here are the settings I almost always use for a plugin like ShortPixel or Imagify:
- Choose "Lossy" Compression: For the vast majority of websites, this is the perfect balance between file size and image quality. Don't let the name scare you—the final image is almost always visually identical to the original.
- Enable WebP Conversion: This is non-negotiable. The plugin will create a next-gen WebP version of your images and serve it to modern browsers for an extra speed boost, while automatically falling back to the original JPG or PNG for older ones.
- Backup Original Images: Always, always turn this on. It saves a copy of your original, uncompressed images. This is your safety net if you ever decide you want to re-compress with different settings or just revert back for any reason.
- Resize Large Images: Set a maximum width for your uploads. Something around 1920px or 2560px is usually a good bet. This stops those enormous photos straight from a camera from ever hitting your server, saving space even before compression kicks in.
Putting a system like this in place can seriously cut down your page load times. And it matters—even a one-second delay can lower conversions by 7%. For the 22% of global e-commerce sites running on WooCommerce, that's a huge deal.
If you're a Divi user like me, it's also worth knowing how images work within the builder itself. For a really deep dive, take a look at our ultimate guide to using images with Divi. It covers some specific tips that can squeeze even more performance out of your site. The goal is to set up a powerful, automated workflow so your site stays fast without you having to think about it.
Going Beyond the Basics With Advanced Optimization
Once your images are perfectly sized, formatted, and compressed, it’s time to move beyond the fundamentals. A couple of advanced techniques can take your site’s performance from good to great. These methods don't change the images themselves, but instead focus on how they're delivered to your visitors, making a huge difference in perceived load time and Core Web Vitals.
The two most powerful strategies here are lazy loading and using a Content Delivery Network (CDN). They might sound a bit technical, but their impact is simple and direct: a much faster experience for your visitors, no matter where they are or what device they're using. Honestly, getting these two right is a massive win for any WordPress site.
The Power of Lazy Loading
Picture a long blog post filled with twenty high-quality images. By default, a browser tries to download all twenty of them the moment the page starts to load. This front-loads a ton of work, delaying the moment a user can actually see and interact with the content at the top of the page. It's inefficient.
Lazy loading flips this process on its head. It cleverly tells the browser, "Hey, only load the images that are currently visible on the screen." As the user scrolls down, images just outside the viewport are loaded right before they come into view. This simple change dramatically improves the initial page load speed and your Largest Contentful Paint (LCP) score.
Thankfully, since WordPress 5.5, native lazy loading is built right in. It automatically adds the loading="lazy" attribute to your images without you having to lift a finger.
However, for more control and even better performance, many optimization and caching plugins offer their own enhanced lazy loading scripts. These often provide smoother transitions and, crucially, let you exclude specific images (like your logo or a hero image) from being lazy-loaded—which is usually a best practice.
Supercharge Delivery With a CDN
A Content Delivery Network, or CDN, is one of the single most effective ways to speed up your entire website, especially your images. In a nutshell, a CDN is a network of servers spread all across the globe that stores copies of your site's static files, like images, CSS, and JavaScript.
Think about it: if your site is hosted on a server in Texas, and a visitor from London tries to access it, the data has to travel a huge distance. This physical distance creates latency, or delay.
A CDN solves this problem beautifully. Instead of fetching the images from your origin server in Texas, the visitor from London will download them from a much closer "edge server" located right in the UK. This drastically reduces the round-trip time and makes your images load much, much faster for a global audience.
This diagram from Cloudflare shows how a CDN works by routing a user's request to the nearest server instead of the distant origin server.
The key insight here is that a CDN decentralizes content delivery. It brings your images physically closer to your users, which is a fundamental win for speed.
Using a CDN isn't just a minor tweak; it's a foundational piece of a high-performance website strategy. By slashing latency, it directly improves user experience and can even provide an extra layer of security against traffic spikes and DDoS attacks.
How to Integrate a CDN with WordPress
Getting started with a CDN is way easier than you might think, and many services offer seamless integration with WordPress.
Here’s a general overview of the process:
- Choose a CDN Provider: Popular choices include Cloudflare (which has a generous free plan), BunnyCDN, and StackPath. Many premium hosting providers also bundle their own integrated CDN services, so check with your host first.
- Sign Up and Add Your Site: You'll create an account and add your website's domain to their system. The CDN will then typically scan your site's DNS records.
- Update Your Nameservers: This is the most common setup method. The CDN provider will give you a set of new nameservers. You'll need to log in to your domain registrar (like GoDaddy, Namecheap, etc.) and replace your current nameservers with the ones provided by the CDN. This change routes all your website traffic through their global network.
- Configure Settings: Once it's active, you can jump into your CDN's dashboard to configure settings. For image optimization, you’ll want to ensure caching is enabled for all image file types. Many CDNs also offer their own powerful image resizing or WebP conversion tools, which can offload that work from your own server.
Even better, many image optimization plugins like ShortPixel or Smush Pro also offer their own built-in CDNs. This can be an incredibly simple route, as enabling their CDN is often just a matter of checking a box in the plugin settings. These specialized CDNs are tuned specifically for delivering images, making them a fantastic, hassle-free option.
Optimizing Images for SEO and Accessibility
Getting your images right isn't just about site speed. It’s also a golden opportunity to help people—and search engines—find and understand your content. This is where image SEO and accessibility intersect, and ignoring them is like leaving free traffic and a better user experience on the table.
This process starts before you even upload an image to your WordPress media library. It begins with the filename. A generic name like IMG_4582.jpg tells you and Google absolutely nothing.
Instead, get into the habit of creating simple, descriptive filenames using lowercase letters and hyphens.
- Bad:
DCIM1023.jpg - Good:
blue-suede-running-shoes.jpg
This tiny step gives search engines immediate context about the image's subject, laying a crucial foundation for good on-page SEO.
Crafting Meaningful Alt Text
Once an image is uploaded, the single most important element for both SEO and accessibility is its alternative text, or alt text. This short description serves two vital purposes: it tells search engine crawlers what an image is about (helping it rank in image searches), and it's read aloud by screen readers for visually impaired users.
Good alt text is a mix of clear description and keyword relevance, but it should never feel forced. It needs to be concise yet descriptive enough to paint a picture for someone who can't see the image.
The goal of alt text is to convey the purpose and content of an image. If the image is purely decorative and adds no real information, it's better to leave the alt text blank so screen readers can skip it.
Let's walk through a real-world example. Imagine you have a product photo for your online store.
- Bad Alt Text:
shoes(Way too generic, provides zero value.) - Okay Alt Text:
blue running shoes(It's a start, but it lacks important detail.) - Good Alt Text:
A pair of blue suede running shoes with white soles on a wooden floor(This is perfect. It's descriptive, specific, and gives fantastic context for both users and search engines.)
This level of detail helps Google understand the image in the context of the surrounding content, boosting its ranking potential. It also provides a genuinely helpful description for anyone using a screen reader. This dual benefit is a cornerstone of a smart content strategy. For a deeper dive into this, check out our guide on WordPress SEO best practices for improving your ranking.
Structuring Your Descriptions
Beyond alt text, WordPress gives you fields for a title, caption, and description. While not as critical as alt text, they offer more chances to add context.
- Title: This text often appears as a tooltip when a user hovers over an image. I usually make this similar to my descriptive filename.
- Caption: This is visible to everyone right below the image. Use it for extra info or to credit the photographer. It’s great for adding context that everyone can see.
- Description: This field is less important for most people. It creates a separate attachment page for the image, which most themes don't use publicly. Unless you have a specific reason to use it (like for a gallery or portfolio), you can safely ignore it.
By thoughtfully naming your files and writing sharp, descriptive alt text, you make your images work so much harder for you. They stop being just pretty pictures and become valuable assets that boost your SEO, improve accessibility, and create a richer experience for every single visitor.
Your WordPress Image Optimization Workflow
Alright, let's pull all these pieces together. A solid, repeatable workflow is what turns the chore of image optimization into a simple habit. Think of this less as a summary and more as a practical action plan to keep your site fast and efficient for the long haul. Consistency here is the real key to lasting performance gains.
This approach covers everything from the prep work you do before an image ever touches your media library to the automated magic that kicks in right after.
Pre-Upload Checklist
Before you even think about hitting that "Add Media" button, running through these quick steps can head off most performance problems at the pass. This is your first line of defense against bloated pages.
- Choose the Right Format: Is it a photo with lots of colors? Stick with JPEG. Does it need a transparent background? Go with PNG. Is it a simple logo or icon? SVG is your best bet.
- Resize Dimensions: Figure out the absolute largest size the image will be displayed on your site and resize it to match. A full-width hero image might be 1920px wide, but an image inside a blog post probably doesn't need to be any wider than 1200px.
- Create SEO-Friendly Filenames: Don't upload
IMG_7890.jpg. Rename it to something descriptive and useful, likedivi-areas-pro-popup-example.jpg. Always use lowercase letters and separate words with hyphens.
Post-Upload Automation
Once your image is uploaded, this is where your plugins and services should take over. You've done the manual prep; now it's time for the "set it and forget it" part of the workflow.
The goal is total automation from this point on. Let a great image optimization plugin like ShortPixel or Imagify handle the compression and WebP conversion. Then, let your CDN serve those perfectly optimized files from a server close to your visitor. This two-punch combo is the core of a high-performance image strategy.
Your automated system should be doing three things without you lifting a finger:
- Automated Compression: The moment you upload, your plugin should compress the image using your preferred settings (I almost always use "lossy" for the best size reduction).
- WebP Conversion: The plugin then generates a next-gen WebP version and serves it to browsers that can handle it (which is most of them these days).
- CDN Delivery: A service like Cloudflare or BunnyCDN grabs that final, optimized image and delivers it from its global network of edge servers.
One last thing: make a habit of auditing your media library every so often. Once a quarter, I like to run a plugin like Media Cleaner to find and delete old, unused images that are just taking up server space. It's good housekeeping that keeps your WordPress install lean and your backups nice and small.
Frequently Asked Questions
Even when you have a solid optimization process down, questions always pop up in the middle of a project. I've been there. Let's tackle some of the most common ones I hear to help you fine-tune your approach and move forward with confidence.
Will Optimizing My Images Make Them Look Blurry?
Not if you do it right. This is probably the biggest fear people have, but modern "lossy" compression is incredibly sophisticated. It's designed to slash file sizes by over 70% with almost no quality difference a person would ever notice.
The whole game is about finding that perfect balance.
Tools like ShortPixel or Imagify are fantastic at this. Their default "lossy" or "aggressive" settings are usually a safe bet and deliver great results. If you've got a super-critical image where every single pixel has to be perfect—say, for a photography portfolio—you can always choose "lossless" compression instead. It still shrinks the file size, just without touching the quality at all.
Should I Resize Images Before Uploading If My Plugin Can Do It?
Yes, one hundred percent. While it's tempting to let a plugin handle resizing giant images after you upload them, it's a much cleaner workflow to do it yourself first.
Think about it: uploading a huge 5MB photo from your camera hogs your server's resources and bandwidth. On a slower connection, that upload might even time out completely.
By resizing an image to the maximum size it will ever need to be on your site (like 1920px wide for a full-screen hero image) before you hit upload, everything runs smoother. Let your plugin do the heavy lifting on compression, but you should always be in charge of the initial dimensions.
The infographic below shows just how big of a difference a few simple steps can make. You can measure, apply the changes, and see the results for yourself.
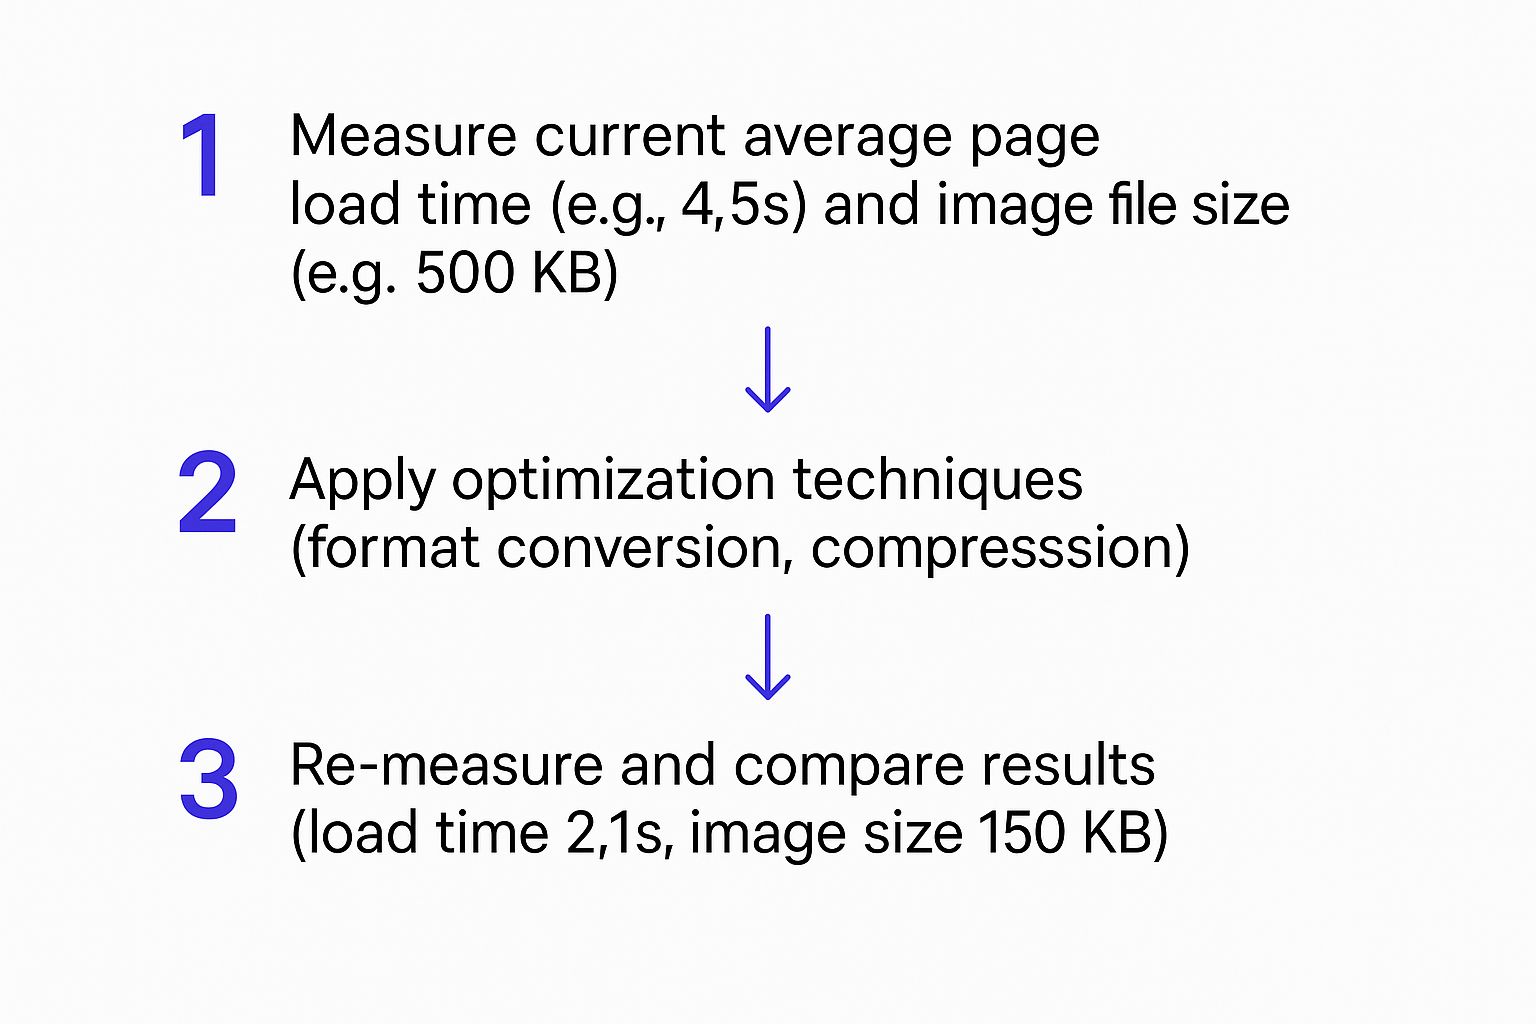
As you can see, basic techniques like picking the right format and running compression can cut page load times by more than half. It’s a huge win for a few minutes of work.
What Is WebP and Should I Be Using It?
WebP is a modern image format from Google that delivers much better compression than old-school JPEGs or PNGs. In plain English, that means you get significantly smaller file sizes for the exact same image quality.
Yes, you should absolutely be using it. WebP is now supported by every major modern browser, so it's a safe and incredibly effective way to boost performance.
The best part is that good optimization plugins make this totally painless. They'll automatically convert your uploads into WebP format and serve them to browsers that can handle it. For the rare older browser that can't, they'll serve the original JPEG or PNG as a fallback. It's a completely automated speed boost.
Ready to build powerful popups, fly-ins, and mega menus that actually improve your user experience without bogging down your site? With Divimode, you can use Divi Areas Pro to create engaging, interactive elements that perform beautifully. Explore what's possible at https://divimode.com.
More Articles You Will Like