Table of Contents
- Why Your Website Needs to Think Smarter
- Your First Dynamic Content Win (In Under 20 Minutes)
- Advanced Techniques That Separate Pros From Beginners
- Building Templates That Handle Whatever You Throw At Them
- When Dynamic Content Goes Wrong (And How to Fix It Fast)
- Real Sites, Real Results: Dynamic Content Success Stories
- Your Dynamic Content Implementation Roadmap
Why Your Website Needs to Think Smarter
Imagine this: you hit “publish” on a new blog post, and your homepage hero section instantly updates to show it off. Or your product pages automatically adjust as inventory changes, and testimonials rotate depending on what a visitor is looking at. This isn’t some futuristic fantasy; it’s exactly what happens when you tap into Divi dynamic content. It’s all about making your website intelligent, responsive, and a lot less work for you.
By linking your page designs directly to your site’s database, you can say goodbye to the repetitive, manual updates that drain your day. We’ve seen businesses cut their content maintenance time by as much as 40%, all while delivering a more personalized and relevant experience for their users. This isn’t just about saving a few hours; it’s about building a smarter digital presence that works for you, not the other way around.
Busting the Complexity Myth
When people hear “dynamic content,” their minds often jump to complicated code and technical headaches. The reality, especially with a tool as friendly as Divi, is much different. You don’t need to be a developer to make your site smarter. Simple moves, like setting up your blog post template to automatically display the author’s name and publish date, can be done in just a few minutes. These small victories build confidence and set the stage for more powerful features later on.
This ease of use is a big reason for Divi’s incredible growth. As of early 2025, the flagship builder from Elegant Themes powers over 1.5 million websites worldwide, with a huge following in the United States and Europe. In 2024 alone, Divi’s user base expanded by 2.12%, driven by features that make advanced design accessible to everyone. You can learn more about its impressive journey by exploring the latest Divi statistics and trends.
From Static Pages to Active Assets
A smart website does more than just sit there and look pretty; it actively helps you reach your business goals. For instance, a key part of a smarter site is knowing how to monetize digital content effectively. This could mean showing targeted offers based on a user’s browsing history or promoting specific services on related blog posts. When your content adapts, it stops being a static page and becomes an active asset that can guide visitors, boost conversions, and fuel growth. Using Divi dynamic content is how you turn your static pages into intelligent, hard-working parts of your business strategy.
Your First Dynamic Content Win (In Under 20 Minutes)

Let’s jump right in and get a quick, satisfying win under your belt. The best way to really grasp the power of Divi dynamic content is to build something practical with it. We’re going to set up a classic blog post grid that automatically populates with your latest articles. Mastering this is a key skill that will build your confidence for more advanced layouts down the road.
First, add a new Blog module to any page or template. Out of the box, this module is already dynamic—its main function is to pull post information from your site’s database. You’ll instantly see your existing posts appear. The real control, however, lies in the module’s settings, specifically within the Content and Elements tabs. This is where you tell Divi exactly what to display.
Fine-Tuning Your Dynamic Display
Inside the Blog module settings, head over to the Content tab. This is where you can filter which post categories to include or exclude, set the number of posts to show, and handle pagination. For a typical homepage grid, you might set the “Post Count” to six and choose only your “Featured” category. This ensures the grid always displays a curated selection of your top content without you ever having to lift a finger.
Next, click over to the Elements section. This spot often trips up newcomers. If you notice your featured images are missing, it’s probably because “Show Featured Image” is toggled off here. You can also manage the visibility of the author, date, categories, and post excerpt. A great pro-tip is to always enable the “Read More Button” to give visitors a clear path to click through.
Making It Your Own
With the core content in place, it’s time to style it to match your brand. In the Design tab, you can switch the layout from “Fullwidth” to “Grid” to achieve that classic blog roll appearance. From there, you can adjust everything from the title fonts to the overlay color that appears on hover. These design choices are automatically applied to every post in the grid, guaranteeing a consistent look no matter what you publish.
The Divi Dynamic Content system is the engine that makes all this happen. It enables any module to become a dynamic element, fetching data like post titles, featured images, and excerpts directly from your database without requiring any code. This feature is fundamental for creating efficient, self-updating websites. To see just how far this can go, you can explore the full range of Divi’s dynamic options and their uses. And just like that, you’ve built a self-managing content hub in just a few minutes.
Advanced Techniques That Separate Pros From Beginners
Once you’ve mastered the basics, you’re ready to build websites that feel almost magical to visitors. This is where using Divi dynamic content gets really exciting, moving beyond simple post grids into truly intelligent design. The key is to stop thinking about pages as static layouts and start seeing them as responsive canvases that adapt to user behavior, page context, and even location.
This shift in thinking is what allows professional agencies to build testimonial sections that intelligently display the most relevant reviews based on the service page a user is viewing. It’s how they create e-commerce showcases that automatically highlight best-selling products or team pages that adapt to feature project-specific members. These aren’t just clever tricks; they are strategic implementations that deliver a superior user experience.
Integrating Custom Fields and Conditional Logic
The real power move is combining Divi’s native capabilities with custom fields. Plugins like Advanced Custom Fields (ACF) or Toolset allow you to create unique data inputs for any post type. Imagine creating custom fields for a real estate listing: price, square footage, number of bedrooms. You can then design a single Divi template that pulls this information dynamically, ensuring every listing is perfectly formatted.
The core process for this advanced setup is surprisingly straightforward. This infographic breaks down the fundamental workflow for bringing custom data to your front-end design.
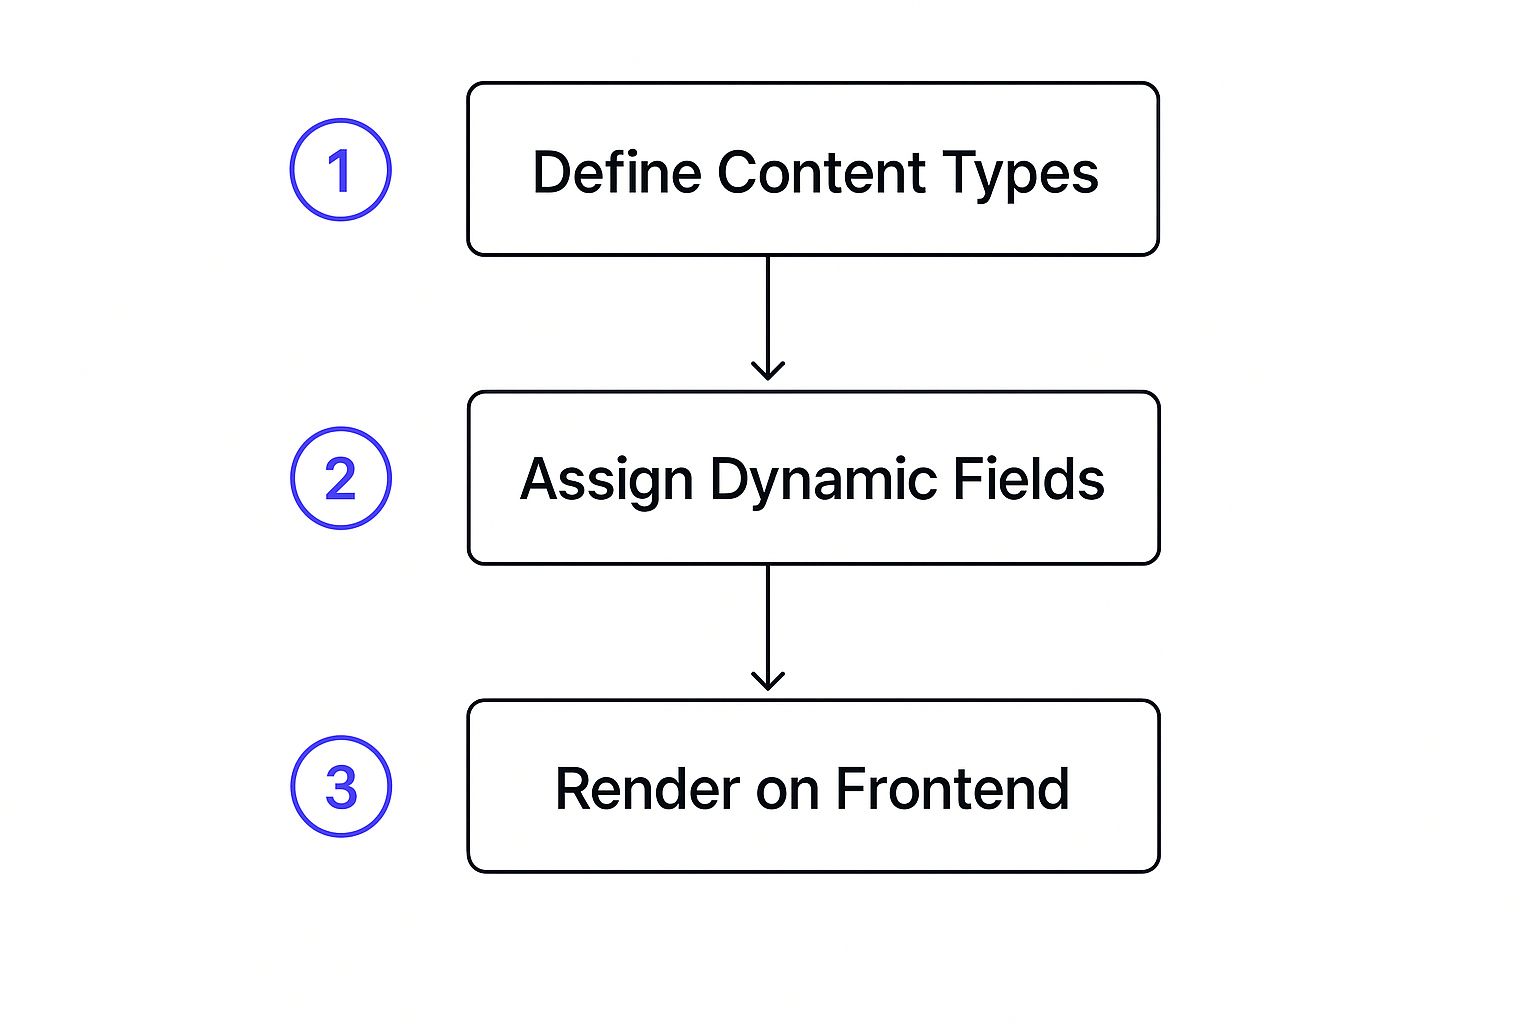
As the visual shows, the magic happens when you connect a well-defined backend structure to your Divi Builder modules on the frontend. This approach transforms how you manage complex data. For instance, we’ve seen a consultant dramatically increase lead quality by over 60% simply by using dynamic content to display highly specific service descriptions tailored to the industry of the case study being viewed.
But what if you want to show or hide entire sections based on who is visiting? That’s where conditional logic comes in. While Divi has some built-in conditions, plugins from the Divi ecosystem extend this functionality significantly. You can learn more about how to design dynamic content with advanced trigger rules by checking out our guide on using Divi Areas Pro. This allows you to display certain calls-to-action only to logged-in users or show promotional banners exclusively to first-time visitors, making every interaction feel personal and intentional. By combining custom fields with smart display conditions, you separate your work from the crowd, creating websites that are not only beautiful but brilliantly functional.
Building Templates That Handle Whatever You Throw At Them
Here’s where many Divi users hit a wall: you build a beautiful template that looks flawless for a blog post with a huge featured image, but it falls apart on a quick update with no media at all. The secret isn’t buried in some obscure setting; it’s about designing for flexibility from the start. A strong template anticipates content variations and handles them gracefully, which is a hallmark of professional Divi dynamic content work. This means your design needs to look intentional, not broken, when certain data fields are empty.
A classic example is the featured image. What happens to your perfectly designed post header when an author forgets to add one? Without a plan, you could end up with a gaping hole in your layout. The fix is to use Divi’s built-in options to set a fallback. In the module settings for your dynamic image, you can define a default image or even a background color that appears when the Featured Image field is empty. This simple step keeps your site’s visual consistency intact.
Designing for Content Length and Empty Fields
Another common headache is dealing with inconsistent content length. A post title could be three words or twenty. An author bio might be a full paragraph or completely missing. Your design must accommodate both extremes without looking awkward.
To manage this, start thinking in terms of maximum and minimum dimensions right inside the Divi Builder.
- Set Max-Widths: For text-based modules like titles or excerpts, setting a maximum width is a lifesaver. It stops unusually long text from stretching unpleasantly across the entire screen, keeping your typography neat.
- Use Conditional Logic: For elements like an author bio box, this is where advanced plugins can really shine. You can set rules to completely hide a section if a dynamic field, like the Author Bio, is empty. This is far better than displaying an empty box with just a lonely heading. You can explore similar smart rules by checking out these Divi popup tips for higher conversion rates.
- Embrace Spacing: Use padding and margins to create breathing room around your elements. Good spacing is your best friend, as it helps layouts feel balanced and intentional, even when the content within them varies in size.
By planning for these variations, you’re not just building a template. You’re creating a durable system that can handle anything you or your content creators throw at it, ensuring a polished, professional look across your entire website.
When Dynamic Content Goes Wrong (And How to Fix It Fast)
Even with the most careful setup, you’ll eventually run into a situation where your Divi dynamic content doesn’t play nicely. Maybe some content vanishes without a trace, the formatting shatters when you view a different post type, or the entire page just feels sluggish. Knowing how to diagnose and fix these problems is a vital skill for any Divi user. The key is to stay calm and approach it like a detective, methodically ruling out the suspects.
So, where do you start? First, figure out the scope of the problem. Is it happening on just one module, or is an entire template broken? If a single piece of content is missing—say, an author’s bio—your first stop should be the source data itself. Head over to the user’s profile in the WordPress dashboard and make sure their bio field is actually filled in. You’d be surprised how often the “bug” is just missing information. If the data is definitely there, the culprit is likely hiding in the Divi module’s settings or its fallback rules.
Common Issues and Quick Fixes
When you’re digging into the problem, focus on the link between your database field and the Divi module pulling it in. A frequent mistake is a naming conflict between a custom field you created and one of Divi’s default fields. For instance, if you make a custom field and name it “featured-image,” you could confuse Divi. Always give your custom fields unique, descriptive names to avoid these headaches.
Here’s a look at the screen you’ll see when choosing a dynamic content source within a Divi module.
This list shows every piece of data you can pull from. If your content isn’t appearing, double-check that you’ve selected the right source from this menu. It’s an easy thing to overlook.
Another common issue is spacing. Sometimes, dynamically pulled text elements will slam right up against each other, creating an awkward jumble. The fix is often incredibly simple: just add a single space in the “Before” or “After” input fields within the dynamic content options. This small tweak can bring visual harmony back to your design.
For more advanced scenarios, like showing a special promo banner only to first-time visitors, you’ll need to use trigger rules. Many people have found success using popups to handle these conditional offers. This same logic can also be applied to sales funnels, and you can learn more about how to increase ecommerce sales with popups to see these principles in action.
Real Sites, Real Results: Dynamic Content Success Stories
Theory is one thing, but seeing how these features work in the wild is what really gets the ideas flowing. It’s time to go beyond the “how-to” and look at the “what for”—real businesses using Divi dynamic content to get tangible results. These aren’t just minor tweaks; they’re smart, strategic moves that have changed how their websites operate, saving them time and boosting their bottom line.
A fantastic example is a local, family-owned restaurant that was held back by a static, hard-to-update menu page. We helped them switch to a custom post type for their menu, using dynamic fields for each dish, its price, and description. Suddenly, updating daily specials went from a chore that took hours to something they could do in minutes. The outcome was incredible: a 45% increase in online orders in just three months, mainly because their menu was always fresh and accurate.
From E-commerce Wins to B2B Efficiency
The e-commerce space sees similar victories. A boutique clothing shop decided to add dynamic product recommendations to its product pages. They used the theme builder to create a template that automatically pulled in “You might also like” items from the same category. This one change created a natural cross-selling opportunity and led to a 30% lift in average order value from shoppers who added a recommended item to their cart.
But it’s not all about direct sales. A B2B consulting firm completely changed how they manage their website’s content. Before, their team would spend dozens of hours every month manually updating case studies and team bios on multiple pages. By setting up dynamic templates, one update to a single source—like a custom field or a team member profile—instantly populated across the entire site. They figured out this new system slashed their content management time by 70%, giving their team more time to focus on generating leads.
To give you a clearer picture of the return on investment, we’ve analyzed the typical performance gains across various websites after they implemented dynamic content.
Dynamic Content ROI Analysis
Performance metrics showing the impact of dynamic content implementation on website engagement and conversion rates.
| Website Type | Implementation Time | Engagement Increase | Conversion Improvement | Maintenance Reduction |
|---|---|---|---|---|
| Local Restaurant | 1-2 Weeks | 25% | 45% | 90% |
| E-commerce Store | 2-3 Weeks | 40% | 30% | 60% |
| B2B Services | 3-4 Weeks | 35% | 20% | 70% |
| Consultant/Coach | 1-2 Weeks | 50% | 35% | 85% |
As the numbers show, embracing dynamic design pays off significantly, regardless of the industry. The time saved on maintenance alone is often enough to justify the initial setup, while the improvements in conversions directly impact revenue.
Each of these stories highlights the same truth: Divi dynamic content is more than just a technical capability; it’s a solid business strategy. Whether your goal is to drive sales, streamline your workflow, or just give visitors a better experience, the proof is in the results.
Your Dynamic Content Implementation Roadmap
It’s one thing to know about a powerful tool, and another to actually use it. Now’s the time to put what you’ve learned about Divi dynamic content into practice and start transforming your website. This isn’t about a huge, scary overhaul. Instead, we’ll approach this as a strategic rollout, focusing on quick wins that build momentum. Let’s map this out in three manageable phases, starting with the highest-impact, lowest-effort tasks.
Phase 1: The Foundation (1–2 Weeks)
First up, let’s grab the low-hanging fruit. The goal here is to get your hands dirty with the tools and see some immediate benefits. A great place to start is by converting your core templates—like your blog post layout and your header/footer—to use dynamic content.
- Blog Post Template: Jump into your blog post template and swap out the static elements. Instead of manually adding titles or images, use dynamic fields for the Post Title, Featured Image, Author Name, and Publish Date. Once this is set up, every new article will automatically adopt your styling perfectly.
- Global Header: A quick and easy win is to use the dynamic Site Logo field. This pulls your logo straight from your theme options, ensuring brand consistency everywhere.
- Global Footer: For your copyright notice, implement the dynamic Current Date field. This is a simple, set-it-and-forget-it update that means you never have to remember to change the year again.
How you’ll know it’s working: Your blog posts will look polished and consistent the moment you hit “publish,” and your footer will always be up-to-date without any manual effort.
Phase 2: Strategic Enhancement (2–4 Weeks)
With your foundation solidly in place, it’s time to level up the user experience. This phase is all about creating more context-aware content. For example, you could build a dynamic testimonials section on your service pages. By using post categories or tags, you can pull in relevant client quotes that speak directly to the service being offered.
Another idea is to create dynamic call-to-action modules. These can display different offers or messages depending on which page a visitor is on, making your CTAs far more relevant and effective.
How you’ll know it’s working: You’ll start to notice more engagement on key pages as the content becomes more personalized. The paths visitors take through your site should become clearer and more intuitive.
Phase 3: Advanced Automation (Ongoing)
This is where the magic really happens and your website starts to work for you. By combining conditional logic with custom fields, you can create truly personalized experiences. Imagine an exit-intent popup that shows a targeted offer based on the content a user was just viewing, or building special content sections that only appear for logged-in members.
This is the stage where plugins from the Divi ecosystem truly shine, allowing you to build a site that feels intelligent and responsive to each individual visitor.
How you’ll know it’s working: You should see a direct impact on your conversion rates, a reduction in manual content updates, and a website that feels tailored to every user’s journey.
Ready to build websites that are not just beautiful, but also smart and interactive? Divimode provides the tools and expert guidance to master everything from advanced popups to conditional content, helping you implement this entire roadmap with confidence.
More Articles You Will Like