
If you've spent any time in the WordPress world, you've probably heard of Popup Maker. It's hands-down the most popular plugin for creating popups, modals, and content overlays that actually get results. Think of it as a smart tool designed to grab your visitors' attention, grow your email list, and boost sales—all without touching a single line of code.
What Is Popup Maker and How Does It Drive Conversions?
Imagine your website is a physical store. People wander in, look around, and many walk right back out without ever talking to anyone. A sharp retail employee knows the perfect moment to step in—not to be pushy, but to offer a helpful discount, point out a popular item, or invite them to a loyalty program.
That’s exactly what Popup Maker does for your WordPress site. It’s your digital sales assistant, strategically engaging visitors at just the right time.
The real problem it solves is turning passive window shoppers into active customers. Instead of letting potential leads drift away, Popup Maker gives you the power to present a compelling offer, guide users toward important content, or stop cart abandonment in its tracks with a last-minute coupon. It helps transform your site from a static online brochure into an interactive conversion machine.
The Power of Proactive Engagement
The real magic of this plugin is its ability to be proactive. Why wait for a user to hunt for your newsletter signup form buried in the footer? Instead, you can pop it up right after they've finished reading a blog post, a clear signal they're interested in what you have to say.
Let's break down some of the key ways it can help your site:
- Building Your Email List: You can display opt-in forms triggered by specific user actions, like when they're about to leave your site (this is called exit-intent). A common and powerful strategy is to build an effective email list by capturing leads at the perfect moment.
- Boosting Sales and Promotions: Got a flash sale or a new product launch? Announce it with an eye-catching banner that only appears on specific pages, grabbing attention where it matters most.
- Reducing Cart Abandonment: Someone's about to leave the checkout page without buying? Use exit-intent technology to offer them a small discount code. It's often just the nudge they need to complete the purchase.
- Improving User Experience: It's not all about sales. You can use popups to guide visitors with welcome messages, handle cookie consent notices, or set up age verification gates without disrupting their browsing flow.

This kind of setup is exactly where a tool like Popup Maker fits into a larger marketing strategy. It's about creating and deploying targeted campaigns that drive growth and conversions directly from your website.
There's a reason Popup Maker has become a go-to tool for so many. With over 780,000 active users, it has helped countless site owners turn their websites into conversion powerhouses. In the massive WordPress ecosystem, where the platform powers a staggering 43.2% of all websites, tools like this are no longer a "nice-to-have"—they're essential for creating a dynamic user experience. The numbers don't lie; you can dig into more popup marketing statistics to see the real-world impact.
Popup Maker Core Features at a Glance
To give you a clearer picture, here’s a quick rundown of what Popup Maker brings to the table and how you might use its core features.
| Feature | Primary Benefit | Example Use Case |
|---|---|---|
| Popup Editor | Create and customize popups with a familiar WordPress interface, no coding needed. | Designing a simple newsletter signup form with custom text and colors. |
| Targeting Conditions | Control exactly where and when your popups appear based on pages, posts, or user roles. | Showing a special offer only on your WooCommerce product pages. |
| Triggers | Choose how a popup is activated, such as on-click, after a time delay, or on scroll. | A contact form popup that appears when a user clicks a "Contact Us" button. |
| Exit-Intent Technology | Detects when a user is about to leave your site and triggers a popup at that moment. | Offering a discount coupon to a user who is about to abandon their shopping cart. |
| Form Integrations | Works seamlessly with popular form plugins like Ninja Forms, Gravity Forms, and Contact Form 7. | Capturing leads using a complex, multi-step Gravity Form inside a popup. |
| Cookies | Control how often a visitor sees a popup to avoid annoying them. | Setting a cookie so a welcome popup only appears once per visitor. |
These features work together to give you precise control over your marketing messages, ensuring they reach the right person at the right time, without being intrusive.
Your First Steps with Installation and Configuration
Jumping into a new plugin can feel a little intimidating, but getting started with Popup Maker is surprisingly painless. Seriously. It’s designed to be intuitive right out of the box, letting you go from installation to a live popup in just a few minutes.
The whole process kicks off right where you'd expect: your WordPress dashboard. No need to download zip files or mess with complicated uploads. You can grab it straight from the official WordPress plugin repository.
Installing the Plugin from Your Dashboard
First, head over to the Plugins section in your WordPress admin menu and click on Add New. This opens up the massive plugin marketplace. In the search bar at the top right, just type in "Popup Maker."
You’ll see it pop up as one of the first results—it’s hard to miss, with over 700,000 active installations. Once you’ve found it, click the Install Now button. WordPress does its thing in the background, and after a few moments, the button will switch to Activate. Go ahead and click that, and you're all set.
For a more detailed walkthrough, our guide on how to install a plugin in WordPress breaks down every step with screenshots. Once activated, a new "Popup Maker" item will appear in your admin menu. This is your new command center for everything popup-related.
Creating Your Very First Popup
With the plugin installed, it’s time for the fun part. Click on Popup Maker in your sidebar, then choose Create Popup. This brings you to the Popup Editor, which was cleverly designed to look and feel just like the classic WordPress editor. You'll feel right at home.
The first thing you’ll want to do is give your popup a name. This is just for you, so make it descriptive. Something like "Welcome Mat Newsletter Signup" or "Holiday Sale Promo" will save you a lot of guesswork later on when you have a bunch of popups to manage.
Right below the name field is the main content editor. Here, you'll add the popup's title (what your visitors see) and the body content. You can write text, drop in images, or even embed videos, just like you would on any other WordPress page.
Key Takeaway: The real beauty of the Popup Maker editor is its familiarity. By sticking to the standard WordPress interface, it completely flattens the learning curve. You get to focus on crafting a great message, not wrestling with a complicated new builder.
Configuring Basic Display Settings
Once your content is ready, scroll down a bit to the Popup Settings box. This is mission control for defining how, when, and where your popup shows up. For this first one, let's stick to the basics.
You'll spot several tabs like "Triggers," "Targeting," and "Display." All we need to worry about right now is setting a trigger.
- Click on the "Triggers" tab. This is where you tell the popup what should make it appear.
- Click "Add New Trigger." A dropdown menu will appear with a few different choices.
- Select "Time Delay / Auto Open." This is probably the most common trigger out there, perfect for welcome messages or general announcements.
- Set the "Delay" time. A value of 5000 milliseconds (5 seconds) is a great starting point. It gives your visitors a moment to get their bearings before the popup appears.
- Click "Add."
And that's it! You've just told the popup to open automatically five seconds after a visitor lands on a page. The plugin takes care of all the other defaults, like adding a close button and handling the basic styling.
When you’re happy with everything, just hit the blue Publish button at the top right of the screen. Congrats—your first popup is officially live and ready to start engaging your audience
Unlocking Advanced Targeting and Trigger Options
So, you’ve set up your first popup and seen just how easy it is to get started. Now it's time to dive into the real magic behind Popup Maker: its advanced targeting and trigger system. This is where you graduate from generic popups to intelligent, context-aware campaigns that actually feel helpful to your visitors.
Think of it like this: a basic popup is a billboard on a highway. Everyone who drives by sees the same message, regardless of who they are or where they're going. An advanced popup, on the other hand, is like a personal shopper who knows exactly what you're looking for and when to step in with a suggestion.
That level of precision comes from mastering two key concepts: Triggers and Targeting Conditions.
Triggers: The “When” Behind Your Popup
Triggers are the specific actions that make your popup appear. They answer the question, "When should this happen?" A simple time delay can work, but the real power comes from tying your popups to actual user behavior.
Here are a few of the most effective triggers:
- Exit Intent: This one’s a classic for a reason. Popup Maker can tell when a visitor's cursor is heading for the back button or the address bar, signaling they’re about to leave. This is your last chance to reel them back in with a special offer, ask for feedback, or capture an email.
- Click Open: This trigger turns any link, button, or menu item on your site into a popup activator. It’s perfect for creating a less intrusive experience, like a login form that appears from a "Login" link in your navigation, or a detailed spec sheet that opens from a "Learn More" button.
- Scroll Trigger: You can set a popup to fire only after a user has scrolled a certain percentage down the page. This is a great way to ensure your message is only seen by visitors who are already engaged with your content.
The goal is to align your popup with the user's journey. When you respond to their actions instead of just interrupting them, the whole interaction feels more natural and relevant.
Moving beyond simple time delays and focusing on behavior is what separates an annoying popup from a genuinely useful one.
Targeting Conditions: The “Who” and “Where”
While triggers handle the "when," Targeting Conditions are all about the "who" and "where." This is how you make sure your carefully crafted message gets in front of the right people, on the right pages. The best part? You can layer multiple conditions to create hyper-specific audience segments.
This flowchart gives a simple overview of the basic workflow you'll follow in Popup Maker before you start layering on these advanced rules.
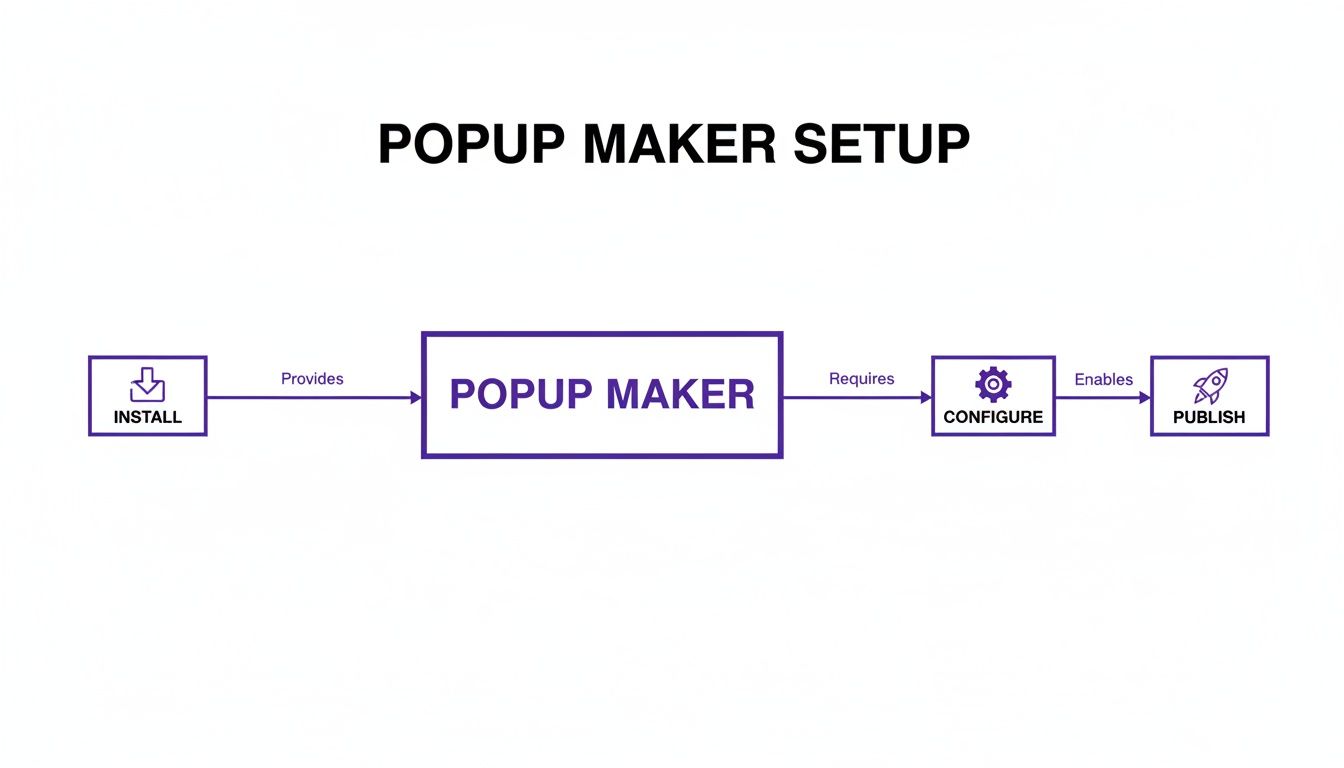
Once you've nailed these foundational steps, you can start applying the real targeting power.
Here are a few real-world examples of how you can use targeting conditions:
- Page-Specific Targeting: Display a popup offering last-minute shipping details, but only on your checkout page.
- Content-Specific Targeting: Show a unique newsletter signup form on all blog posts tagged with "Beginner Tips," offering a relevant ebook download.
- Device-Specific Targeting: Create a smaller, mobile-friendly popup that only appears for visitors on smartphones or tablets.
- User Role Targeting: Present a special discount offer that's only visible to logged-in customers.
This level of granularity is what sets Popup Maker apart. WordPress powers a massive portion of the web—somewhere between 43% and 65.1% of all websites—giving plugins like this a huge potential audience. With over 780,000 active users, it's clear these advanced targeting features are essential for driving conversions on a global scale. You can find more insights on the reach of popular WordPress plugins here.
By combining smart triggers with precise targeting conditions, you can transform your popups from generic announcements into personalized, high-impact marketing tools. Imagine a welcome message for first-time visitors from a specific country, a special offer for returning customers browsing a certain product category, or a feedback form that only appears after someone completes a purchase.
This is the kind of control that ensures your messages are not just seen, but are genuinely relevant and valuable to the person on the other side of the screen.
Proven Popup Recipes for Maximum Impact
Knowing all the individual features and settings inside the Popup Maker WordPress plugin is a good start. But the real magic happens when you combine them into effective campaigns that actually get results. This is where we shift from theory to practice with some proven "recipes" for the most common and high-impact popups you can build.
Think of each recipe as a clear blueprint—the trigger, the targeting, and the content—that you can follow to hit a specific goal. Instead of just knowing what an exit-intent trigger is, you'll see exactly how to wire it up to capture leads right before they leave your site. Let's turn these abstract concepts into real-world strategies you can set up today.
Recipe 1: The List-Building Exit Popup
This one is the quintessential lead generation machine. The entire goal is to catch visitors right as they're about to leave and give them a compelling reason to join your email list before they're gone for good. A well-timed exit-intent popup can honestly recover between 10% to 15% of visitors you would have otherwise lost forever.
The Ingredients:
- Trigger: Exit Intent. This is the heart of the recipe. The popup only shows up when a user's cursor zips toward the top of the browser, signaling they're about to close the tab or hit the back button.
- Targeting Conditions: You'll want to apply this popup to your most valuable content pages—think blog posts, detailed guides, and service pages. At the same time, make sure to exclude it from your checkout or contact pages where it could feel distracting or interrupt a conversion.
- Content: Keep the message simple and focused on value. A strong headline like "Before You Go…" or "Get Our Best Tips" works wonders. Your content should offer a clear, irresistible incentive (like a free guide, a checklist, or a discount code) in exchange for their email. Just embed a simple form from your email provider, and you're set.
By targeting engaged readers on your best content at the exact moment of departure, you're presenting a super-relevant offer without ever getting in the way of their browsing.
Recipe 2: The Seamless Click-Triggered Login Form
So many websites hide their login form on a completely separate page, which forces returning users to click away and wait for a new page to load. This recipe creates a much smoother, more professional experience by putting the login form inside a popup that appears directly from a link in your navigation menu.
The Ingredients:
- Trigger: Click Open. This is the key. You'll need to give your "Login" menu item a unique CSS selector (for example,
#menu-item-login a) and use that as the click trigger. - Targeting Conditions: This popup needs to be available sitewide so users can log in from literally anywhere on your site. No need for any page-specific rules here.
- Content: The popup should just contain your standard WordPress login form. Most form plugins have login form modules, or you can often use a shortcode from a membership or security plugin. Keep the design clean and focused entirely on the login fields.
This simple change dramatically improves the user experience. It keeps people on their current page while they log in, which reduces friction and makes your site feel much more modern and responsive.
Pro Tip: When you set up a click-triggered popup, make sure your link or button has a crystal-clear call-to-action. Text like "Login Here" or "Open Form" leaves no doubt in the user's mind about what will happen when they click.
Recipe 3: The Time-Delayed Promotional Banner
Looking to promote a special offer or a new product without being overly aggressive? A time-delayed popup is your best friend. It gives visitors a moment to land on the page and get their bearings before you present your offer, which makes it feel less like an interruption and more like a helpful heads-up.
The Ingredients:
- Trigger: Time Delay / Auto Open. I’ve found that a delay of about 10-15 seconds (that's 10000-15000 milliseconds in the settings) is the sweet spot. It's long enough for someone to understand what the page is about, but short enough to grab their attention before they click away.
- Targeting Conditions: Get specific with this one. Target a particular product category in WooCommerce or a group of closely related pages. For instance, if you're running a sale on hiking boots, you should only show the popup on pages within your "Outdoor Gear" category.
- Content: This is where visuals matter. Use a high-quality product image, a bold headline announcing the sale ("25% Off All Hiking Boots!"), and a clear call-to-action button that links people straight to the sale page.
Recipe 4: The Cookie-Controlled Welcome Message
First impressions are everything. This recipe uses cookies to show a warm welcome message only to first-time visitors, letting you guide them to your best content without ever annoying your regular readers.
The Ingredients:
- Trigger: Time Delay / Auto Open. A short delay of just 3-5 seconds works perfectly. You just want to give the page a moment to load first.
- Targeting Conditions: Set this to appear on your homepage or maybe a few key landing pages where new visitors are most likely to arrive.
- Cookie Settings: This is the most critical part of the recipe. You need to create an "On Popup Open" cookie. This tells the Popup Maker WordPress plugin to drop a cookie in the user's browser the instant the popup is displayed. Set the cookie duration to something long, like 1 year, to make sure that visitor won't see it again anytime soon.
- Content: Keep the message friendly and helpful. Welcome them to your site and maybe offer a link to your "Start Here" page, your most popular articles, or a special introductory discount for new customers.
By getting the cookie configuration right, you create a really nice, personalized experience that acknowledges new visitors while respecting the journey of your returning fans.
So, How Does Popup Maker Actually Work with Divi?
For the massive community of Divi users, bringing any new plugin into the mix always raises a few key questions. Will it play nice with the Divi Builder? Is it going to slow my site down? When it comes to a powerful tool like Popup Maker, the answer is a bit of a mixed bag—you get some incredible benefits, but there are a few hurdles to be aware of.
The easiest way to think about Popup Maker and Divi is as two separate systems working side-by-side. Popup Maker does its thing outside the Divi Builder, using the classic WordPress editor to create the popup's content. This separation is both its biggest strength and its main limitation.
The Major Advantages for Divi Users
The single biggest win here is getting access to Popup Maker’s incredibly sophisticated targeting and trigger engine without shelling out for a premium Divi extension. You can launch popups based on super-specific conditions—like user roles, the number of pages someone has viewed, or even certain parameters in a URL. That's a level of control that goes way beyond Divi’s built-in capabilities.
Because it operates independently, you can build out complex marketing campaigns that aren't tied to Divi's internal logic. For instance, you could trigger a popup based on a user's interaction with a non-Divi element on your site.
- Advanced Targeting: You can set up granular rules that Divi alone just can't handle, like showing a popup only to shoppers who have a specific product in their WooCommerce cart.
- Cost-Effective Power: The free version gives you access to advanced features like exit-intent triggers and detailed cookie settings, which almost always require a paid addon in the Divi ecosystem.
- Plugin Independence: Since it doesn't rely on the Divi Builder, your popups will keep working perfectly even if you have to temporarily disable the builder for troubleshooting.
Potential Friction Points and Limitations
Now for the flip side. The primary drawback is the design workflow. You can't just open up the familiar drag-and-drop Divi Builder to style the content inside your popups. Instead, you're back in the standard WordPress editor, which can feel pretty restrictive for anyone used to Divi's visual freedom.
This means getting your popups to perfectly match the slick, custom design of your Divi site can be a real challenge. You'll almost certainly need to dip into some custom CSS to get your fonts, button styles, and spacing just right and keep everything on-brand.
Key Consideration: The trade-off is crystal clear: you sacrifice the seamless design experience of the Divi Builder for a much more powerful and precise targeting engine. The right choice really boils down to your top priority—is it pixel-perfect design integration, or is it advanced marketing automation?
Another point of friction is trying to use Divi modules inside a popup. While you can drop shortcodes into a popup's content, embedding complex Divi layouts or modules isn't a native feature. It often requires technical workarounds that can be flaky and unreliable. For a deeper dive into different methods, check out our guide on how to add popups in Divi with six different options.
At the end of the day, Popup Maker can be an amazing tool for Divi users who need robust targeting features and are comfortable writing a bit of custom CSS to nail the final look. However, if your main goal is to design visually rich popups using the Divi Builder itself, a native solution like Divi Areas Pro or Popups for Divi will be a much better fit for your workflow.
Popup Maker vs Divi Native Solutions
Alright, so how does a powerhouse like Popup Maker stack up against tools built specifically for Divi? It really boils down to a head-to-head comparison. While the Popup Maker WordPress plugin brings a seriously powerful, standalone engine to the table, Divi-native solutions like Divi’s own features or our Divi Areas Pro promise a design experience that feels right at home.
Let's put them side-by-side to see where each one shines.
The core difference is all about philosophy. Divi-native tools are built for a seamless design workflow, letting you craft popups visually with the Divi Builder you already know and love. Popup Maker, on the other hand, is laser-focused on its targeting engine, giving you an incredible amount of control over who sees your popups and when—even in the free version.
A Head-to-Head Comparison
To make the choice a bit clearer, let's break things down feature by feature. This should help you figure out which tool is the right fit for your project, whether you're chasing pixel-perfect design or running complex, behavior-driven marketing campaigns.
Popup Maker vs Divi Popup Solutions
Choosing the right popup tool for your Divi site often feels like picking between two different paths to the same destination. One path offers incredible, granular control over your marketing engine, while the other provides a beautifully integrated design experience. This table breaks down the key differences to help you decide which path is yours.
| Feature | Popup Maker | Divi Native Alternatives (e.g., Divimode) |
|---|---|---|
| Design Flexibility | Uses the classic WordPress editor. You'll need some custom CSS to get it to match Divi styles perfectly. | Full Divi Builder integration. Build everything with familiar drag-and-drop modules. |
| Trigger Sophistication | Extremely advanced free options, including exit-intent, scroll depth, and robust cookie controls. | Basic triggers are available, but advanced options like exit-intent usually require a premium plugin. |
| Targeting Rules | Granular free targeting by page, post, user role, and more. Advanced extensions add even more power. | Targeting is often tied to the Divi ecosystem, which can be simpler but less flexible. |
| Ease of Styling | More challenging for Divi users. Can feel disconnected from your site's design without some CSS work. | Effortless. Popups naturally inherit your theme's styles, fonts, and colors. |
| Performance Impact | Generally lightweight, but performance depends on the complexity of your content and targeting rules. | Highly optimized for the Divi framework, ensuring minimal impact on site speed. |
| Overall Cost | Offers a feature-rich free version. Premium extensions are available for specialized needs. | Basic features are built-in, but advanced functionality requires a premium plugin like Divi Areas Pro. |
As you can see, there's a clear trade-off here. If your number one goal is to build visually stunning popups using the Divi Builder without leaving your comfort zone, a native solution is the clear winner. But if marketing muscle is what you're after, Popup Maker's free version is tough to beat.
Key Takeaway: Divi-native tools offer an unmatched design experience, while Popup Maker provides a superior marketing and targeting engine, especially in its free version. The best choice depends entirely on whether your primary goal is design fidelity or targeting precision.
When to Choose Each Option
So, how do you make the final call? It really comes down to what you're trying to accomplish, your budget, and how comfortable you are poking around in a stylesheet.
Choose Popup Maker when: Your marketing strategy requires complex targeting rules, you need advanced triggers like exit-intent on a tight budget, and you don’t mind writing a bit of custom CSS to make the design match your Divi theme.
Choose a Divi-native solution when: Your absolute top priority is creating beautiful, on-brand popups with the Divi Builder, you want a workflow that feels seamless and integrated, and you're ready to invest in a premium plugin for those advanced features.
Ultimately, both paths can get you to a successful popup campaign. By understanding their core strengths and weaknesses, you can confidently pick the popup maker for your WordPress site that will hit your conversion goals without creating a bunch of extra work for yourself.
Got Questions About Popup Maker? We've Got Answers
Even with a tool as straightforward as the Popup Maker WordPress plugin, a few questions always come up. Let's tackle some of the most common ones so you can move forward with confidence.
Free vs. Premium: What's the Real Difference?
Honestly, the free version of Popup Maker is a powerhouse. It gives you all the core features you'd expect, like exit-intent triggers, time delays, and solid cookie controls. For many websites, this is more than enough to get effective lead generation and promotional campaigns off the ground.
So, when should you upgrade? The premium extensions are built for very specific, advanced marketing needs. Think of them as specialized tools for complex jobs. They unlock features like:
- Advanced Targeting Conditions: Go beyond the basics and target users based on their device, the site they came from, or even how many pages they've looked at.
- Scheduling: Got a flash sale? Set your popups to run only during specific dates or times. Perfect for limited-time offers.
- Age Verification Modals: An absolute must-have for websites with age-restricted content.
The bottom line is you only need to go premium if your strategy demands these laser-focused capabilities.
Will It Slow Down My Website?
This is a fair question for any plugin you add to your WordPress site. The good news is that Popup Maker itself is well-coded and pretty lightweight. A simple text popup will have virtually zero impact on your site's performance.
Where you might run into trouble is with what you put inside your popups. If you start loading them up with massive, unoptimized images or heavy scripts, you could see a slight dip in speed. The key is just to follow good web practices: compress your images and keep the popup content as lean as possible. Do that, and you'll keep things zipping along for your users.
Can I Use Shortcodes from Other Plugins?
Yes, you absolutely can! This is one of Popup Maker's biggest strengths. The content editor for your popups works just like the classic WordPress editor, which means it has full support for shortcodes.
This opens up a world of possibilities. You can drop in a contact form from Gravity Forms, a login form from your membership plugin, or even a product slider from WooCommerce. It essentially turns Popup Maker into a central hub for displaying dynamic content from all your other favorite tools.
This flexibility means you're never stuck with just text and images. You can create some seriously functional and interactive popups.
Ready to create stunning, high-converting popups with the seamless integration of the Divi Builder? Divimode offers the tools you need. Explore our powerful solutions and start building better popups today at https://divimode.com.
More Articles You Will Like