To speed up your WordPress website, you need a clear plan. It starts with figuring out where you are right now by establishing a performance baseline with tools like Google PageSpeed Insights. From there, it's a systematic process of tackling the biggest bottlenecks, like optimizing your hosting, enabling caching, compressing images, and cleaning up your code. This is how you turn a slow, clunky site into a fast, responsive experience that keeps users happy and boosts your SEO.
Why Site Speed Is Non-Negotiable and How to Measure It
A slow website isn't just a minor annoyance; it's a direct hit to your bottom line and your brand's reputation. In a world where attention spans are measured in seconds, every millisecond truly matters. But before you dive into tweaking settings or installing new plugins, it's critical to understand why speed is so important and, more practically, how to get an accurate read on your site's current performance.
Think of this initial measurement as your "before" photo. Without it, you’re essentially flying blind. You won't be able to tell if your changes are actually helping or hurting, and you'll miss out on the satisfaction of seeing tangible, data-driven improvements. This baseline gives you a clear starting point to track your progress and celebrate real wins.
The Real Cost of a Slow Website
Slow load times don't just test a visitor's patience—they actively push potential customers away. It's not an exaggeration. A measly one-second delay can slash conversions by a whopping 7%. Push that delay past two seconds, and you’ll see customer satisfaction plummet by 16% as bounce rates spike.
To put that into real-world numbers, just dropping your load time from 3.5 seconds to 1.2 seconds can cut your bounce rate from 60% down to 35%. That's a massive improvement in engagement from what seems like a small tweak.
On top of that, search engines like Google are obsessed with user experience, and they use page speed as a major ranking factor. A sluggish site can directly sabotage your SEO efforts, making it much harder to climb the search results and pull in valuable organic traffic. For a deeper look into this, check out this great article on why speed matters and practical fixes for slow websites.
How to Get Your Performance Baseline
To get a reliable baseline, you need the right tools for the job—ones that can analyze your site and spit out actionable data. The two most trusted names in the game are Google PageSpeed Insights and GTmetrix. These platforms don't just give you a generic "speed score"; they break down your site's performance into specific components, showing you exactly where the problems lie.
When you run your tests, you'll see a lot of different metrics. Here are the ones you absolutely need to pay attention to:
- Largest Contentful Paint (LCP): This measures how long it takes for the biggest, most important piece of content (usually an image or a block of text) to become visible. Anything under 2.5 seconds is considered good.
- Interaction to Next Paint (INP): This is all about responsiveness. It measures the delay between a user's action (like a click) and the browser's response. You want this to be below 200 milliseconds.
- Cumulative Layout Shift (CLS): This tracks visual stability. It measures how much your page content unexpectedly jumps around as it loads. A good CLS score is less than 0.1.
These three metrics are what Google calls the Core Web Vitals. They are direct ranking signals because they reflect the real-world experience a user has on your site. If you want to get into the nitty-gritty, we have a complete guide on website performance monitoring tools that covers all this and more.
To help you get your head around these terms, here’s a quick reference table.
Key Performance Metrics and What They Mean
| Metric | What It Measures | Good Score |
|---|---|---|
| Largest Contentful Paint (LCP) | The time it takes for the main content of a page to load. | Under 2.5 seconds |
| Interaction to Next Paint (INP) | The site's responsiveness to user interactions like clicks and taps. | Below 200 ms |
| Cumulative Layout Shift (CLS) | The visual stability of the page during loading. | Less than 0.1 |
| First Contentful Paint (FCP) | The time it takes for the first piece of content to appear on the screen. | Under 1.8 seconds |
| Time to First Byte (TTFB) | The time it takes for the browser to receive the first byte of data from the server. | Under 800 ms |
Understanding these metrics is the first step toward making meaningful improvements. They give you a clear language to diagnose problems and track your progress.
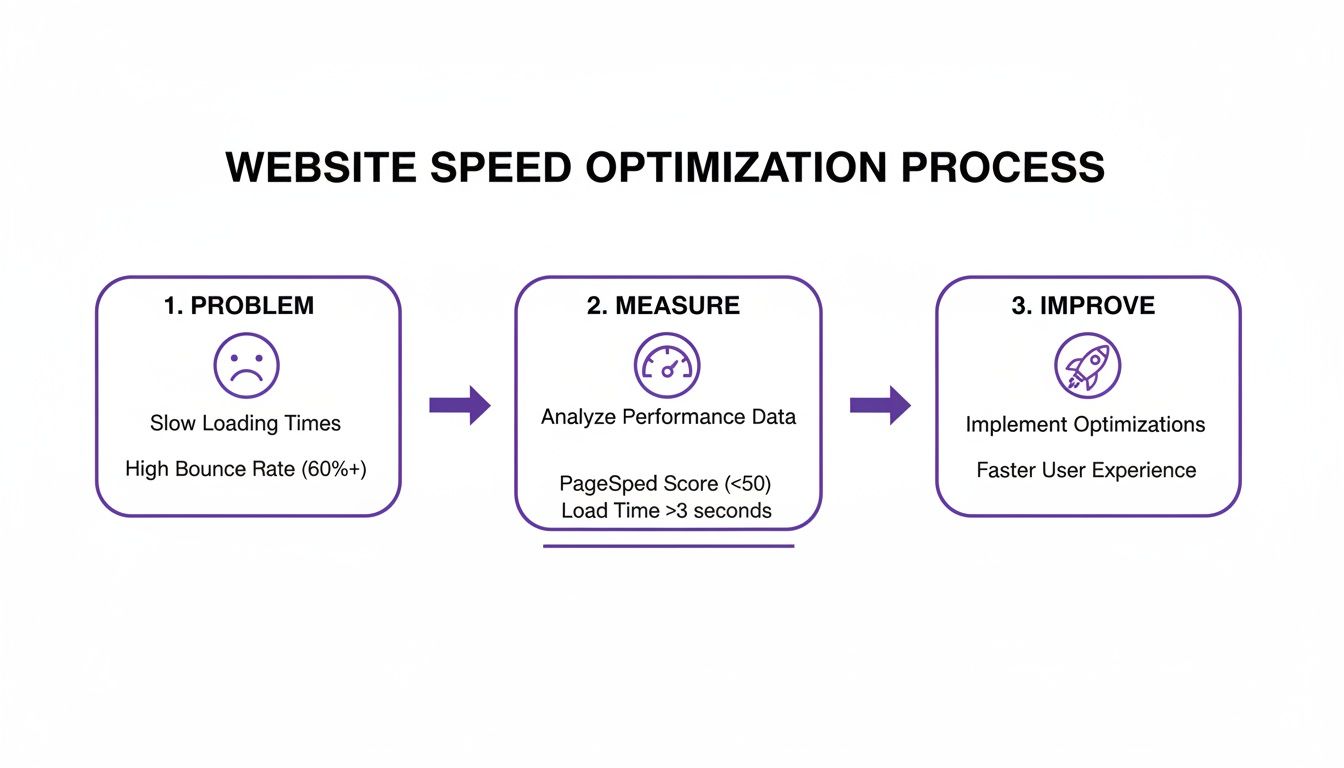
This visual really nails down the process. It's a simple but powerful cycle: identify the problem, measure its impact, and then take targeted action to make things better. That's the core of effective website optimization.
3. Lock in Your Foundation: Hosting, Caching, and CDN
Once you've got a baseline from your performance tests, it's time to look at the absolute bedrock of your website: the hosting. I like to think of a web host as the engine in a car. You can tune everything else to perfection, but if the engine is underpowered, you’re never going to win the race. Making a smart choice here is one of the most powerful moves you can make to speed up your Divi site right from the start.
A lot of us begin our journey with shared hosting because, let's be honest, it's cheap. The catch? Your site is crammed onto a server with hundreds of others, all fighting for the same CPU and RAM. When one of those "noisy neighbors" gets a huge traffic spike, your site can slow to a crawl. It’s a classic recipe for inconsistent performance.
The Hosting Hierarchy
For any serious website, moving beyond shared hosting is a non-negotiable step. The two main upgrades are a Virtual Private Server (VPS) or a dedicated Managed WordPress Hosting plan. A VPS is a solid step up, giving you a guaranteed slice of server resources for more power and stability. The downside is that you're usually on your own to manage, secure, and optimize the server, which can be a real headache if you're not a sysadmin.
This is where managed WordPress hosting really shines. Companies like Kinsta or WP Engine have built their entire platform specifically for WordPress. They handle all the tricky server-side optimizations, security hardening, and updates for you. It costs more, sure, but the investment pays for itself in raw speed, uptime, and the simple peace of mind that comes with it.
Key Takeaway: Your hosting choice sets the performance ceiling for your entire website. Investing in quality managed WordPress hosting is the single most impactful upgrade you can make for immediate and lasting speed improvements.
The Power of Caching
With a solid hosting foundation in place, the next layer is caching. Think of caching as creating a temporary memory for your website. Instead of your server building a page from scratch every single time someone visits—running database queries, processing code—it just serves up a pre-built static HTML version. It's dramatically faster.
You'll generally encounter two types of caching:
- Server-Side Caching: This is the gold standard. High-performance hosts handle this directly at the server level, which is incredibly fast and means you don't have to configure a thing. It just works.
- Plugin-Based Caching: If your host doesn't offer robust server-level caching, or if you want more fine-grained control, a caching plugin is essential. These tools not only create static files of your pages but often pack in other speed-boosting features like code minification.
If you're exploring plugin options, we've put together a list of the most popular caching plugins to help you sort through the choices. And if you're leaning toward a specific tool, a good in-depth WP Rocket review can offer some great real-world insights into its setup and impact.
Supercharge Your Global Reach with a CDN
The final piece of this foundational puzzle is a Content Delivery Network (CDN). A CDN is a game-changer for reaching a global audience. It takes your site's static files—like images, CSS, and JavaScript—and copies them to a network of servers all around the world. These are often called Points of Presence (PoPs).
When someone visits your site, the CDN serves those files from the server that's geographically closest to them.
This screenshot from Cloudflare gives you a sense of how a global network works to get your content to users faster, no matter where they are. By shrinking the physical distance the data has to travel, a CDN drastically reduces latency and slashes load times for your international visitors.
The results speak for themselves. With over 40 million sites now using CDNs, these networks can cut load times by up to 50%. Combine that with a good caching plugin, which can make sites 40% faster, and you start to see why well-optimized sites get a traffic boost of around 20%. Fast hosting, smart caching, and a powerful CDN—that's the trifecta for a blazing-fast WordPress site.
Optimizing Your On-Page Assets and Media

Alright, you've sorted out your hosting and set up a CDN. That’s a massive step forward, but the next performance battle is fought right on your pages. The assets you upload—especially images—are almost always the heaviest part of a webpage.
I've seen it countless times: a beautiful, high-resolution hero image that single-handedly undoes all the hard work put into server optimization. Every extra kilobyte adds to the page weight, forcing visitors to download more data. This is a killer for users on mobile or slower connections, creating a frustrating experience that sends them packing.
Choosing the Right Image Format
Before you even think about uploading an image, picking the right file format is your first line of defense. It’s a simple choice that can make a huge difference in speeding up your WordPress site.
Here's a quick and dirty breakdown of the formats I use every day:
- JPEG (or JPG): Your go-to for photographs and images with lots of colors and gradients. JPEGs use "lossy" compression, meaning some data is discarded to shrink the file size. The trick is finding that sweet spot between file size and visual quality.
- PNG: Perfect for anything that needs a transparent background, like logos or icons. PNGs use "lossless" compression, keeping all the original data, which usually means larger files than JPEGs.
- WebP: This is the modern powerhouse format from Google. WebP images are typically 25-34% smaller than their JPEG counterparts with no noticeable drop in quality. With broad browser support, it's a no-brainer for performance.
For a really deep dive into this, check out our guide on optimizing images for WordPress. It’s packed with actionable steps.
Pro Tip: I highly recommend converting your existing JPEGs and PNGs to WebP. It's one of the quickest ways to shed page weight. Most good image optimization plugins can handle this automatically, serving WebP to browsers that support it and falling back to the original format for those that don't.
Automating Image Compression
Let's be real—manually compressing every single image is a tedious job that's easy to forget. That’s where image optimization plugins become your best friend. Tools like Smush, ShortPixel, or Imagify are absolute lifesavers.
Set one of these up, and every time you upload an image, the plugin will automatically shrink its file size based on your settings. They can also run a bulk optimization on your entire media library, giving you an instant performance bump across your whole site. It’s a "set it and forget it" solution that ensures every image is as light as possible.
Implementing Lazy Loading
Lazy loading is easily one of the most powerful tricks in the performance playbook. Instead of forcing the browser to download every image on a page right away, lazy loading defers anything that's "below the fold." An image only starts downloading when a user scrolls and it's about to appear on their screen.
This makes a huge difference in initial load time, making the page feel incredibly fast. It's especially effective for long-form articles or image-heavy portfolio pages. This technique is so crucial that industry projections show 85% of high-traffic WP sites will use it by 2025, cutting their initial load times by an average of 40%.
WordPress has had native lazy loading since version 5.5, which is a great start. However, I've found that dedicated performance plugins often provide more advanced controls and better compatibility, making sure the feature works perfectly with any theme or browser.
Streamlining Your Code and Auditing Plugins
Every single plugin, theme feature, and third-party script you add to your WordPress site comes with a performance cost. Think of each one as a small item in a backpack you're carrying on a long hike. A few items are no big deal, but they add up quickly, and soon that backpack is weighing you down. This section is all about lightening that load by cleaning up your code and being ruthless with your plugins.
These optimizations are crucial for improving your site's initial render time. When a browser loads your page, it has to download, parse, and execute every CSS and JavaScript file it finds. The more files and the larger they are, the longer it takes before your visitor sees anything useful on their screen. This is where a few smart techniques can dramatically speed up your WordPress website.

Minify and Combine Your Code
When developers write code, they use spacing, comments, and long, descriptive variable names to make it readable for humans. This is great for maintenance but adds unnecessary weight to the files. Minification is the process of stripping all of this extra stuff out—comments, whitespace, and line breaks—to make the file as small as possible.
Similarly, a typical WordPress site, especially one built with Divi, might load dozens of individual CSS and JavaScript files. Each file requires a separate request to the server, which adds up to a lot of small delays. Concatenation is the process of combining multiple files into a single one (e.g., ten CSS files into one). This reduces the number of server requests, which is a major win for performance.
Many performance plugins, like WP Rocket or LiteSpeed Cache, can handle both minification and concatenation with a few clicks.
Defer Non-Critical Scripts
Not all JavaScript needs to load right away. Think about scripts for your comment section, social sharing buttons, or a popup that only appears after a delay. These are perfect candidates for deferral.
By deferring a script, you're telling the browser, "Don't load this file yet. Go ahead and render the important visual stuff first, and then come back for this when you're done." This ensures that essential content like your text and images appear on the screen almost instantly, significantly improving the user's perceived performance.
Deferring non-critical JavaScript is one of the most effective ways to improve your Largest Contentful Paint (LCP) score. It prioritizes the content your visitors came to see, making the site feel much faster even if the total load time remains the same.
The Art of the Plugin Audit
Plugins are the heart of WordPress's flexibility, but they're also one of the biggest sources of performance drag. A plugin audit is not a one-time task; it should be a regular part of your site maintenance routine. It’s about asking tough questions and being honest about what you truly need.
Start by making a list of every active plugin on your site. For each one, ask yourself:
- What specific problem does this plugin solve? Be precise. "It adds social icons" is a good answer. "I think I need it" is not.
- Is this functionality absolutely essential to my business or user experience? Could you live without it?
- Could this task be accomplished in a different, more efficient way? For instance, can your theme handle this natively?
- When was the last time this plugin was updated? An outdated plugin isn't just a performance risk; it's a security vulnerability.
Once you have your answers, be ruthless. Deactivate and delete any plugin that doesn’t pull its weight. Your goal is to run the leanest possible setup without sacrificing core functionality.
To help you decide on the right tools for the job, here’s a quick comparison of some of the most popular performance plugins and what they offer.
Popular Performance Plugin Features
| Feature | WP Rocket | Perfmatters | LiteSpeed Cache |
|---|---|---|---|
| Page Caching | Yes | No (pairs with other caching) | Yes (server-level) |
| Asset Minification | Yes | Yes | Yes |
| Defer/Delay JS | Yes | Yes | Yes |
| Script Manager | No | Yes | Yes |
| Database Cleanup | Yes | Yes | Yes |
| CDN Integration | Yes | Yes | Yes |
| User Interface | Very Beginner-Friendly | Intermediate | Advanced (best with LiteSpeed server) |
This table should give you a starting point. Perfmatters, for instance, is brilliant for fine-grained control over which scripts load where, while WP Rocket is a fantastic all-in-one solution if you want simplicity. Choose the tool that best fits your technical comfort level and your site's specific needs.
Specific Optimizations for Divi Users
If you're using the Divi theme, you have some powerful, built-in performance options that can make a huge difference. You can find these settings in your WordPress dashboard under Divi > Theme Options > General > Performance.
Here are the key settings to enable:
- Dynamic Module Framework & Dynamic CSS: These are game-changers. Divi will only load the code and styles for the specific modules you're actually using on a page, dramatically reducing bloat.
- Minify and Combine JavaScript & CSS: Enable these to automatically handle the code optimizations we discussed earlier.
- Defer Gutenberg Block CSS: If you’re not using Gutenberg blocks heavily within the Divi Builder, enabling this prevents unnecessary stylesheet loading.
- Load Google Fonts from Server: When a user's browser fetches fonts from Google, it creates an external request which can slow things down. By enabling the "Improve Google Fonts Loading" option, Divi downloads the fonts and serves them directly from your own server, eliminating that extra request. This simple toggle can significantly clean up your site’s request waterfall and speed up font rendering.
Once you've handled the low-hanging fruit—your code, plugins, and media files—it's time to dig into the deeper layers of your site. This is where you can find those final, impactful speed gains that separate a fast site from a truly optimized one.
Two areas that often get overlooked but can secretly drag down performance are your WordPress database and the way your site loads fonts.
Think of your database as a giant, ever-expanding filing cabinet. Every post revision, plugin installation, and settings change adds another file. Over time, it gets cluttered with old drafts, expired temporary data (transients), and junk left over from uninstalled plugins. This makes it much harder for your server to find what it needs, slowing everything down.
Performing a Database Cleanup
A bloated database directly impacts your server's response time. Each query takes just a fraction of a second longer, but those milliseconds add up fast, creating a sluggish admin experience and a slower Time to First Byte (TTFB) for visitors.
You don't need to be a database admin to tackle this. Plugins like WP-Optimize or the database tools built into WP Rocket can safely automate the cleanup. They scan for all the digital junk and let you clear it out with a few clicks.
Here's what you should be cleaning up on a regular basis:
- Post Revisions: WordPress saves a copy every time you update a post. You can safely clear these out and even limit how many it stores going forward.
- Auto-Drafts: These are posts you started but never finished or published.
- Spam and Trashed Comments: Clearing these keeps your comments table clean.
- Expired Transients: Temporary cached data that sometimes forgets to delete itself, leaving useless data behind.
- Orphaned Metadata: Data from plugins and themes you've long since uninstalled.
Running these optimizations monthly is a great habit. It keeps your database lean, ensuring your server can fetch data with maximum efficiency.
Mastering Font Loading Strategies
Another area that can deliver a huge win for user experience is font optimization. Web fonts are often large files that can block your page from rendering text. This leads to that annoying flash of invisible text or, even worse, causes Cumulative Layout Shift (CLS) as content jumps around when the fonts finally load.
The default method, especially for Google Fonts, is to load them from a third-party server. This adds an external request, forcing the browser to perform another DNS lookup and connection, which introduces a delay.
Imagine losing 7% of conversions for every extra second your site takes to load. That’s the reality for many sites, where sluggish performance directly hits the bottom line. You can dig into more data on how WordPress site speed impacts conversions on onenine.com.
The best practice here is to host your fonts locally. Instead of fetching fonts from Google's servers, the browser gets them directly from your own. This simple change eliminates the external connection time, making the whole process faster and more reliable.
Performance plugins like Perfmatters and even Divi’s built-in performance settings can automate this for you, downloading Google Fonts to your own server.
Preloading Critical Font Files
To take it a step further, you can use preloading. This is a powerful directive that tells the browser, "Hey, I know we're going to need this specific font file to render the important stuff above the fold, so start downloading it now with high priority."
By preloading your main body text font or a key headline font, you ensure text is visible almost instantly. It’s the single best way to prevent font-related layout shifts and deliver a polished, professional experience from the moment the page starts loading. This can be done with a bit of code or managed through features in plugins like WP Rocket or Perfmatters.
Common Questions About WordPress Speed Optimization
Diving into website performance can bring up a lot of questions. Even when you have a solid optimization plan, you're bound to run into specific issues or wonder which trade-offs are actually worth making.
This section is all about tackling those common hurdles head-on. Think of it as a quick-reference guide to help you make smarter decisions and troubleshoot problems as they pop up. We’ll cover everything from the "how many plugins is too many" debate to the real value of page speed scores, helping you fine-tune your strategy.
How Many Plugins Are Too Many?
This is easily one of the most asked questions, and the honest answer isn't a specific number. The real problem isn't the quantity of plugins; it's their quality. A single, poorly coded plugin can inflict more damage on your load times than 20 high-quality, lightweight ones.
Instead of fixating on a raw count, shift your mindset to a "necessity and impact" audit. For every plugin, ask yourself: is this function absolutely critical to my site's goals? A plugin that generates significant revenue is probably worth a bit of performance overhead. A purely cosmetic one? Maybe not.
Here’s a better way to think about it:
- Audit Regularly: At least twice a year, go through your plugin list. Deactivate and delete anything you aren’t actively using.
- Measure Impact: Use a tool like Query Monitor to see which plugins are making the most database queries or slowing down your admin area. You might be surprised.
- Prioritize Quality: Always opt for plugins from reputable developers known for performance-minded coding and consistent updates.
Should I Chase a Perfect 100 on PageSpeed Insights?
It’s incredibly tempting to obsess over a perfect 100 score from tools like Google PageSpeed Insights, but this often leads to diminishing returns. Squeezing out those final 5-10 points can take a massive amount of effort for very little real-world benefit. A score in the green (90+) is an excellent target and already signals a fast, well-optimized user experience.
Your primary goal should be a fast, responsive experience for your human visitors, not just a perfect score for a robot. Focus on the Core Web Vitals—LCP, INP, and CLS—as these directly reflect user experience and are confirmed ranking factors.
Chasing that perfect score can sometimes lead you to make decisions that actually harm usability. For example, you might remove important third-party scripts like analytics or chat widgets just to shave off a few milliseconds. Always weigh raw performance metrics against your site's business goals.
Does My Choice of Page Builder Affect Speed?
Yes, absolutely. Page builders like Divi, Elementor, or Beaver Builder all add their own CSS and JavaScript to render your designs. Some are naturally more lightweight than others. Divi, for instance, has made huge strides with its built-in performance settings that dynamically load only the code needed for the modules on a specific page.
But how you use the page builder is just as important as the tool itself. Overloading a page with complex animations, dozens of modules, and massive, unoptimized images will bog it down, no matter which builder you're using. The key is to use these powerful tools responsibly. Stick to efficient design practices and make sure you’re taking full advantage of the builder’s own optimization features.
Is Lazy Loading Always a Good Idea?
For the most part, yes. Lazy loading images and iframes is one of the single most effective ways to slash your initial page load time. By 2025, it's anticipated that 85% of high-traffic WordPress sites will harness lazy loading, trimming initial page loads by an average of 40%, which showcases its dominance in modern speed strategies. You can find more WordPress performance statistics on magecomp.com.
However, there's a critical exception: above-the-fold images.
You should never, ever lazy-load your main hero image, your logo, or any other visual a user sees immediately without scrolling. Doing so can wreck your Largest Contentful Paint (LCP) score because the browser has to wait for JavaScript to run before it can even start downloading that critical, visible image. Thankfully, most modern performance plugins let you exclude the first one or two images from lazy loading to avoid this exact problem.
Ready to transform your Divi website with popups that capture attention and drive conversions? With Divimode, you can build anything from welcome mats and exit-intent offers to mega menus and contact forms, all within the familiar Divi Builder. Discover the power of Divi Areas Pro and start creating smarter, more engaging user experiences today.
More Articles You Will Like