Redesigning your website is more than just a cosmetic update; it's a strategic overhaul to boost performance, enhance user experience, and achieve specific business goals. A successful redesign requires meticulous planning and a structured approach to avoid common pitfalls like lost SEO rankings, broken functionality, and a confusing user journey. Without a clear plan, even the most visually stunning redesign can fail to deliver results, leading to wasted resources and a negative impact on your bottom line.
This comprehensive website redesign checklist is your roadmap to a seamless and successful launch. It breaks down the entire process into eight actionable phases, from the initial audit to post-launch optimization. We will guide you through each critical step, providing specific insights and practical examples to ensure your new website is not only beautiful but also a powerful engine for growth.
Think of this guide as your project management blueprint. It covers crucial stages like:
- Conducting a thorough website audit and analytics review.
- Defining user personas and mapping the ideal customer journey.
- Developing a content strategy that preserves and enhances your SEO equity.
- Planning a robust launch and post-launch monitoring strategy.
Whether you're an e-commerce manager leveraging WooCommerce, a designer building with a theme like Divi, or a marketing professional focused on lead generation, this checklist provides the structure needed for a predictable, successful outcome. By following these phases, you can confidently navigate the complexities of a redesign, ensuring your project stays on schedule, on budget, and delivers a significant return on investment. Let’s dive into the first phase: the foundational audit.
1. Phase 1: Comprehensive Website Audit and Analytics Review
Before altering a single pixel, the first step in any successful website redesign checklist is a deep, data-driven audit of your current site. This foundational phase moves your project from guesswork to a strategic, evidence-based plan. It involves a meticulous review of your analytics, user behavior, content performance, and technical health to identify what to improve, what to eliminate, and, crucially, what to preserve.
Why a Pre-Design Audit is Non-Negotiable
Jumping straight into design without data is like building a house without a blueprint. You risk demolishing high-performing landing pages, breaking valuable SEO-ranking content, and alienating users who have established habits. A comprehensive audit ensures every decision is purposeful. For instance, Spotify continually refines its user interface not on whims, but on hard data from user interactions, A/B tests, and usage patterns, ensuring changes genuinely improve the listener experience.
This initial review establishes your baseline. By documenting key performance indicators (KPIs) like conversion rates, bounce rates, and top-performing pages, you create measurable goals for the new design.
Your Three-Part Audit Workflow
To conduct a thorough analysis, your audit should follow a structured process. This involves looking at user traffic, assessing the site's technical foundation, and evaluating its overall performance against business goals.
The following infographic illustrates the essential workflow for your pre-redesign audit, ensuring you cover all critical areas in a logical sequence.
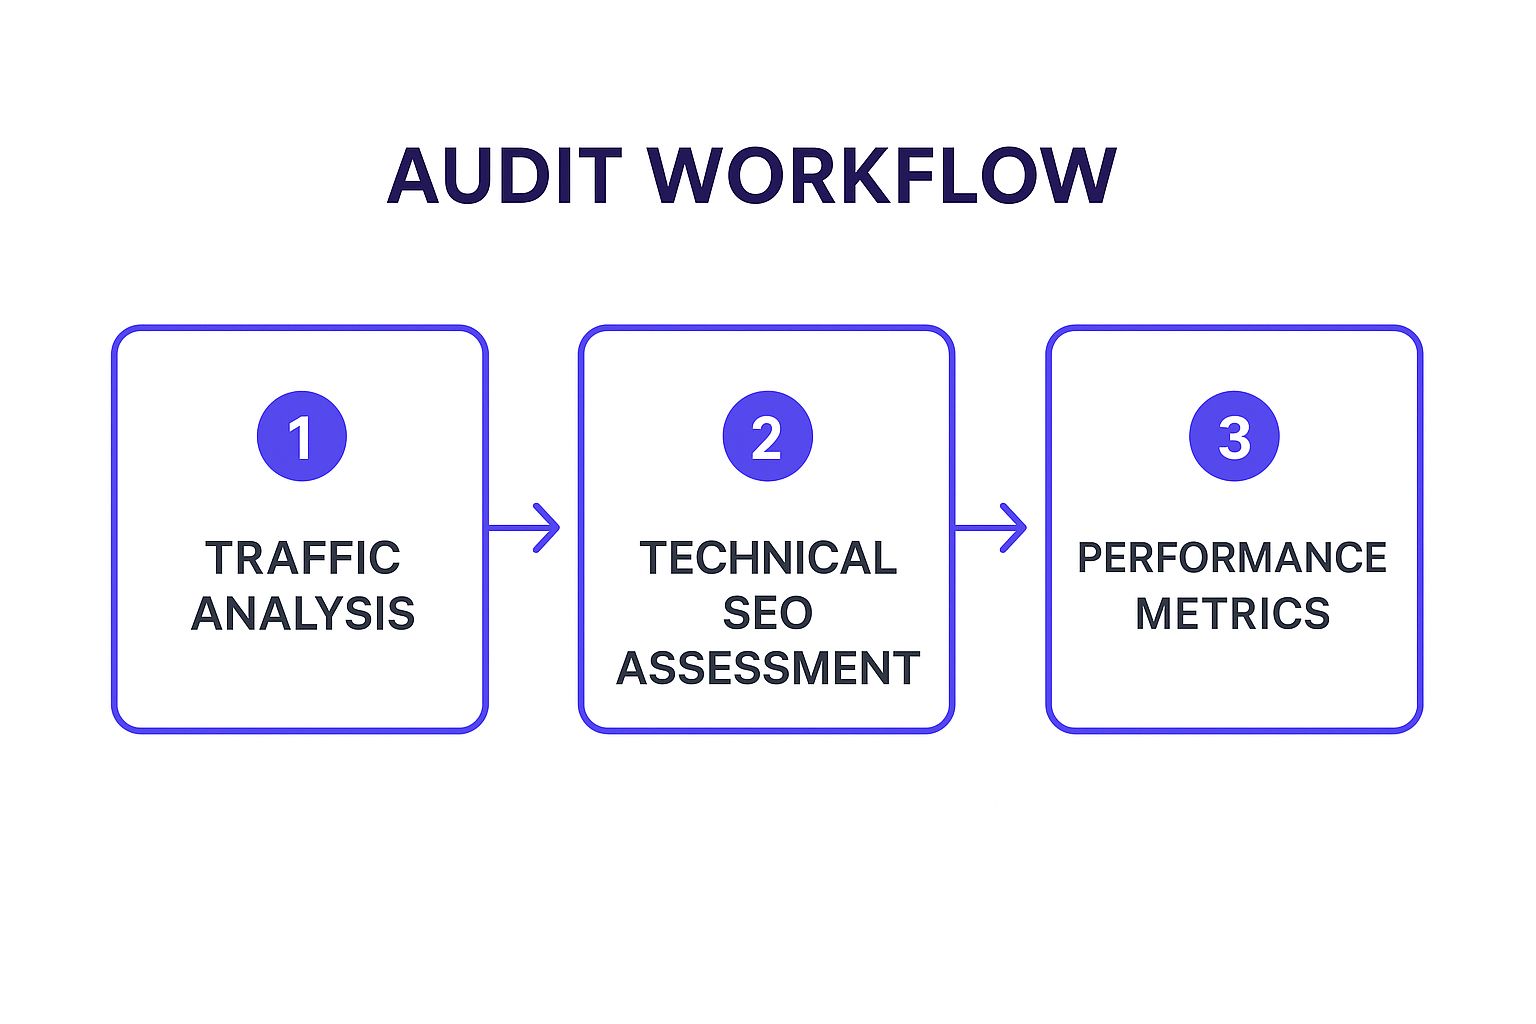
This structured flow ensures that you first understand your audience (traffic), then confirm your site is technically sound for search engines (SEO), and finally measure how effectively it achieves its goals (performance).
Actionable Audit Tips
- Dive into Analytics: Use tools like Google Analytics to identify your most popular pages, traffic sources, and user demographics. Pinpoint pages with high exit rates or low time-on-page as prime candidates for improvement. For an in-depth guide, you can learn more about how to track your website performance like a pro.
- Visualize User Behavior: Implement heatmaps (Hotjar, Crazy Egg) to see where users click, scroll, and hover. Session recordings provide an over-the-shoulder view of real user journeys, revealing friction points and usability issues that raw numbers can't.
- Conduct a Content and SEO Audit: Catalog all your existing content. Use tools like Ahrefs or Semrush to identify pages with high-ranking keywords, valuable backlinks, and organic traffic. This SEO equity must be protected with proper 301 redirects during the redesign.
- Survey Your Users: Ask your audience directly. A simple survey can uncover major pain points and feature requests, providing qualitative context to your quantitative data.
2. User Experience (UX) Research and Persona Development
Following your site audit, the next critical phase in your website redesign checklist is to translate data into human-centric insights through User Experience (UX) research. This step involves deeply understanding your target audience's needs, motivations, and pain points. The goal is to create detailed user personas and journey maps that serve as the foundation for a truly intuitive and effective design.

Why UX Research is the Core of Your Redesign
Designing without understanding your user is like writing a book without knowing who will read it. UX research prevents you from building a website based on internal assumptions, ensuring the new design solves real problems for the people who matter most: your customers. Dropbox, for example, used extensive user behavior studies to evolve its interface from a feature-heavy tool to the simplified, file-focused platform it is today, directly addressing user needs for clarity and ease of use.
This process ensures your redesign is not just aesthetically pleasing but functionally superior. It provides the "why" behind user actions, allowing you to create navigation, layouts, and calls-to-action that feel natural and compelling.
Your Three-Part UX Research Workflow
A structured approach to UX research turns abstract user feedback into concrete design requirements. This involves gathering qualitative data, synthesizing it into representative personas, and mapping out the user’s entire interaction with your brand. At the core of effective UX research and development, understanding the Design Thinking process provides a powerful framework for empathizing with users and innovating on their behalf.
The video below offers a great introduction to the fundamentals of UX research and how it bridges the gap between business goals and user needs.
This workflow moves from broad understanding (interviews) to specific representation (personas) and finally to actionable strategy (journey maps).
Actionable UX Research Tips
- Conduct User Interviews: Talk to 5-10 representative customers. Go beyond surface-level questions to uncover their underlying goals, challenges, and what they really need from your website.
- Create Data-Driven Personas: Synthesize your research into 2-3 primary user personas. Give them names, goals, and frustrations based on real data, not stereotypes. These personas will become the "users" you design for throughout the project.
- Map the User Journey: Visualize the entire path a user takes, from first becoming aware of your brand to achieving a goal on your site. Identify key touchpoints, emotional highs and lows, and opportunities for improvement at each stage.
- Use Card Sorting for Navigation: To build an intuitive site structure, conduct card sorting exercises. Ask users to group your website's topics into categories that make sense to them. This user-led approach is far more effective than guessing at navigation labels.
3. Phase 1: Content Strategy and SEO Preservation
With your audit complete, the next critical step in your website redesign checklist is crafting a robust content strategy and a plan to preserve your hard-won SEO equity. This phase ensures your new design is supported by high-quality, relevant content while protecting your existing search engine rankings. It involves auditing your content, mapping keywords to new pages, and planning for a seamless technical transition.
Why Content and SEO Preservation is Non-Negotiable
A redesign that ignores content and SEO is destined to fail. You risk losing valuable organic traffic, confusing your audience with mismatched messaging, and watching your search rankings plummet. A successful redesign enhances content discoverability and strengthens SEO, it doesn't destroy it. For instance, when HubSpot redesigned its blog, it didn't just change the look; it reorganized content around topic clusters, which improved user navigation and significantly boosted its SEO performance by signaling topic authority to search engines.
This phase bridges the gap between your old site’s successes and your new site’s potential. By strategically managing your content, you ensure the new user experience is not only beautiful but also meaningful and discoverable.
Your Three-Part Preservation Workflow
To protect and enhance your content and SEO, you must follow a systematic process. This involves taking inventory of your existing content, mapping its future on the new site, and establishing the technical safeguards needed to maintain search engine trust.
- Content Audit & Inventory: Catalog every piece of content, evaluating it based on performance metrics (traffic, conversions, engagement) and relevance. Decide what to keep, what to improve, and what to remove.
- Keyword & URL Mapping: Map your high-performing keywords to the new site structure. Create a comprehensive URL mapping spreadsheet that lists every old URL and its corresponding new URL.
- Redirection & Optimization Plan: Plan the implementation of 301 redirects to guide users and search engines from old pages to new ones. This is also the perfect time to optimize page titles, meta descriptions, and on-page content for your target keywords.
This structured workflow ensures that no content is left behind and that your SEO foundation is transferred securely to the new design.
Actionable Content & SEO Tips
- Create a Comprehensive URL Mapping Document: Use a spreadsheet to list every current URL in one column and its corresponding new URL in another. This document is your blueprint for implementing redirects and is essential for preventing 404 errors.
- Optimize Metadata During Migration: As you move content, review and rewrite page titles and meta descriptions. Ensure they are compelling, accurate, and optimized for their target keywords to improve click-through rates from search results.
- Develop a Content Creation Plan: Identify content gaps discovered during your audit and create a plan to fill them. When developing your content strategy, consider incorporating practical content creation tips to enhance your material and streamline your workflow.
- Implement and Test 301 Redirects: Before launch, use a staging environment to implement all 301 redirects from your URL map. Use a tool like Screaming Frog to crawl the staging site and verify that all redirects are working correctly and there are no redirect chains or loops.
4. Technical Infrastructure and Performance Optimization
While a stunning visual design captures attention, the underlying technical infrastructure determines whether users stick around. This phase of your website redesign checklist focuses on the engine of your site: its hosting, platform, security, and speed. Optimizing this technical foundation ensures your beautiful new site is fast, reliable, and secure, preventing poor performance from undermining your design efforts.
Why a Robust Technical Foundation is Critical
A slow or insecure website actively drives away users and damages your brand's reputation. A redesign offers the perfect opportunity to upgrade your technical stack, ensuring it can support your new features and handle anticipated traffic. For example, Etsy invested heavily in optimizing its infrastructure to reduce page load times, knowing that even a millisecond delay could result in lost sales. Their focus on server response times and efficient code delivery directly improved user engagement and conversion rates.
This technical review ensures your redesigned site is built on solid ground. By evaluating your hosting environment, CMS capabilities, and security protocols, you create a seamless experience that performs as good as it looks.
Your Three-Part Technical Workflow
To build a high-performing site, your technical evaluation should be methodical. This involves assessing your hosting and CMS, implementing performance-boosting techniques, and ensuring robust security measures are in place.
This structured approach ensures you first choose the right platform (hosting/CMS), then make it fast (performance), and finally make it safe (security).
Actionable Optimization Tips
- Compress and Optimize All Assets: Large files are the primary cause of slow load times. Use tools like TinyPNG or image optimization plugins to compress images without sacrificing quality. Minify your CSS, JavaScript, and HTML files to remove unnecessary characters and reduce file sizes.
- Implement Lazy Loading: Configure images and videos to load only when they enter the user's viewport. This technique significantly speeds up initial page load, a crucial factor for user retention. Modern WordPress themes and plugins often include this feature built-in.
- Leverage a Content Delivery Network (CDN): A CDN stores copies of your site's static assets (images, CSS, JS) on servers around the globe. When a user visits your site, the CDN serves these assets from the server closest to them, dramatically reducing latency and speeding up delivery.
- Upgrade Your Hosting Plan: If you're on a shared hosting plan and anticipate more traffic, consider upgrading to a VPS or dedicated server. A better hosting environment provides more resources, improving speed and reliability, especially for e-commerce sites built with platforms like WooCommerce. You can find robust options tailored for WordPress performance at providers like WP Engine.
- Conduct Security Hardening: Install a security plugin (e.g., Wordfence), use strong, unique passwords for all admin accounts, and enable two-factor authentication. Ensure your SSL certificate is correctly configured to encrypt data between your server and the user's browser.
5. Responsive Design and Mobile Optimization
In an era where mobile devices generate over half of all website traffic, responsive design is no longer an optional feature; it's a fundamental requirement. This step in your website redesign checklist ensures your site provides a flawless viewing and interaction experience across every device, from wide-screen desktops to smartphones and tablets. It involves creating flexible layouts, touch-friendly navigation, and mobile-specific performance optimizations that adapt automatically to the user's screen size.

Why Mobile-First Design is a Strategic Imperative
Ignoring mobile users means ignoring the majority of your potential audience and revenue. A non-responsive site forces users to pinch, zoom, and struggle with tiny buttons, leading to high bounce rates and lost conversions. Google’s mobile-first indexing also means your mobile site's performance directly impacts your search engine rankings. A prime example is Starbucks, which prioritized its mobile experience by creating a PWA-like website that feels like a native app, making it fast and easy to order on the go. This focus directly serves their customer's primary use case.
This approach, popularized by thought leaders like Ethan Marcotte and Luke Wroblewski, shifts the design process to start with the smallest screen first. By doing so, you prioritize core content and functionality, ensuring the most constrained environment receives a perfect experience before scaling up to larger screens.
Your Responsive Implementation Workflow
To guarantee a seamless experience on all devices, your workflow should be systematic. It starts with establishing your breakpoints, designing for touch, and testing rigorously on actual hardware. This structured approach ensures that you don't just shrink your desktop site but rather create a genuinely optimized mobile experience.
A mobile-first workflow prevents the common pitfall of trying to cram a complex desktop design into a small screen. It forces clarity and focus from the very beginning of the design phase.
Actionable Responsive Design Tips
- Design Mobile-First: Start your design process with the mobile viewport. This forces you to prioritize essential content and functionality. Once the mobile version is perfected, progressively enhance the design for tablets and desktops.
- Test on Real Devices: Browser emulators are useful for quick checks, but they don't replicate the nuances of touch interaction, varying processing power, or network conditions. Always test your redesign on a range of actual iOS and Android devices.
- Optimize Touch Targets: Frustration mounts when users can't tap the right button. Ensure all interactive elements like buttons and links have a minimum touch target size of 44×44 pixels to prevent mis-taps and improve usability.
- Use Flexible Units and Layouts: Build your layouts using a flexible grid system and relative units like percentages (%), viewport width (vw), and rems instead of fixed pixels. This allows your content to fluidly adapt to different screen sizes. For a deeper dive, you can explore some key tips for better Divi mobile responsiveness.
6. Testing and Quality Assurance Protocol
After the development phase, the next critical step in your website redesign checklist is establishing a rigorous testing and quality assurance (QA) protocol. This systematic process involves vetting every aspect of the new site, from button clicks to browser compatibility, to guarantee a flawless user experience upon launch. It's the final defense against bugs, broken links, and performance issues that could otherwise derail your project's success.
Why a Testing Protocol is Non-Negotiable
Launching a website without comprehensive testing is like opening a restaurant without tasting the food. You are risking your brand's reputation and undermining the investment made in the redesign. A structured QA process ensures functionality, usability, and performance meet expectations before real users are impacted. For instance, e-commerce giant Amazon runs thousands of automated and manual tests on any new feature, ensuring that from the product page to the checkout, the customer journey is seamless and reliable across all platforms.
This phase transforms a "finished" website into a "launch-ready" one. By methodically identifying and resolving issues, you prevent post-launch emergencies, protect your SEO rankings from technical errors, and build user trust from day one.
Your Three-Part Testing Workflow
To ensure complete coverage, your QA protocol should be divided into distinct, sequential stages. This structured approach moves from core functionality to real-world user validation, ensuring every layer of the site is vetted.
The following infographic illustrates the essential workflow for your pre-launch testing, ensuring you cover all critical areas in a logical sequence.
This workflow ensures you first confirm the site works as intended (functional), then verify it works everywhere (compatibility), and finally validate that it works for your actual users (UAT).
Actionable Testing Tips
- Create a Detailed Testing Checklist: Document every single feature and user path. This includes testing all forms, links, pop-ups, interactive elements, and e-commerce checkout processes. A comprehensive checklist prevents anything from slipping through the cracks.
- Test on Real Devices: While simulators are useful, nothing beats testing on actual physical devices. Test your site on various iPhones, Android phones, tablets, and desktops to uncover device-specific bugs and rendering issues that emulators might miss.
- Include Stakeholders in User Acceptance Testing (UAT): Before the final sign-off, have key stakeholders and a small group of target users navigate the site. Their fresh eyes are invaluable for spotting usability issues and validating that the site meets business objectives. For a deep dive, you can explore best practices for conducting effective User Acceptance Testing.
- Perform Load and Stress Testing: Use tools like LoadRunner or JMeter to simulate high traffic spikes. This ensures your server can handle a sudden influx of visitors, such as from a successful marketing campaign, without crashing or slowing down.
7. Phase 4: Launch Strategy and Rollout Plan
After months of meticulous planning, design, and development, the final hurdle is the launch itself. A well-defined launch strategy and rollout plan is not just about flipping a switch; it's a carefully orchestrated event that ensures a seamless transition from the old site to the new one with minimal downtime, disruption, and risk. This phase is the culmination of your entire website redesign checklist.
Why a Strategic Launch is Non-Negotiable
A botched launch can undo all your hard work. It can lead to extended downtime, lost revenue, frustrated users, and a sudden drop in search engine rankings. A strategic plan mitigates these risks by preparing for every contingency. For example, major platforms like Slack and Facebook don't release massive redesigns to all users at once. They use phased rollouts, releasing changes to small segments of their user base first to monitor performance and gather feedback before a full-scale deployment.
This controlled approach allows you to identify and fix critical bugs, server issues, or user experience problems before they impact your entire audience. It turns the launch from a high-stakes gamble into a calculated, manageable process.
Your Three-Part Launch Workflow
A successful launch requires a clear sequence of actions before, during, and after the deployment. This workflow ensures that all technical preparations are complete, the launch itself is executed smoothly, and post-launch monitoring is in place to catch any immediate issues.
- Pre-Launch Readiness: This involves finalizing all technical preparations, including DNS settings, SSL certificates, and server configurations. It’s also when you perform final backups and freeze any further changes to the code.
- Execution and Deployment: This is the core process of moving the new site live. It includes a clear timeline, designated roles for team members, and a protocol for communicating progress to all stakeholders.
- Post-Launch Monitoring: Immediately after launch, your team must actively monitor site performance, analytics, and user feedback channels to quickly address any unforeseen problems.
Actionable Launch Tips
- Schedule for Low Traffic: Deploy the new site during your historically lowest traffic period, such as late at night or over a weekend. This minimizes the impact on users if issues arise.
- Have an "All-Hands-on-Deck" Protocol: Ensure your core technical team (developers, server admins) is on standby during and immediately after the launch to troubleshoot in real time.
- Create a Rollback Plan: Hope for the best but plan for the worst. Have a documented, tested procedure to revert to the old website instantly if a catastrophic failure occurs.
- Monitor Vitals Intensely: For the first 48 hours, keep a close watch on server load, page speed, 404 errors, and conversion rates. Set up alerts for any anomalies. A comprehensive pre-launch checklist is crucial; you can learn more about preparing your site with a pre-launch SEO checklist.
8. Post-Launch Monitoring and Optimization
Launching your redesigned website isn't the finish line; it's the starting line for a new phase of growth. The final, critical item in a comprehensive website redesign checklist is establishing a continuous cycle of monitoring and optimization. This process involves tracking performance, analyzing user behavior, and making iterative improvements to ensure the redesign achieves and exceeds its goals over time.
Why Post-Launch Optimization is Non-Negotiable
A website is a dynamic asset, not a static brochure. Without ongoing attention, even the most brilliant redesign can see its performance degrade as user expectations, market trends, and search engine algorithms evolve. Continuous optimization ensures your investment yields long-term returns. For example, Dropbox constantly A/B tests elements of its user interface, from button colors to signup flows, using real-time data to refine the user experience and drive conversions, ensuring the platform remains intuitive and effective.
This ongoing process transforms your website from a one-time project into a powerful business tool that adapts and improves. By comparing post-launch data against the baseline metrics you established in your pre-design audit, you can definitively prove the redesign's ROI and identify new opportunities for growth.
Your Three-Part Optimization Workflow
To create a sustainable optimization engine, your efforts must be structured and consistent. This involves setting up robust monitoring systems, establishing a regular cadence for analysis and reporting, and implementing changes based on data-driven insights.
The following infographic illustrates the essential workflow for your post-launch optimization, creating a continuous feedback loop that drives improvement.
This cyclical flow ensures that you are always aware of your site's health (monitor), understand the "why" behind the numbers (analyze), and are actively working to improve performance (iterate).
Actionable Optimization Tips
- Set Up Automated Alerts: Use Google Analytics to create custom alerts for sudden traffic drops, spikes in 404 errors, or significant changes in conversion rates. These early warnings allow you to address critical issues before they impact your business.
- Establish a Reporting Schedule: Create a weekly or monthly dashboard that tracks key performance indicators (KPIs) against your pre-redesign baseline. This disciplined reporting keeps stakeholders informed and ensures accountability for the redesign's success.
- Prioritize User Feedback: Continue collecting user feedback through surveys, support tickets, and session recordings. A quick response to user-reported bugs or usability frustrations demonstrates a commitment to customer experience and provides invaluable qualitative data.
- Budget for Iteration: The most successful websites are never "done." Allocate a portion of your budget and team resources specifically for ongoing A/B testing, content updates, and feature enhancements. This proactive approach is a core part of any effective website redesign checklist that aims for sustained success.
Website Redesign Checklist Comparison
| Item | Implementation Complexity 🔄 | Resource Requirements ⚡ | Expected Outcomes 📊 | Ideal Use Cases 💡 | Key Advantages ⭐ |
|---|---|---|---|---|---|
| Comprehensive Website Audit and Analytics Review | Medium – involves multiple tools and data interpretation | Medium – requires analytics tools and expertise | Data-driven insights, problem identification, baseline metrics | Before redesign to understand current performance | Informs design with real user data; preserves successful elements |
| User Experience (UX) Research and Persona Development | High – extensive user research and journey mapping | High – time and possibly budget for research tools/external help | User-centered design, improved satisfaction and conversions | When user behavior needs deep understanding for redesign | Reduces guesswork; increases engagement and conversions |
| Content Strategy and SEO Preservation | Medium-High – SEO expertise needed, complex content management | Medium – SEO tools and content review time | Maintains search rankings, improves content quality | When preserving SEO and managing content during redesign | Prevents ranking drops; optimizes content relevance |
| Technical Infrastructure and Performance Optimization | High – technical expertise needed, complex migration | High – may increase hosting/infrastructure costs | Faster load times, better security, scalability | For large sites needing performance and security improvements | Enhances speed, reliability, and SEO rankings |
| Responsive Design and Mobile Optimization | Medium – requires adaptive design and extensive device testing | Medium – testing tools and device variety | Improved mobile UX, higher mobile conversions | When mobile experience and accessibility are priorities | Future-proofs design; boosts SEO with mobile-first indexing |
| Testing and Quality Assurance Protocol | High – comprehensive testing across platforms and devices | High – specialized tools and resources | Bug-free launch, consistent UX, performance validation | Before launch to ensure functionality and compatibility | Prevents issues; ensures performance and accessibility |
| Launch Strategy and Rollout Plan | Medium – requires careful coordination and timing | Medium – technical and communication resources | Smooth deployment, minimal downtime, risk mitigation | For controlled and low-risk website launches | Reduces downtime risk; enables quick rollback |
| Post-Launch Monitoring and Optimization | Medium – ongoing monitoring and analysis | Medium to High – continuous tools and manpower | Continuous improvement, issue detection, objective validation | After launch to ensure success and iteratively improve | Ensures long-term success; data-driven optimization |
Bringing It All Together for a Flawless Redesign
A website redesign is a monumental project, but as this detailed guide illustrates, it's a manageable and profoundly rewarding one when approached with a structured plan. By following a comprehensive website redesign checklist, you elevate the process from a mere facelift to a strategic overhaul that can redefine your digital presence and drive significant business growth. The journey from initial audit to post-launch optimization is not just a series of tasks to be checked off; it is a holistic process where each phase informs the next.
This is not about slapping on a new coat of paint. It's about building a fundamentally better digital home for your brand, one that is data-informed, user-centric, and technically sound. The power of this checklist lies in its integrated nature. Without a thorough audit, your design choices are based on guesswork. Without solid UX research, your beautiful new interface may confuse and frustrate the very users you aim to attract. And without a robust post-launch plan, even the most successful launch will eventually see its performance degrade.
From Checklist to Strategic Asset
The true value of mastering this process is transforming your website from a static online brochure into a dynamic, high-performing business asset. Think of each major phase as a critical pillar supporting the final structure:
- Pillar 1: Data-Driven Foundation: Your initial audit, analytics review, and UX research (Phases 1 & 2) provide the essential blueprint. This is where you replace assumptions with concrete data, ensuring every subsequent decision is aligned with user behavior and business goals.
- Pillar 2: Strategic Content & Performance: A solid content strategy and a focus on technical SEO (Phase 3 & 4) ensure that your redesigned site not only looks good but is also discoverable, fast, and authoritative in the eyes of both users and search engines.
- Pillar 3: Flawless Execution: The design, development, and rigorous testing phases (Phases 5 & 6) are where your strategic vision comes to life. A commitment to responsive design and a meticulous quality assurance protocol prevents a disastrous launch day filled with bugs and broken layouts.
- Pillar 4: Sustained Growth: The final pillars, launch and post-launch optimization (Phases 7 & 8), are arguably the most important. A successful launch is not the end goal; it is the new beginning. This is where you start gathering fresh data, running A/B tests, and continuously iterating to improve performance over time.
For web professionals using the Divi framework, this structured approach is particularly potent. The flexibility of Divi allows you to implement the creative and functional changes identified in your checklist with precision. You can leverage its powerful features to bring your data-backed UX improvements to life, build high-performance pages identified in your audit, and then use tools within the ecosystem to A/B test elements post-launch, closing the loop on the optimization cycle.
Remember, the goal of this extensive website redesign checklist is to provide a reliable, repeatable framework that minimizes risk and maximizes your return on investment. By embracing this strategic methodology, you move beyond subjective preferences and anchor your project in the principles of effective digital marketing, user experience design, and technical excellence. The result is more than just a new website; it's a powerful engine for growth, built to serve your audience and achieve your business objectives for years to come.
Ready to supercharge your Divi redesign workflow? The comprehensive planning from this checklist is only half the battle. To accelerate development and build with unparalleled efficiency, explore the powerful toolkit offered by Divimode. With Divimode, you can save and reuse your meticulously crafted Divi layouts, sections, and modules in the cloud, streamlining your process and ensuring brand consistency across every project.
More Articles You Will Like