Learning how to create a ecommerce website with wordpress is really about pairing the core WordPress software with a powerhouse e-commerce plugin like WooCommerce. This duo gives you something that hosted platforms just can't match: total control. You're in charge of your store's design, its features, and most importantly, your own data—all without being locked into the escalating monthly fees of other platforms.
Why WordPress Is the Right Choice for Your Store
Before we get into the nitty-gritty, let's talk about why millions of businesses bet on WordPress. Unlike closed-off platforms like Shopify or BigCommerce, which operate on a subscription model, WordPress is open-source. This isn't just a technical detail; it's a fundamental difference in philosophy. You're not just renting a digital storefront; you truly own your website and every bit of its content.
This ownership model is liberating. It means you can tweak every single part of your store, from the look of your product pages to the logic of your checkout process, without ever hitting a paywall or a platform limitation. You’re never stuck with a pre-set menu of features or a rigid design.
A Quick Comparison: WordPress vs. All-in-One eCommerce Platforms
It can be tough to visualize the differences, especially when you're just starting out. One approach gives you total ownership and flexibility, while the other offers simplicity for a monthly fee. Neither is "wrong," but they serve very different needs.
Here’s a quick breakdown to help you see where they stand apart:
| Feature | WordPress with WooCommerce | All-in-One Platforms (e.g., Shopify) |
|---|---|---|
| Ownership | You own 100% of your site and data. It’s a digital asset you control completely. | You rent your store. If you stop paying, your store is gone. |
| Customization | Virtually limitless. If you can imagine it, you can build it with themes and plugins. | Limited to the platform's themes and approved apps. |
| Cost Structure | Lower upfront costs for hosting/plugins. No monthly platform fees. | Monthly subscription fees that can increase with your sales volume. |
| Ease of Use | Steeper learning curve, requires more hands-on management. | Very beginner-friendly with a guided setup process. |
| Scalability | Extremely scalable. You can grow without platform-imposed limits or fees. | Can be expensive to scale as transaction fees and app costs add up. |
| Support | Community-driven. Relies on forums, developers, and hosting support. | Dedicated 24/7 support included with your subscription. |
Ultimately, choosing WordPress is like buying a commercial property instead of leasing it. It's an investment in an asset that you can shape, grow, and control for the long haul.
Unlocking True Creative Freedom
Think of it this way: building on a hosted platform is like decorating a rented apartment. You can paint the walls and hang pictures, but you can't knock down a wall. With WordPress, you own the whole building. That’s the kind of creative control we're talking about.
The platform's massive ecosystem of themes and plugins lets you add almost any feature you can dream up.
Want to launch a complex loyalty program? Offer product subscriptions? Integrate a custom shipping calculator? There's almost certainly a plugin ready to go. This flexibility means your store can adapt and grow right alongside your business.
The Power of the WordPress Ecosystem
The numbers really tell the story here. As of 2025, WordPress powers a staggering 43% of all websites on the internet. Drilled down to e-commerce, its top plugin, WooCommerce, runs about 28% of all online stores and is the engine behind nearly 94% of e-commerce sites built on WordPress. You can dig into more WordPress store statistics to get the full scope.
This isn't a fluke. It's a testament to the platform's reliability and sheer capability.
The real magic of WordPress isn't just the software itself. It's the colossal community and marketplace that surrounds it. You get instant access to thousands of tools, expert developers, and support forums, so you're never truly starting from scratch.
This community backing means you can always find an answer, whether you're fixing a tiny glitch or mapping out a huge new feature. The long-term financial benefits are huge, too. By owning your digital assets, you sidestep those endless monthly fees and invest directly into a platform that becomes more valuable as your business grows.
Setting Up Your Domain and Hosting
Before you can even think about designing your store, you need two foundational pieces: a domain name and a hosting plan. Think of it like this: your domain is your store's street address, and hosting is the physical space where your store is built. Getting these two things right from the get-go will save you a world of hurt later and set your new business up for success.
Picking a domain name can feel like a massive commitment because, well, it is. This isn't just a web address; it’s the cornerstone of your brand. A good domain is easy for customers to remember and type, and it subtly hints at what you're all about.
When you're brainstorming, don't just go for catchy. Think about SEO, too. Slipping a keyword in there can be a smart move, but don't jam it in if it feels unnatural. For instance, if you're selling artisanal coffee, a name like GrindMasters.com is decent, but something like ArtisanGrindCoffee.com is even better for telling search engines what you do.
How to Choose a Great Domain Name
The sweet spot is a name that's both intuitive for your customers and a clear signal to Google. Simple is almost always better. Steer clear of hyphens and numbers—they’re a pain to remember and even harder to explain to someone out loud.
Here are a few tips I've picked up over the years:
- Make it Brandable: Your domain needs to be unique. Think about names like
AllbirdsorWarby Parker. They don't just describe a product; they feel like a brand. - Keep it Simple: If you have to spell it out over the phone, it’s too complicated. Avoid weird spellings or words that are hard to pronounce.
- Think Long-Term: Don't box yourself in.
KevinsSockShack.comis great until you want to start selling t-shirts. Pick a name that gives your business room to grow.
Once you’ve got a shortlist, check if the domain is available and—this is important—see if the social media handles are free, too. Brand consistency across every platform is a huge win.
Selecting the Right Web Hosting
Got your domain? Awesome. Next up is web hosting. This is where all your website’s files will live, and it’s a decision that directly impacts your store’s speed, security, and uptime. These aren't just tech specs; they're critical for any e-commerce site. A slow-loading site is a sales killer. A delay of just one second in page load time can lead to a 7% drop in conversions.
Let's quickly run through the common hosting types so you can make the right call for your WordPress store.
| Hosting Type | Best For | Key Features |
|---|---|---|
| Shared Hosting | New stores on a tight budget with low traffic. | Super affordable, but you share server resources, which can slow you down during traffic spikes. |
| VPS Hosting | Growing stores that need more muscle and control. | A virtual private server gives you dedicated resources without the price tag of a dedicated machine. |
| Managed WordPress | Store owners who value speed and their sanity. | Optimized for WordPress with auto-updates, beefed-up security, and expert support. |
For most new WooCommerce stores, I almost always recommend Managed WordPress Hosting. It costs a bit more than shared hosting, but the perks are huge. Companies like SiteGround or WP Engine handle all the technical grunt work, freeing you up to focus on what actually matters: growing your business.
Investing in quality hosting is one of the smartest decisions you can make. It’s the engine of your store, and a cheap, unreliable engine will eventually break down, often at the worst possible moment.
Installing WordPress with One Click
Once you've signed up with a host, the final piece of the foundation is installing WordPress. Thankfully, the days of messing with FTP clients and databases for a simple install are long gone. Pretty much every modern host offers a "one-click" WordPress installer right from their control panel.
You'll just log into your hosting account, find the WordPress tool, and follow the simple on-screen prompts. You’ll pick your domain, set an admin username and password, and that's really it. In less than five minutes, you’ll have a clean WordPress site ready to go, giving you the perfect canvas to create an ecommerce website with WordPress.
Bringing Your Store to Life with WooCommerce
Alright, with your WordPress foundation solidly in place, it's time to install the engine that will power your entire e-commerce operation. This is the moment your basic website starts its transformation into a dynamic, sales-generating machine. That engine is WooCommerce, the world's most popular open-source e-commerce solution.
Think of WooCommerce as more than just a plugin; it's a complete platform that integrates so cleanly with WordPress you'll forget they're separate. It's built to handle everything from product listings and inventory management to secure payments and shipping calculations. Best of all, it holds true to the core WordPress philosophy of flexibility and ownership, giving you the power to build the exact store you have in mind.
Installing and Activating WooCommerce
Getting started is surprisingly straightforward. If you've ever installed a WordPress plugin before, you already know the drill. From your WordPress dashboard, just head over to Plugins > Add New, and type "WooCommerce" into the search bar. Once you spot the official plugin by Automattic, click "Install Now" and then "Activate."
That simple action kicks off the WooCommerce Setup Wizard, a guided process that makes getting your store's core settings configured a breeze. I've seen a lot of people rush through this, but my advice is to take your time. Each step is an opportunity to make smart decisions for your business right from the get-go.
This handy visual breaks down the simple, three-step journey from a plain WordPress site to a functional WooCommerce store.
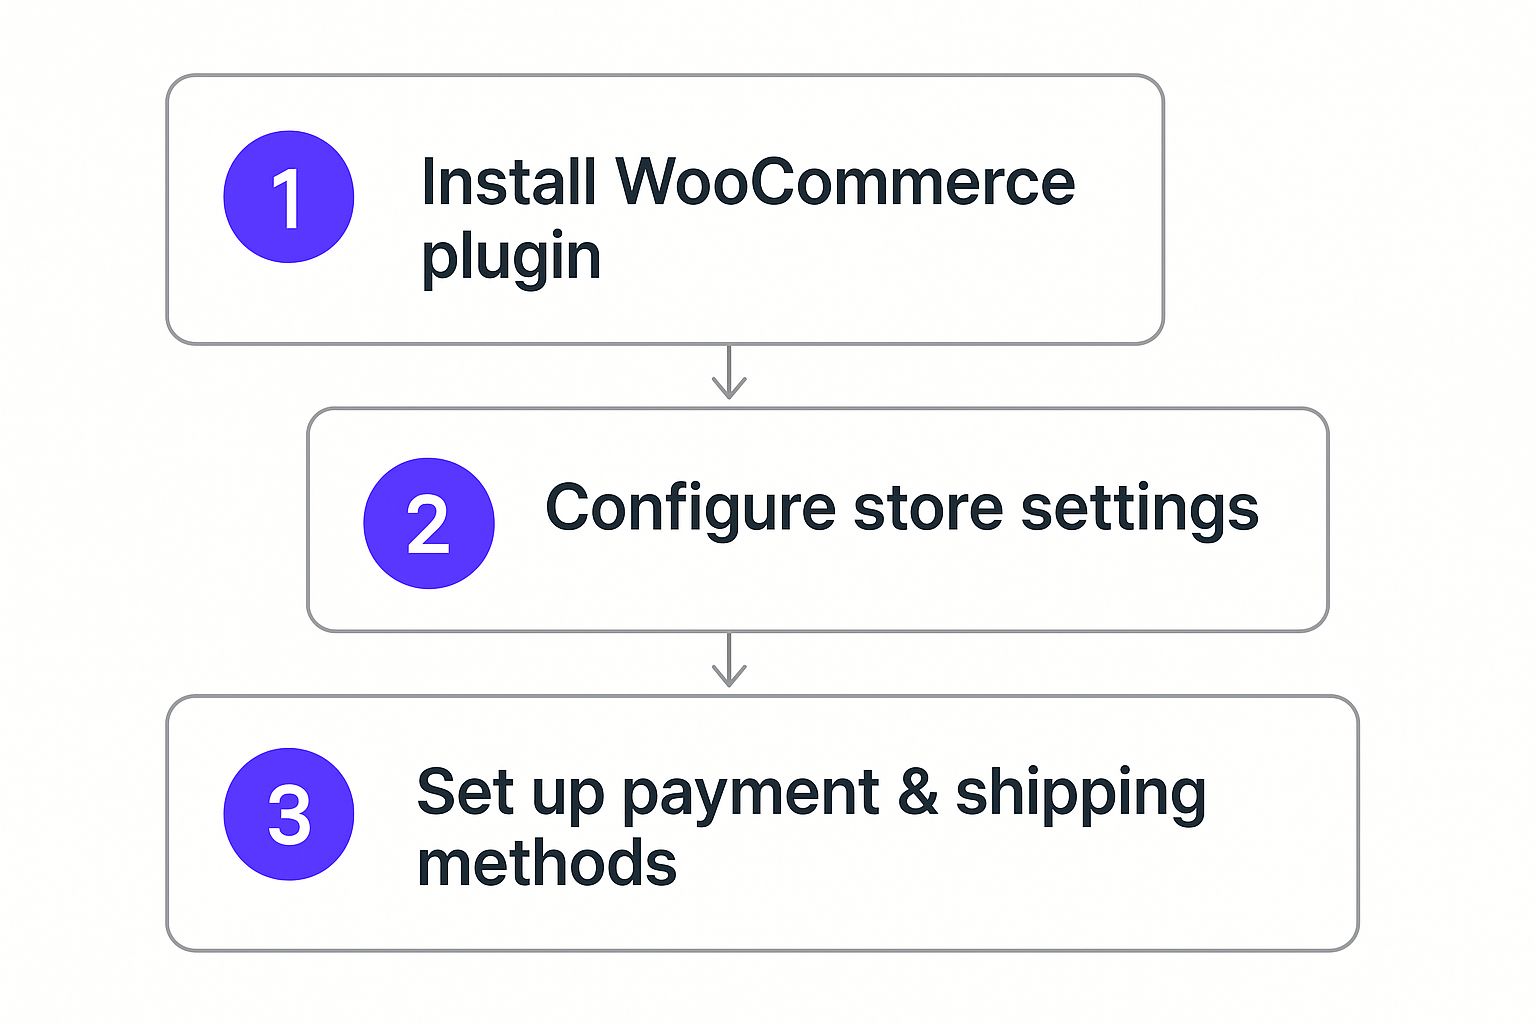
As you can see, the process is designed to be logical and sequential. You're building a solid operational base first before diving into the finer details of design.
Navigating the Setup Wizard
First up, the wizard will ask for some basic info about your store—things like its address, your industry, and what kinds of products you plan on selling (physical, digital, or both). This isn't just busywork; this information helps WooCommerce pre-configure settings like currency, measurement units, and even suggest other helpful plugins. Be as accurate as you can here, as these details will influence your tax and shipping setups down the line.
Next, you'll hit one of the most critical parts of your setup: payment processing.
Your payment gateway is the bridge between your customer's bank and yours. Choosing a reliable, secure, and user-friendly option is non-negotiable for building customer trust and maximizing conversions. A clunky or untrustworthy payment process is a guaranteed way to lose sales.
WooCommerce plays nicely with all the major payment processors. The wizard will probably suggest setting up WooCommerce Payments (which is powered by Stripe) and PayPal. Honestly, I highly recommend activating both.
- Stripe: This lets you accept credit card payments directly on your site. Customers never have to leave your checkout page, which creates a much smoother and more professional experience.
- PayPal: This gives millions of users a familiar and trusted option, perfect for those who'd rather not pull out their credit card on a new site.
Giving customers a choice is always a smart move. In my experience, offering multiple payment options can give your conversion rates a real boost by catering to different preferences and comfort levels. For a deeper dive into making your store look as good as it functions, check out our detailed guide on using WooCommerce with Divi.
Configuring Shipping and Taxes
The final major steps in the wizard deal with shipping and taxes. I know these can be intimidating for new store owners, but WooCommerce really does simplify them.
For shipping, you'll start by defining Shipping Zones. A zone is just a geographic region you ship to, like your home country or specific continents. Within each zone, you can create different shipping methods and set their costs. For example:
- Zone Name: United States
- Shipping Methods:
- Flat Rate: $5.00
- Free Shipping (for orders over $50)
- Local Pickup
This layered approach gives you incredibly precise control over your shipping logistics. You can create as many zones as you need, which ensures every customer sees the correct shipping options and prices based on their location.
Finally, you’ll be prompted to set up taxes. WooCommerce can automate this whole process using WooCommerce Tax, a free service that calculates sales tax rates at checkout based on your store’s address and the customer's location. Enabling this is a massive time-saver and helps keep you compliant with local tax laws without having to manually track and update tax tables.
Once you complete the wizard, your WordPress site officially becomes a fully functional, albeit empty, e-commerce store—ready for you to add products and bring your design to life.
Designing a High-Converting Storefront with Divi
Your store's design is more than just window dressing; it's your silent salesperson, working 24/7. It can either draw customers in or send them packing before they even see a product. In fact, poor design is one of the top reasons people bail on a website. Forget wrestling with rigid, cookie-cutter templates—our goal here is to build a beautiful, intuitive shopping experience that guides customers smoothly from browsing to buying.

This is exactly where the Divi theme comes into play. It's become a go-to for anyone learning how to create an ecommerce website with WordPress because it completely removes the need to touch code. Its visual, drag-and-drop builder lets you see your changes happen in real-time, making the whole process feel more like art than engineering. You can craft a completely unique look that truly reflects your brand.
Why Divi Is a Game-Changer for WooCommerce
Divi's secret weapon is its Theme Builder. This incredible feature lets you design custom templates for every single part of your WooCommerce store. You’re no longer stuck with the default, often generic, layouts for your shop page, product pages, or even your checkout process.
Instead, you can design a custom header that stays consistent across your entire store or build a product page template that puts your stunning photography front and center. This level of control is what separates a professional, high-converting store from an amateur one. You can make sure every customer touchpoint is branded, consistent, and optimized for sales.
Supercharging Your Design with DiviMode
While Divi provides an amazing foundation, a specialized child theme can push its capabilities into a whole new league. That’s where DiviMode comes in.
Think of DiviMode as a professional toolkit built specifically to make Divi and WooCommerce work together seamlessly. As a child theme, it inherits all of Divi's power while adding a whole suite of e-commerce-focused features and modules. This combination lets you build a store that not only looks incredible but is also packed with conversion-driving functionality that would normally require a dozen different plugins.
A great design guides the user's eye. It strategically places calls-to-action, uses color to evoke emotion, and creates a clear visual hierarchy. With the right tools, you're not just designing a page; you're engineering a customer journey.
Using a tool like DiviMode streamlines this process immensely. Instead of trying to piece together different solutions, you have an integrated system that was built for the job from the ground up.
Crafting High-Converting Pages with DiviMode Modules
The real magic of DiviMode is in its custom modules for the Divi Builder. These are ready-made elements you can just drag and drop into your layouts to create a sophisticated shopping experience without the headache. Let’s look at a few practical examples of what you can do.
- Custom Shop Grids: Go way beyond the basic WooCommerce product grid. You can design a visually stunning shop page with custom layouts, unique hover effects, and advanced filters that help customers find exactly what they’re looking for.
- Gorgeous Product Pages: DiviMode lets you completely deconstruct the standard product page and rebuild it to your exact vision. Create custom image galleries, place "add to cart" buttons wherever you want, and design unique tabs for product details, specs, and reviews.
- An Optimized Checkout Process: Cart abandonment is a huge problem in e-commerce—nearly 70% of shoppers leave before paying. DiviMode allows you to customize the entire checkout flow, removing distractions and creating a simple, frictionless path to purchase.
Let’s put this into a real-world scenario. Imagine you sell handmade leather bags. With Divi and DiviMode, you could create a product page template that features a huge, immersive image gallery right at the top, followed by a short, compelling description.
Below that, you could place a bold "Add to Cart" button with a crystal-clear price display. Further down, you could use custom tabs to showcase the crafting process, material details, and customer testimonials—building trust and justifying your price point every step of the way. This is the kind of thoughtful design that turns browsers into buyers, and it's entirely achievable with this powerful combo.
Adding and Managing Your Products Like a Pro
An empty store doesn’t make money. With your design locked in, it’s time to fill those digital shelves with products people actually want to buy. This is more than just data entry—it’s about turning a simple listing into a compelling reason to click "Add to Cart."

We're going to move past the basics of just clicking "Add New Product" in WooCommerce. Instead, let's dive into the strategies that turn casual browsers into loyal customers, from persuasive writing to getting your product variations set up just right.
Writing Product Descriptions That Actually Sell
Your product description has one job: connect a customer’s problem to your product’s solution. So many store owners fall into the trap of just listing features. A great description, on the other hand, answers questions before they're asked, overcomes hesitation, and sparks a little desire.
Instead of saying "Made from 100% cotton," try something like, "Experience the breathable comfort of our soft, 100% premium cotton tee, perfect for all-day wear." See the difference? One is a fact; the other is a feeling.
To write descriptions that convert, keep these points in mind:
- Know Your Audience: Are you talking to a seasoned expert or a total newbie? Your language, tone, and the level of technical detail should reflect that.
- Benefits Over Features, Always: Don't just state what it does; explain how that feature makes your customer's life better, easier, or more enjoyable.
- Use Sensory Words: Words like "silky," "crisp," or "velvety" help customers imagine what it’s like to hold and use your product.
A well-crafted description builds trust and chips away at the doubt that leads to abandoned carts.
Mastering Product Data and Variations
Beyond the description, the Product Data section in WooCommerce is your command center. This is where you'll handle pricing, manage inventory, and dial in all the shipping details.
One of the most critical areas to get right is Product Variations. This is an absolute must if you sell items that come in different options, like sizes, materials, or colors.
Let's say you're selling a t-shirt. Here’s how you’d set it up:
- First, switch the "Product data" dropdown from "Simple product" to "Variable product."
- Next, head to the "Attributes" tab to create attributes like "Color" (with values like Red, Blue, Green) and "Size" (with values like S, M, L).
- Finally, jump over to the "Variations" tab and generate variations from those attributes. From there, you can set a unique price, SKU, stock level, and even a different image for each specific combination (like a red, medium t-shirt).
Getting this right is vital for a smooth customer experience. It lets shoppers easily pick the exact option they want before hitting that buy button. For a deeper dive, check out our guide on https://divimode.com/creating-product-pages-that-sell-comprehensive-guide.
A high-quality product image is often the single most persuasive element on the page. It’s the closest a customer can get to touching and feeling your product online. Invest in crisp, clear, and professional-looking photos.
Organizing Your Store for Easy Navigation
As your product line grows, organization becomes non-negotiable. If customers can't find what they're looking for, they'll just leave. WooCommerce gives you two main tools to keep things tidy: Categories and Tags.
Categories are for your broad product groups. Think of them like the main aisles in a department store: 'Men's Clothing,' 'Women's Shoes,' or 'Home Decor.' They're also hierarchical, so you can have sub-categories, like 'T-Shirts' inside 'Men's Clothing.'
Tags are for more specific, descriptive details that might cut across different categories. For example, a 'vintage-style' tag could be applied to a dress in 'Women's Clothing,' a handbag in 'Accessories,' and a pair of sunglasses.
Using both effectively makes your store a breeze to browse and filter, which dramatically improves the shopping experience. For more complex stores, you might also need to set up special shipping rules. For example, you might need to learn how to restrict shipping for specific products in WooCommerce if certain items can't be shipped everywhere. This level of control is key to building an e-commerce site that’s not just beautiful, but smart and functional, too.
You're in the home stretch. The site looks great, you've loaded up your products, and you're just about ready to flip the switch. But hold on. This final phase, the pre-launch check, is what truly separates a polished, professional store from an amateur one that leaks sales.
Rushing the launch is a classic mistake. I've seen it lead to lost sales and a tarnished reputation right out of the gate. A few hours of methodical checks now will build the solid foundation your new business needs to thrive.
Getting Your Essential Plugins Dialed In
Before you even dream of running a test purchase, you need the right tools humming along in the background. Think of these plugins less as "add-ons" and more as your site's core operational team for security, performance, and getting found.
First up, SEO. Without a solid SEO plugin, your new store is basically invisible to Google. My go-to recommendations are almost always Rank Math or Yoast SEO. Pick one, install it, and walk through its setup wizard. This is a non-negotiable step that configures site-wide settings, creates your XML sitemap, and connects you to Google Search Console—your future command center for tracking organic traffic.
Next, let's talk security. A hacked store is a dead store. It's that simple. Get a reputable security plugin like Wordfence or Sucuri installed immediately. Run an initial scan to make sure you're starting from a clean slate, then configure basic hardening rules like limiting login attempts. This is your first line of defense against the web's automated baddies.
Finally, we need to talk about speed. A slow store is a sales killer, period. You'll want a top-tier caching plugin like WP Rocket or W3 Total Cache. Caching dramatically speeds up your site by serving static, pre-built versions of your pages to visitors. The setup wizards on these plugins are usually fantastic and will apply the best settings for your server with just a few clicks.
Running the Final Testing Gauntlet
With your core plugins in place, it's time to put on your customer hat. This is where you get hands-on and experience your store exactly as a shopper would, catching all those little bugs that can kill a sale.
Your main mission here is to run several test orders. Don't just do one and call it a day. You need to simulate different real-world scenarios. Use a registered account for one, then try the guest checkout for another.
- Buy a simple, straightforward product.
- Purchase a variable product, like a t-shirt with different sizes and colors.
- Test a coupon code you created. Does the discount apply correctly?
- Walk through the entire checkout process for each of your payment gateways (just make sure they're in "test mode" first!).
A clunky or broken checkout process is the number one reason for abandoned carts. Industry stats show cart abandonment can spike as high as 70%, and a confusing checkout is a huge contributor. Meticulous testing is your only defense.
While you're testing, keep a close eye on your inbox. Did the order confirmation emails arrive? Did they look right? Check that your branding is correct and all the essential order details are there.
Cross-Device and Browser Checks
Your site may look pixel-perfect on your big desktop monitor, but what about on an iPhone? Or in Firefox? With over half of all e-commerce traffic coming from mobile, a flawless mobile experience isn't optional—it's mandatory.
Grab your phone and go through your entire site from top to bottom.
- Try the Menus: Can you easily navigate on a smaller screen?
- Browse Product Pages: Are product images clear? Is that "Add to Cart" button big enough and easy to tap?
- Go Through Checkout: How painful is it to fill out the form fields on a mobile keyboard?
Don't stop there. Fire up major browsers like Chrome, Firefox, and Safari on your desktop to make sure the experience is consistent for everyone. This last round of checks ensures no potential customer gets left behind because of a simple technical glitch.
For an even deeper dive, our complete website launch checklist covers every single detail you should review before going live.
More Articles You Will Like