Locking down your WordPress content is a lot easier than you might think. In fact, you can instantly password-protect a page with just a few clicks right inside your editor, thanks to WordPress's built-in visibility settings. It's the perfect way to quickly secure content without having to hunt for an extra plugin.
Why You Need to Password Protect WordPress Pages
Before we get into the nuts and bolts, let’s talk about why this matters. Securing your content isn't just for top-secret documents. There are plenty of everyday situations where controlling access is just a smart move, giving you total command over who sees your work and when.

This simple WordPress feature acts as a solid first line of defense for all sorts of practical needs.
Common Scenarios for Page Protection
Think beyond basic security for a moment. Here are some real-world examples where a password-protected page becomes incredibly useful:
- Exclusive Client Resources: Give your paying clients a private link to project updates, special guides, or download links.
- Internal Team Collaboration: Create a private space for your team to review internal documents, training materials, or company news.
- Staging New Designs: Share a work-in-progress website design with key stakeholders for feedback before it ever goes public.
- Subscriber-Only Content: Reward your email subscribers with premium articles, videos, or tutorials that nobody else can access.
This simple feature is even more critical when you remember how popular WordPress is. A staggering 61.65% of all malware-infected websites are built on WordPress, which makes even small security tweaks essential for reducing your site's vulnerability.
Protecting a page is a fundamental security practice. It prevents sensitive information from being publicly accessible, thereby reducing the risk of unauthorized access and potential data breaches.
Ultimately, password protection is an easy win. For a wider view on keeping your site safe, it's always worth reviewing general website security best practices. And if you're a Divi user, you can take things a step further—our guide on Divi-specific security offers more ways to lock things down: https://divimode.com/divi-security-6-practices-to-keep-your-website-safe/
Using WordPress's Built-In Visibility Control
Sometimes, the simplest solution is the best one. The most direct way to password protect a page in WordPress is by using a feature that’s already built right into the core software. You don’t need to hunt for a plugin or write any code; the functionality is waiting for you inside the page editor.
This native option is my go-to for quickly securing a single piece of content. Think of it as the perfect tool for sharing a project draft with a client, posting an internal announcement for your team, or gating a special resource without a complex setup.
Finding the Visibility Setting
Getting started is a breeze. Just open the page or post you want to protect in the WordPress editor. Over in the right-hand sidebar, you'll see the Summary panel, which holds all the key settings for that piece of content. The specific option we're looking for is labeled Visibility.

By default, every new page you create is set to Public. When you click that link, a small menu pops up with three choices. This is where you can instantly change who gets to see your work.
Just select the Password Protected radio button. As soon as you do, a new text box will appear, prompting you to enter the password you want to use for the page.
Setting a Strong Password
Once you've typed in a secure password, all that's left is to click the Update or Publish button to lock it in. That's it—your page is now protected.
Anyone who tries to visit the page's URL will now see a simple, clean prompt asking for the password before they can view the content.
Pro Tip: Please, don't use "password123" or your company name. Always create a strong, unique password for sensitive content by mixing letters, numbers, and symbols.
This isn't just a friendly suggestion; weak credentials are a massive security hole. A staggering 81% of WordPress hacks are blamed on weak or stolen passwords. The problem gets worse when you realize that 34% of people reuse the same password (or a slight variation) across different websites. If you want to dive deeper into this, LoginPress has some eye-opening password strength statistics.
The built-in method is incredibly straightforward, but it helps to know exactly what each visibility option does.
Comparing WordPress Visibility Options
Before moving on, here’s a quick breakdown of the three default visibility settings you'll find in WordPress. Understanding the differences will help you choose the right tool for the job every time.
| Visibility Setting | Who Can See It | Best Use Case |
|---|---|---|
| Public | Everyone on the internet. | Your main website pages, blog posts, and public-facing content. |
| Private | Only logged-in Admins and Editors. | Internal drafts, sensitive notes, or content not meant for any external viewers. |
| Password Protected | Anyone with the correct password. | Sharing drafts with clients, offering exclusive content to a select group, or internal team pages. |
Each setting has a clear purpose. Public is for everything you want the world to see, Private is for your eyes only (and your core team), and Password Protected is the perfect middle ground for controlled sharing.
Unlocking Advanced Protection with Plugins
WordPress’s built-in visibility setting is great for locking down a single page here and there. But what happens when your needs get a little more complex? For more granular control over how you password protect a page in WordPress, you'll want to turn to a dedicated plugin. They open up a world of advanced features that the default settings just can’t touch.
Imagine you're running a private resource hub for different client tiers. With a plugin, you could protect an entire category of posts with a single password, set passwords to expire after a project wraps up, or even let specific user roles—like your internal team—bypass the password prompt entirely. These tools are built for efficiency, especially when you're managing content at scale.
This level of control is crucial, especially when you consider WordPress’s massive footprint. The platform powers roughly 43.3% of all websites globally as of 2025, which also makes it a prime target for security threats. A specialized plugin adds a much more robust layer of defense. You can learn more about WordPress's market share on Invedus.
Choosing and Installing Your Plugin
Navigating the WordPress plugin repository can feel a bit overwhelming, but finding the right tool doesn't have to be. A popular and reliable choice is Password Protect WordPress (PPWP) Lite, which offers a great balance of features in its free version.
Getting it set up is simple. From your WordPress dashboard, just head over to Plugins > Add New. Use the search bar to find "Password Protect WordPress," then click "Install Now" and "Activate."
Once it's active, you’ll find a new menu item in your dashboard. This gives you a central hub to manage all your protection settings—a huge step up from editing pages one by one.
Configuring Advanced Rules
Let's walk through a common scenario: protecting all posts filed under a "Client Projects" category. Instead of editing each post individually, a plugin lets you do this in seconds.
Here's how it generally works:
- Navigate to the plugin’s settings. You'll usually find an option labeled something like "Category Protection."
- Select your target category. In this case, you'd choose "Client Projects" from the list.
- Set a master password. Create a single, strong password that will apply to all posts within that category.
- Save your changes. Just like that, any post assigned to that category is automatically locked down.
This method is far more efficient and scalable. You can manage access for hundreds of posts from one screen, ensuring consistent security across your entire private content library.
A dedicated plugin doesn't just add features; it streamlines your workflow. Instead of managing dozens of individual page passwords, you can create a single rule that secures an entire content library. This saves a ton of time and seriously reduces the chance of human error.
If you're interested in a broader security strategy beyond just password protection, it's worth exploring the various WordPress security plugins that offer essential tools for protecting your site.
Securing Content within the Divi Builder
If you build with Divi, you have a powerhouse of access controls built right into the theme—and it's a feature that's surprisingly overlooked. This is a far cry from the all-or-nothing approach of the default WordPress feature, giving you almost surgical precision over who sees what.
Instead of needing to password protect a page in WordPress entirely, you can lock down individual sections, rows, or even single modules.
This granular control is a game-changer for creating hybrid pages with both public and private content. Imagine you've built a project proposal page. The general details can be public, but you have a section with specific pricing and sensitive deliverables that should only be visible to the client. This is exactly where Divi's native visibility settings shine.
Using Divi's Visibility and Conditions
To tap into these settings, just open any section, row, or module in the Divi Builder and head over to the Advanced tab. You'll find a panel there called Conditions. Think of this as your command center for setting up all kinds of access rules.
You can restrict content based on a huge range of criteria, from user login status and specific user roles to date ranges and so much more. It's incredibly flexible.
Let's say you want to create a members-only download area on an otherwise public page. Here’s how you could do it:
- First, add a Button Module for your download link.
- Next, pop into the button's Advanced > Conditions settings.
- Click Add New Condition.
- Set the condition to display only if the "User Role" is "Subscriber" (or whatever role you've assigned to your members).
And just like that, only logged-in users with the right role will see the download button. Everyone else gets a seamless experience, completely unaware that the button is even there. For more complex setups, you can even learn how to use conditional inline content in Divi to show different text or links based on a user's status.
The infographic below breaks down the key aspects of Divi's powerful access controls.
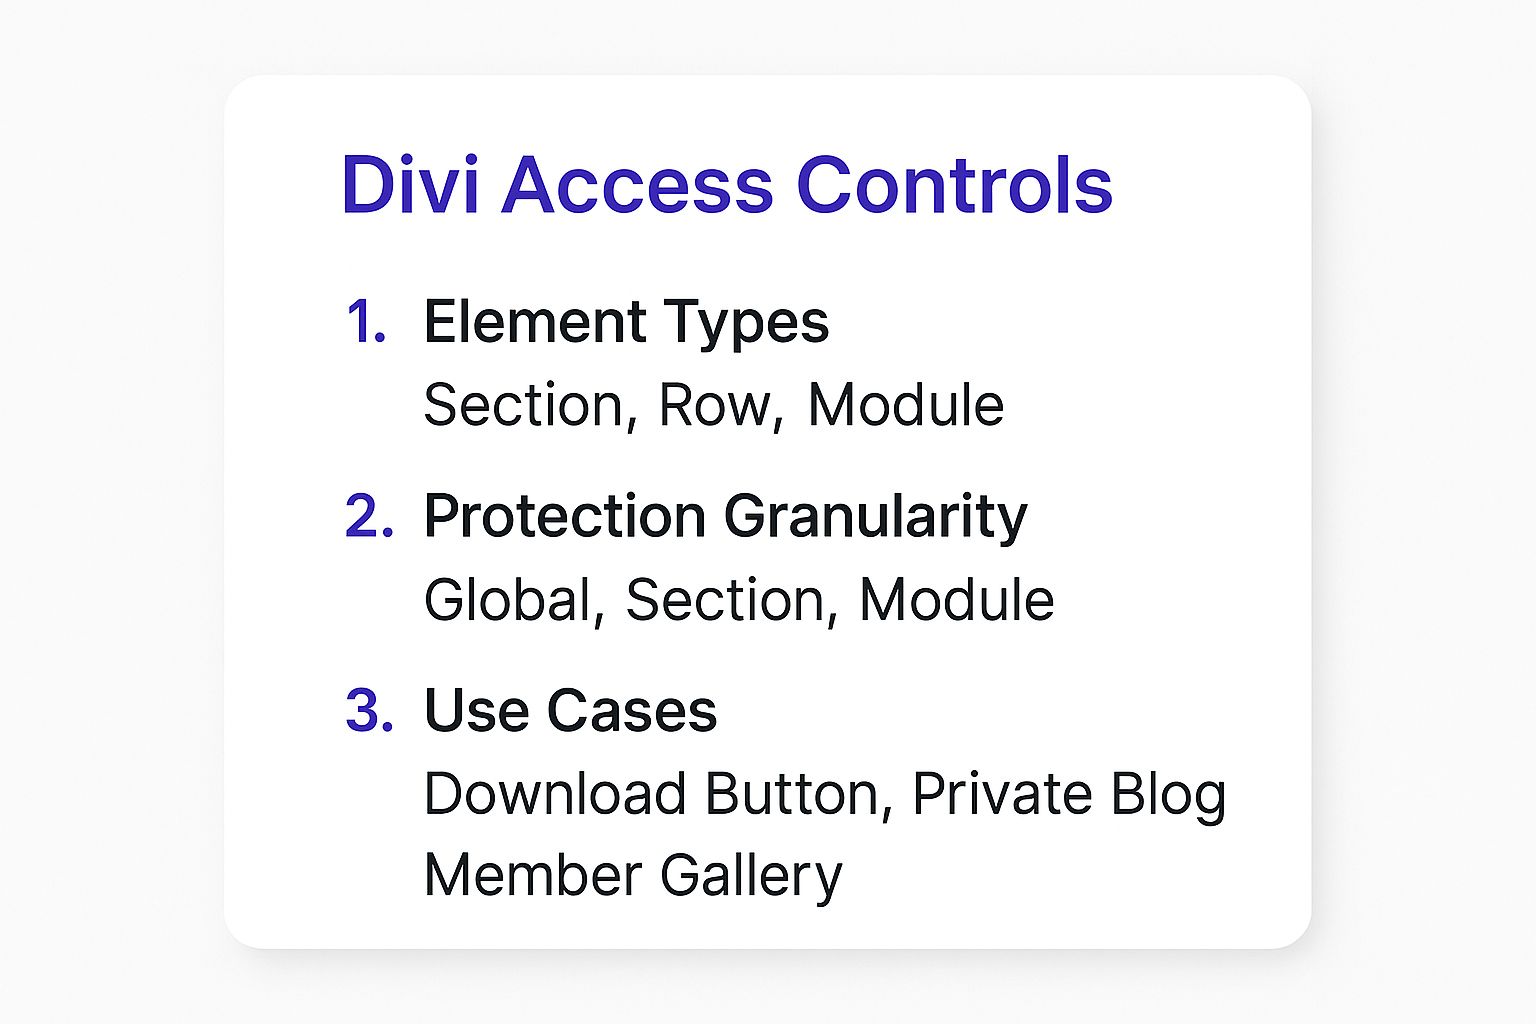
As you can see, this visual highlights how you can apply protection at any level—from a sprawling section down to a tiny module—for all sorts of different scenarios.
By using Divi's built-in conditions, you can often avoid installing extra plugins for simple access control. This keeps your site leaner and faster while giving you the flexibility to create sophisticated, content-aware pages for different audiences. It's an elegant solution that's already at your fingertips.
Choosing Your Content Protection Method
Figuring out the best way to password protect a page in WordPress really comes down to what you’re trying to accomplish. You’ve got three solid options: the built-in WordPress feature, a dedicated plugin, or Divi’s own controls. Each one is the right tool for a different kind of job—you wouldn’t use a sledgehammer to hang a picture frame, right?
Let’s dig into the practical differences so you can pick the perfect approach for your project.
When to Use WordPress’s Built-In Protection
The default visibility control in WordPress is all about simplicity and speed. It's the go-to when you need to lock down a single page or post quickly without any extra bells and whistles.
This method is perfect for one-off tasks like:
- Sharing a draft with a colleague: Just send them a private link to get feedback before you go live.
- A simple client preview: Give a client a sneak peek at a new design or some fresh content.
- Internal announcements: Post a team-only update that you don’t want the public to see.
If your needs are straightforward and you don't need fancy features like expiring passwords or protecting whole categories at once, this is your most efficient bet.
When a Plugin Is Your Best Friend
The moment your protection needs get more complex, a dedicated plugin becomes a must-have. A tool like Password Protect WordPress (PPWP) Lite takes you from basic, page-by-page security to a centralized management system that can handle much more.
A plugin is the clear winner when you need to:
- Protect an entire category of blog posts with just one password.
- Manage access for a larger group, like a members-only resource library.
- Make passwords expire after a certain date or a set number of uses.
- Let specific user roles bypass the password prompt altogether.
This approach gives you the flexibility and scale needed for bigger projects, saving you from the headache of managing individual passwords for dozens of pages.
Leveraging Divi’s Module-Level Control
For those of us building with Divi, the builder’s built-in conditions offer surgical precision. Instead of locking down an entire page, you can protect specific sections, rows, or even individual modules. It's a fantastic way to create hybrid pages with both public and private content.
Think about using Divi’s controls when you want to:
- Hide a "Download Now" button that’s only meant for a specific client.
- Show a special offer or a unique pricing table only to logged-in members.
- Build a single page where most of the content is public, but the premium stuff is locked away.
By using Divi’s built-in conditions, you can often skip installing an extra plugin for access control. This keeps your site leaner and faster while giving you the power to create some really sophisticated, content-aware pages.
While password protection is great for specific use cases, it's also worth exploring other ways to manage access. For instance, implementing concepts like paywalls can offer different strategies for both protecting and monetizing your content.
A Quick Comparison Table
To make the decision even easier, here’s a head-to-head look at how the three methods stack up based on a few key factors.
| Feature | Built-In WordPress | Dedicated Plugin | Divi Builder Conditions |
|---|---|---|---|
| Ease of Use | Excellent | Very Good | Good (Slight learning curve) |
| Flexibility | Low | High | Very High |
| Scalability | Low | High | Medium |
| Best For | Single-page protection | Site-wide or category protection | Granular, on-page protection |
Ultimately, the best method to password protect a page in WordPress is the one that aligns with the scope and complexity of your needs.
Frequently Asked Questions
When you start digging into how to password protect a page in WordPress, a few common questions always seem to pop up. Nailing down these details is key to making sure your content is secure and your site works just the way you want it to. Let's tackle some of the most common head-scratchers.
Can I Use One Password for Multiple WordPress Pages?
Out of the box, WordPress makes you set passwords one page at a time. If you only have a couple of pages to lock, that's fine, but it gets old fast.
For anyone needing broader control, a plugin like Password Protect WordPress (PPWP) Lite is the way to go. It lets you create a single password that can unlock a whole bunch of pages, posts, or even entire categories at once. It's a huge time-saver for managing larger private areas on your site.
Will Password Protecting a Page Affect My SEO?
Yes, it's a big deal for SEO. When you lock a page with a password, search engines like Google can't get in to crawl or index the content. That means the page simply won't show up in search results.
This is exactly what you want for truly private content, but it's a disaster for any pages that are part of your SEO strategy or drive organic traffic. The moment that password goes on, your content becomes invisible to search engine crawlers.
Keep in mind that while the content itself is hidden, the page's title and URL might still get indexed if a search engine finds a link pointing to it. For total privacy, you'll also want to set the page to 'noindex' using an SEO plugin.
How Can I Customize the Password Entry Form?
The default WordPress password form is… functional. It gets the job done, but it’s pretty plain and won't win any design awards. While it might pick up some basic styling from your theme, there are no built-in options to customize it.
If you want to tweak the design, text, or colors to match your brand, you’ve got a couple of good options:
- Use a dedicated plugin: Many content protection plugins come with simple styling controls right in their settings. This lets you customize the form without ever having to look at a line of code.
- Add custom CSS: For those comfortable with code, you can always add custom CSS to your theme's stylesheet to target the form elements and restyle them however you like.
For most people, a plugin is the easiest and safest route. It helps you create a password prompt that looks professional and feels like a natural part of your website, creating a much better user experience.
Ready to create stunning popups, fly-ins, and other interactive elements in Divi? At Divimode, we build powerful plugins that give you full control over your website's design and user engagement. Explore our tools and tutorials to take your Divi site to the next level. https://divimode.com
More Articles You Will Like