When you use a WordPress plugin, you're essentially finding it, installing it through your dashboard, and then activating it to unlock new features for your website. From there, it's all about tweaking the specific settings to get the functionality just right. This is how you can transform a basic site into a powerful, feature-rich platform without ever touching a line of code.
What WordPress Plugins Are and Why They Matter
Think of your brand-new WordPress website like a new smartphone. Right out of the box, it’s great for the basics. But the real magic happens when you start adding apps. In the world of WordPress, those "apps" are called plugins.
Plugins are simply pieces of software you add to your site to introduce new features or beef up the ones you already have.
Without them, you’d be stuck hiring a developer to custom-code every little thing you want, from a simple contact form to a full-blown eCommerce store. Plugins put that power in your hands, no matter your technical skill level. They're the building blocks that let you shape your website to fit your exact needs.
The Power of Extensibility
The real strength of WordPress is its incredible flexibility, and plugins are the engine that makes it all possible. Need to boost your site’s SEO, add social media sharing buttons, create popups with a tool like Popups for Divi, or lock down your site against threats? Yep, there’s a plugin for that.
This massive ecosystem is a huge reason why the platform is so dominant. With over 60,000 plugins out there, the possibilities feel almost infinite. It's a key factor in why WordPress powers an incredible 43.3% of all websites worldwide. The whole system is designed to be simple, letting you add, activate, or remove features right from your admin dashboard.
Plugins truly democratize web development. They give everyday users the power to build complex, professional websites with just a few clicks, turning an idea into reality without writing a single line of code.
Before we dive in, let’s quickly cover the three main ways you can add plugins to your site. Each method has its place, and knowing the difference will save you time down the road.
Three Core Methods for Adding WordPress Plugins
Here’s a quick summary of the different ways you can add a new plugin to your WordPress site, which we'll cover in detail.
| Installation Method | Best For | Difficulty Level |
|---|---|---|
| WordPress Plugin Directory | Finding and installing free plugins directly from your dashboard. | Beginner |
| Manual Upload (ZIP file) | Installing premium plugins or those not in the official directory. | Beginner |
| FTP Upload | Manually installing plugins when the dashboard isn't working. | Intermediate |
We’ll walk through each of these step-by-step, so you’ll know exactly what to do no matter which type of plugin you’re working with.
Preparing to Use Plugins
Before you start installing anything, it helps to grasp the basic concept. Every plugin is a self-contained package of code that "plugs into" your WordPress site. This modular approach is super efficient, but it also means you should be a little selective. For a great primer on the fundamentals, check out our guide on what a WordPress plugin is.
The key takeaway here is that while plugins are incredibly powerful, you should always use them with a purpose. Every active plugin adds more code to your site, which can impact both performance and security. Throughout this guide, we'll show you exactly how to pick top-quality plugins and manage them like a pro for a fast, secure website.
How to Find and Install Your First Plugin
Now that we’ve got the fundamentals down, it's time for the fun part: adding your first plugin. This is where you really start to bolt new features onto your website. There are a few different ways to get a plugin up and running, and we'll walk through the three main approaches you'll use.
Thankfully, the whole process has gotten so much simpler over the years. WordPress has been around for over two decades, and the way plugins are handled has changed dramatically to keep up with its massive user base. These days, most installations happen right inside the WordPress dashboard, making it a breeze even if you're not a technical person.
One quick tip before you start: always make sure you have a recent backup of your site. It's rare, but a poorly coded plugin can sometimes cause conflicts, and a backup is your safety net.
Using the Official WordPress Plugin Directory
This is the most common and straightforward way to add new functionality. The official WordPress plugin directory is built right into your dashboard and is home to over 60,000 free plugins that have all been vetted for basic security standards.
To get there, just navigate to Plugins > Add New from your main admin menu. You’ll land on a search page where you can look for plugins by keyword, author, or tag. For example, if you wanted to add a popup to your site, you could search for something generic like "popup" or get specific with a name like "Popups for Divi."
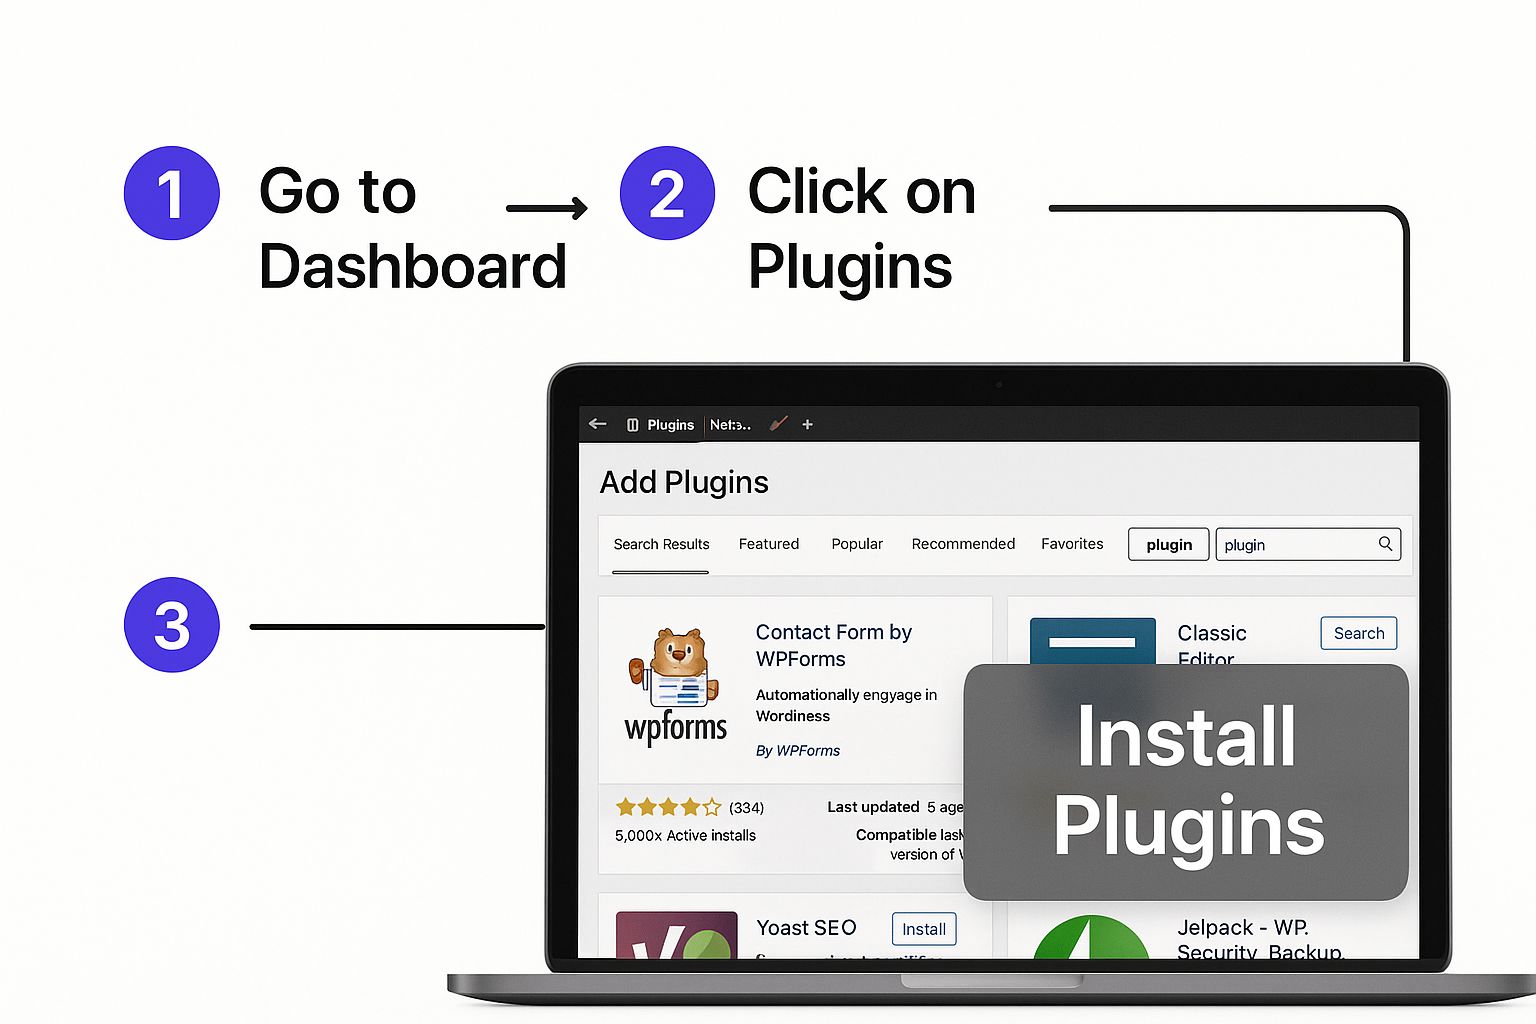
This screen is your gateway to thousands of free tools. As you can see, the flow is designed to be simple: find what you need, install it, and activate it.
Once you’ve found a plugin that looks right for the job, click the "Install Now" button. After a moment, that button will change to "Activate." Click it, and you’re done! The plugin is now live on your site and ready for you to configure.
Uploading a Plugin from Your Computer
Sometimes, you’ll get your hands on a plugin from outside the official directory. This is the standard way you'll install premium plugins, like our own Divi Areas Pro or anything else you purchase from a third-party developer. When you buy a premium plugin, you'll almost always receive a .zip file.
Installing it is just as easy.
- Head back to Plugins > Add New in your dashboard.
- At the top of the screen, click the "Upload Plugin" button.
- Click "Choose File" and locate the .zip file you downloaded to your computer.
- Finally, click "Install Now" and then "Activate Plugin."
This method is your ticket to more advanced features and the kind of dedicated support that free plugins often can't provide. It’s the same simple process, just starting from a file on your computer instead of the directory.
The Manual FTP Method for Troubleshooting
On rare occasions, you might find yourself locked out of your WordPress dashboard. This can happen if a plugin conflict or some other server issue takes your site down. When that’s the case, you can still install a plugin manually using a File Transfer Protocol (FTP) client.
This is a bit more of a hands-on approach. It involves connecting directly to your server, finding the wp-content/plugins folder, and uploading the unzipped plugin folder there. It’s definitely more technical, but it's an incredibly useful skill to have in your back pocket for troubleshooting.
If you ever find yourself in this situation and need a more detailed walkthrough, this complete guide on how to add a plugin to WordPress breaks down every step. Knowing all three installation methods means you'll be prepared for pretty much any scenario you'll face while managing your site.
Activating and Configuring Your New Plugin
You’ve found the perfect plugin and hit "Install Now." That's a great first step, but the real magic happens after installation. Right now, that plugin is just dormant code on your site. To turn it into a powerful tool that actually does something, you need to activate and configure it for your specific goals.
Activating it is the easy part. Once the installation is complete, that "Install Now" button flips to a blue "Activate" button. Give that a click, and you've officially brought the plugin to life. You can also head over to your main Plugins page, find your new plugin in the list, and click the "Activate" link right below its name.
So, it’s active. Now, the big question: where did it go?
Finding Your Plugin's Settings
Once a plugin is running, it needs a home inside your WordPress dashboard. This part can be a little confusing at first because there isn't one standard spot for every plugin's settings. Over the years, I've found they almost always pop up in one of three places:
- A New Top-Level Menu Item: Big, feature-rich plugins like our own Popups for Divi often add a brand-new item to your main WordPress sidebar. Just look for a new icon and label.
- Under the "Settings" Tab: Simpler plugins tend to tuck their options away as a sub-menu item under the main Settings tab. You'll likely find it at
Settings > [Plugin Name]. - Under the "Tools" Tab: Less common, but some utility-focused plugins will place their controls under the Tools menu.
If you’re ever stuck, the plugin’s page on the WordPress directory or the developer's own documentation is your best friend. They'll always point you in the right direction. For now, let's walk through a real-world example to see this in action.
A Practical Configuration Walkthrough
Let’s imagine you just installed Popups for Divi because you want to add a slick email opt-in form to your site. After you activate it, you'll see a fresh "Popups" item in your sidebar—a perfect example of a top-level menu item.
Clicking this takes you right into the plugin’s main hub where you can start building. This kind of setup is pretty common for plugins that let you create new types of content. You’d create a new popup here just like you’d create a new page, using the Divi Builder you already know and love.
The real configuration, though, happens inside the settings panel for the specific popup you're building.
This is the key to mastering WordPress plugins: realizing that each one has its own unique control panel. Your job is to get in there and explore these settings to unlock everything the plugin can do.
Inside the Popup settings, you’ll find options for triggers and display conditions. This is where you tell the popup how and when it should appear.
- Triggers: Want it to show up after a 10-second delay? Or maybe right when a user is about to leave the page (Exit-Intent)? You just pick the trigger that makes the most sense for your campaign.
- Display Conditions: You also get to control where it appears. Should it be on the entire site, or just on your blog posts? You can set these rules to make sure your popup is only showing up for the right people, at the right moment.
By tweaking just a few of these settings, you take a generic popup tool and turn it into a highly targeted marketing machine. This same fundamental process—activate, find the settings, and configure—is the exact same one you'll use for pretty much every plugin you ever install.
Managing Plugins for Peak Website Performance
Once you've gotten the hang of installing plugins, your focus needs to shift from simply adding them to smart, ongoing management. So many people make the mistake of treating plugins as a "set it and forget it" feature, but that's a surefire way to end up with a slow, vulnerable website.
Think of it this way: regular plugin maintenance isn't just a "best practice" you can ignore. It's absolutely essential for keeping your site fast, secure, and running like a well-oiled machine.
The heart of the process is simple: keep your plugins updated. Developers don't push out updates for fun—they're patching security holes, squashing bugs, and boosting performance. When you ignore those little update notifications, you're basically leaving a welcome mat out for hackers who actively look for those known vulnerabilities. A single outdated plugin can be the weak link that brings your whole site down.
Keeping Your Plugin Ecosystem Healthy
Your goal should always be to run a lean, efficient setup. That means being really intentional about what you keep installed on your site. I like to compare it to the apps on my phone; if I haven't opened one in six months, it’s just taking up space and creating a potential security risk. The exact same logic applies to your WordPress plugins.
Every few months, take some time to audit what you have installed. Ask yourself a few simple questions for each one:
- Is this plugin still doing something important for my site?
- Could its job be done by another, more powerful plugin I already use?
- When was the last time the developer updated it? Is it abandoned?
Going through this process helps you trim the "plugin bloat"—all that unnecessary code that quietly drags down your site speed. And just deactivating a plugin isn't enough. If you know you're not going to use it again, you need to deactivate and then delete it. This completely removes its files from your server.
The rule of thumb is simple: It's not the quantity of plugins that matters, but their quality and necessity. A site with 20 high-quality, necessary plugins will outperform one with 10 poorly coded or redundant ones every time.
Managing your plugins is a continuous process that pays huge dividends in site speed and security. Plus, a clean plugin library makes troubleshooting a whole lot easier if a problem ever does pop up. Of course, for the best performance, your hosting is just as critical. You can explore some of the top website hosting services to find a provider that will help your WordPress site run smoothly.
Dealing with Updates and Site Speed
When you see that update notification, it’s always a good idea to have a recent backup of your site ready to go. On the off chance an update causes a problem, you can quickly restore the previous version and breathe easy.
A well-managed plugin list also has a direct impact on your site's loading speed. By keeping only what you need and ensuring everything is updated, you're minimizing the load on your server.
This proactive approach is especially important when you consider that plugins are a huge reason why WordPress now powers over 43% of all websites. We're talking about 38 million live sites using plugins, a number that grows by millions every year, which just goes to show their massive impact.
To give your site an extra speed boost, one of the most effective things you can do is implement caching. Check out our detailed guide on the most popular caching plugins for WordPress to get started.
Troubleshooting Common Plugin Conflicts and Errors
Sooner or later, every WordPress user runs into it. You update a plugin, and suddenly your site breaks. Or worse, you're met with the dreaded "white screen of death." It's a frustrating experience, but the key is not to panic. More often than not, the cause is a plugin conflict, and there’s a clear, systematic way to fix it.
A conflict usually happens when the code from two or more plugins (or a plugin and your theme) just doesn't play nicely together. The first question I always ask myself is, "What just changed?" Did I install something new? Run an update? That's almost always where the problem started.
Identifying the Problematic Plugin
The most reliable way to hunt down the source of a conflict is the good old deactivation method. It might sound tedious, but it's a surefire way to isolate exactly which plugin is causing the headache.
If you can still get into your WordPress admin area, here’s what to do:
- Navigate to your Plugins page in the dashboard.
- Tick the checkbox at the very top of the list to select all your plugins.
- From the "Bulk Actions" dropdown menu, choose Deactivate and hit "Apply."
- Now, check your site. If the error is gone, you've confirmed it's a plugin issue.
- All that's left is to reactivate each plugin one by one, refreshing your site after each activation. The moment the error comes back, you've found your culprit.
Once you know which plugin is misbehaving, you can keep it deactivated and start looking for an alternative or reach out to the developer for a fix.
When You're Locked Out of Your Dashboard
Of course, sometimes a plugin error will completely lock you out of your WordPress admin panel. Don't worry, you're not stuck. You'll just need to access your site's files directly using an FTP client (like FileZilla) or the file manager in your hosting provider's cPanel.
Once you're in, navigate to the wp-content/plugins folder. The quickest way to disable everything is to simply rename the plugins folder to something like plugins_old. This forces WordPress to deactivate every plugin, which should restore your admin access. After you log back in, you can rename the folder back to plugins and then reactivate them one by one from your dashboard to find the source of the problem.
Troubleshooting is just a process of elimination. By methodically isolating variables, you can confidently figure out the root cause of almost any plugin issue without any guesswork.
For more complex situations, especially with Divi, Divimode has put together a fantastic guide with detailed troubleshooting steps for Divi users. It's an invaluable resource that can help you get your site back to normal in no time. Find it here: https://divimode.com/knowledge-base/details-for-troubleshooting/
Got Questions About WordPress Plugins? We've Got Answers.
As you get more comfortable using plugins in WordPress, you’re bound to have some questions pop up. It’s a huge ecosystem out there, and understanding a few key details can save you a ton of time—and some serious headaches down the line.
Let's break down some of the most common questions I hear from both new and seasoned WordPress users.
Free vs. Premium Plugins: What’s the Real Difference?
The short answer? It boils down to features, support, and cost. Free plugins, like the thousands you'll find on the official WordPress.org directory, are perfect for adding standard functionality to your site without spending a dime. They’re often built by passionate developers, but you might find they lack advanced options or dedicated, one-on-one support.
Premium plugins are a different ballgame. These are commercial products sold by companies (like us!) that typically pack a much bigger punch. Think more powerful features, regular updates with fresh functionality, and professional customer support you can actually count on. For instance, a premium tool like Divi Areas Pro gives you advanced targeting and trigger options that you just won't find in most free alternatives.
Your choice really depends on your budget and how critical that feature is to your website's goals.
How Many Plugins Is Too Many?
This is the million-dollar question, isn't it? But the answer isn't a simple number. The real issue isn't quantity, it's quality. I've seen websites running 50 lightweight, well-coded plugins that are faster than a site struggling with just five bloated, poorly built ones.
So, instead of fixating on a magic number, focus on necessity and reputation.
- Only install plugins that add real, tangible value to your site.
- Stick with plugins from reputable developers who have solid reviews and recent updates.
- Make it a habit to audit your plugins every few months and delete anything you're no longer using.
The true metric for "too many" is your site's performance. If things feel sluggish, it's time to audit your plugins, whether you have 10 or 100. It's all about being intentional, not just counting installs.
Help! A Plugin Update Just Broke My Site. What Now?
First, take a breath—don't panic. This happens more often than you'd think, and it's almost always fixable. If an update has crashed your site or given you the dreaded "white screen of death," your first job is to figure out which plugin is the culprit and switch it off.
If you can still get into your WordPress dashboard, just head over to the Plugins page and deactivate the one you just updated. That should bring your site back online instantly.
Locked out of your admin area? No problem. You'll need to use an FTP client or your hosting provider's file manager to get into your site's files. Navigate to the wp-content/plugins folder and find the folder for the plugin causing the trouble. Simply rename that folder (e.g., from bad-plugin to bad-plugin-off), and WordPress will automatically deactivate it. This will let you log back in and sort things out.
And this, my friends, is exactly why running a backup before you hit that "update" button is always a brilliant idea.
Ready to unlock the full potential of your Divi website? Divimode empowers you to create stunning, high-converting popups and interactive content with ease. Start building with Divi Areas Pro and see the difference it can make. Learn more at divimode.com.
More Articles You Will Like