
Making your website load faster isn't just one magic trick. It's a combination of smart moves—optimizing images, setting up caching, using a Content Delivery Network (CDN), and cleaning up your code. Each step works together to shrink the amount of data a browser has to download, which directly translates to a better user experience and a nice boost in search rankings.
Why Website Speed Is a Game Changer
In a world where attention spans are getting shorter by the second, a slow website is more than just a minor hiccup—it's a business killer. Speed isn't just a number on a report; it's the very first impression you make. That tiny delay of just a few seconds can be the difference between gaining a loyal customer and losing them forever.
When a page lags, you can almost feel the user's frustration building. They don't stick around. They hit the back button, your bounce rate climbs, and you send a clear signal to search engines that your site isn't up to snuff. This hits your bottom line, impacting everything from the leads you generate to the sales you make.
Understanding Key Performance Metrics
Before you can make your site faster, you have to know how to measure its speed. Google uses a set of benchmarks called Core Web Vitals to get a real sense of the user experience. These aren't just technical terms; they reflect how a real person interacts with your page.
Here’s what you need to keep an eye on:
- Largest Contentful Paint (LCP): This measures how long it takes for the biggest element on your page—like a hero image or a main headline—to show up. You're aiming for under 2.5 seconds.
- First Input Delay (FID): FID gauges how quickly your site responds when a user first tries to do something, like clicking a button or tapping a link. An ideal FID is less than 100 milliseconds.
- Cumulative Layout Shift (CLS): This one tracks visual stability. It measures how much your page's content unexpectedly jumps around while loading, which is a surefire way to annoy visitors.
Another one to watch is Time to First Byte (TTFB). This tells you how fast your server responds to a request before it even starts sending over the website files. A slow TTFB is often a red flag for hosting problems or server-side issues that need fixing.
To put these metrics into perspective, here's a quick breakdown of what they are and why they matter for building a zippy site.
Key Website Speed Metrics At a Glance
| Metric (Abbreviation) | What It Measures | Why It's Important |
|---|---|---|
| Largest Contentful Paint (LCP) | The time it takes for the largest content element (e.g., image, text block) to become visible. | Directly impacts perceived load speed. A fast LCP reassures users that the page is loading correctly. |
| First Input Delay (FID) | The time from a user's first interaction (e.g., a click) to the browser's response. | Measures interactivity and responsiveness. A low FID makes your site feel quick and smooth to use. |
| Cumulative Layout Shift (CLS) | The measurement of unexpected layout shifts during the page load. | Affects visual stability. A low CLS prevents frustrating experiences like accidentally clicking the wrong button. |
| Time to First Byte (TTFB) | How long it takes for the browser to receive the first byte of data from the server. | Indicates server responsiveness. A slow TTFB is a bottleneck that delays the entire page load process. |
Getting a handle on these key metrics is the first step toward diagnosing and fixing whatever is slowing your site down.
The modern web moves fast. In 2025, average website load times are around 1.9 seconds for mobile and 1.7 seconds for desktop. Even a half-second improvement can put you ahead of the competition and keep impatient users engaged.
The Tangible Cost of a Slow Site
The data is crystal clear: a sluggish website is bad for business. For example, studies consistently show that as page load time goes from one to three seconds, the probability of a user bouncing increases by a staggering 32%. That's not just a vanity metric; that's real, quantifiable lost revenue.
Think about an e-commerce store for a second. If a product page takes forever to load, that potential customer is going to abandon their cart and buy from a competitor who offers a smoother experience. If you run a blog, slow loading means fewer page views and less ad revenue. It's a direct hit, every time.
A Google PageSpeed Insights report can be your best friend here, giving you clear, actionable steps to improve your site's performance.

This kind of report breaks down exactly what needs fixing, like compressing images or cutting down server response times. It turns the vague goal of "make the site faster" into a concrete to-do list.
Investing in performance isn't just an expense—it's a direct investment in user satisfaction, SEO, and your overall success. Modern benchmarks, like the First Contentful Paint (FCP), now happen at 1.4 seconds on mobile according to Google's Chrome User Experience Report. If you want to dive deeper, you can explore more website speed statistics from this detailed analysis.
Mastering Image and Media Optimization
If your site is slow, there's a good chance images are the main culprit. High-resolution photos and videos are almost always the heaviest things on a page, and taming them is one of the biggest wins you can get for site speed. But this isn't about sacrificing quality; it's about being smart and delivering a visually rich experience that's also incredibly fast.

The journey to faster media starts with something simple: choosing the right file format. For years, we all relied on JPEGs and PNGs, but modern formats blow them out of the water when it comes to compression and quality.
Choose Modern Image Formats
The format you save your image in has a massive effect on its final file size. Making the right choice here can shave precious kilobytes—and seconds—off every single page load.
Here’s a practical breakdown of when to use each one:
- JPEG: This is your classic workhorse for photographs and any complex images with lots of colors and gradients. It offers great compression but has one key limitation: no transparency.
- PNG: The go-to choice for anything that needs a transparent background, like logos, icons, or interface elements. It uses lossless compression, which means perfect quality but often much larger file sizes.
- WebP: A modern format from Google that offers far better compression than JPEG and PNG. It supports transparency and can shrink file sizes by 25-35% with no visible drop in quality. It’s a game-changer and is now supported by every major browser.
- AVIF: This is the new kid on the block, often providing even better compression than WebP. While it's gaining ground fast, you'll still want a WebP or JPEG fallback for older browsers just in case.
For most Divi sites, simply converting your JPEGs and PNGs to WebP is a safe, easy, and highly effective way to get an immediate speed boost. Many caching plugins and CDNs can even do this for you automatically.
Compress and Resize Aggressively
I can't tell you how many times I've seen a massive, 4000-pixel-wide image uploaded straight from a camera. This is one of the most common and damaging performance mistakes out there. The browser is forced to download a huge file only to shrink it down to fit the screen. It's a total waste of bandwidth and a load-time killer.
A great rule of thumb is to get every image file well under 100KB. For hero images that are critical to your Largest Contentful Paint (LCP) score, you need to be even more aggressive.
Before you even think about uploading an image, resize it. If your blog's content area is only 800 pixels wide, there is absolutely no reason to upload an image wider than that.
After resizing, you compress it. Compression algorithms intelligently strip out unnecessary data to make the file smaller. You can use online tools like Squoosh or TinyPNG, or get a plugin like ShortPixel to automate the process. These tools are fantastic at finding that perfect balance between a tiny file size and great visual quality.
For a more detailed walkthrough, our guide on optimizing images for WordPress dives much deeper into these techniques.
Implement Lazy Loading
Lazy loading is such a simple concept, but it's incredibly powerful. It tells the browser not to load off-screen images and videos until the user actually scrolls down to them. Think about it: why force a visitor to download every single image on a long sales page if they might never even see the ones at the bottom?
This trick dramatically improves the initial page load time and saves bandwidth, which is a huge deal for anyone on a mobile connection.
Here's how it works:
- When the page first loads, the browser only downloads the images visible in the "viewport" (what's on screen).
- Placeholder images are often used for the content further down the page.
- As the user scrolls, the browser gets a signal to load the next set of images just before they scroll into view.
The good news is that WordPress has included native lazy loading since version 5.5, so for most people, it just works. However, performance plugins like Perfmatters or WP Rocket give you more advanced control, letting you fine-tune the experience for maximum speed. By prioritizing that all-important above-the-fold content, you deliver a much faster perceived load time, which is key to keeping visitors from bouncing.
Caching and Content Delivery Networks: Your Site's Express Lane
You've done the hard work of optimizing your site's files, but now it's time to tackle the next big bottleneck: the round trip your data makes between the server and the visitor. This is where caching and Content Delivery Networks (CDNs) become your best friends.
Think of them as a series of brilliant shortcuts that turn a cross-country data journey into a quick stop at a local library. They dramatically cut down the work your server has to do, and the result is a noticeably faster site.
Without caching, a visitor’s browser has to download every single file—logos, stylesheets, fonts, you name it—every single time they load a new page. It’s a huge waste of bandwidth and time. Caching solves this by creating a temporary storage space to keep these files handy for the next visit.
Get Smart with Caching
Browser caching is your secret weapon for making repeat visitors happy. It tells a user's browser to save static assets like images, CSS, and JavaScript on their local device. When they come back or visit another page, their browser just grabs those files from its local cache instead of downloading them all over again. It’s what makes subsequent page loads feel almost instant.
Server-side caching tackles the problem from the other end. Instead of building a page from scratch for every single visitor—which involves a bunch of database queries and processing—the server saves a pre-built HTML copy. When a new visitor arrives, the server can just hand over that finished version. This seriously reduces server load and improves your Time to First Byte (TTFB).
For WordPress sites, getting this set up is surprisingly simple. Plugins like WP Rocket or Perfmatters handle all the heavy lifting for you. And if you're hungry for more speed-boosting tricks, our complete guide on how to optimize WordPress speed dives even deeper.
Shorten the Distance with a CDN
A Content Delivery Network takes the idea of local storage and puts it on a global scale. A CDN is just a network of servers spread all over the world. It grabs copies of your website's static files—images, scripts, etc.—and stores them on each of those servers.
When someone visits your site, the CDN delivers those files from the server that's physically closest to them.
Someone in London? They get your files from a London server. A visitor in Tokyo? They're served from a server in Tokyo. This one change drastically reduces latency, which is the time it takes for data to travel from your host server to the user's computer.
A CDN can slash the physical distance your data travels by over 90%. That translates directly into faster load times for your entire global audience. It's one of the single most effective performance upgrades you can make.
The infographic below breaks down just how simple it is to get a CDN working for your site.
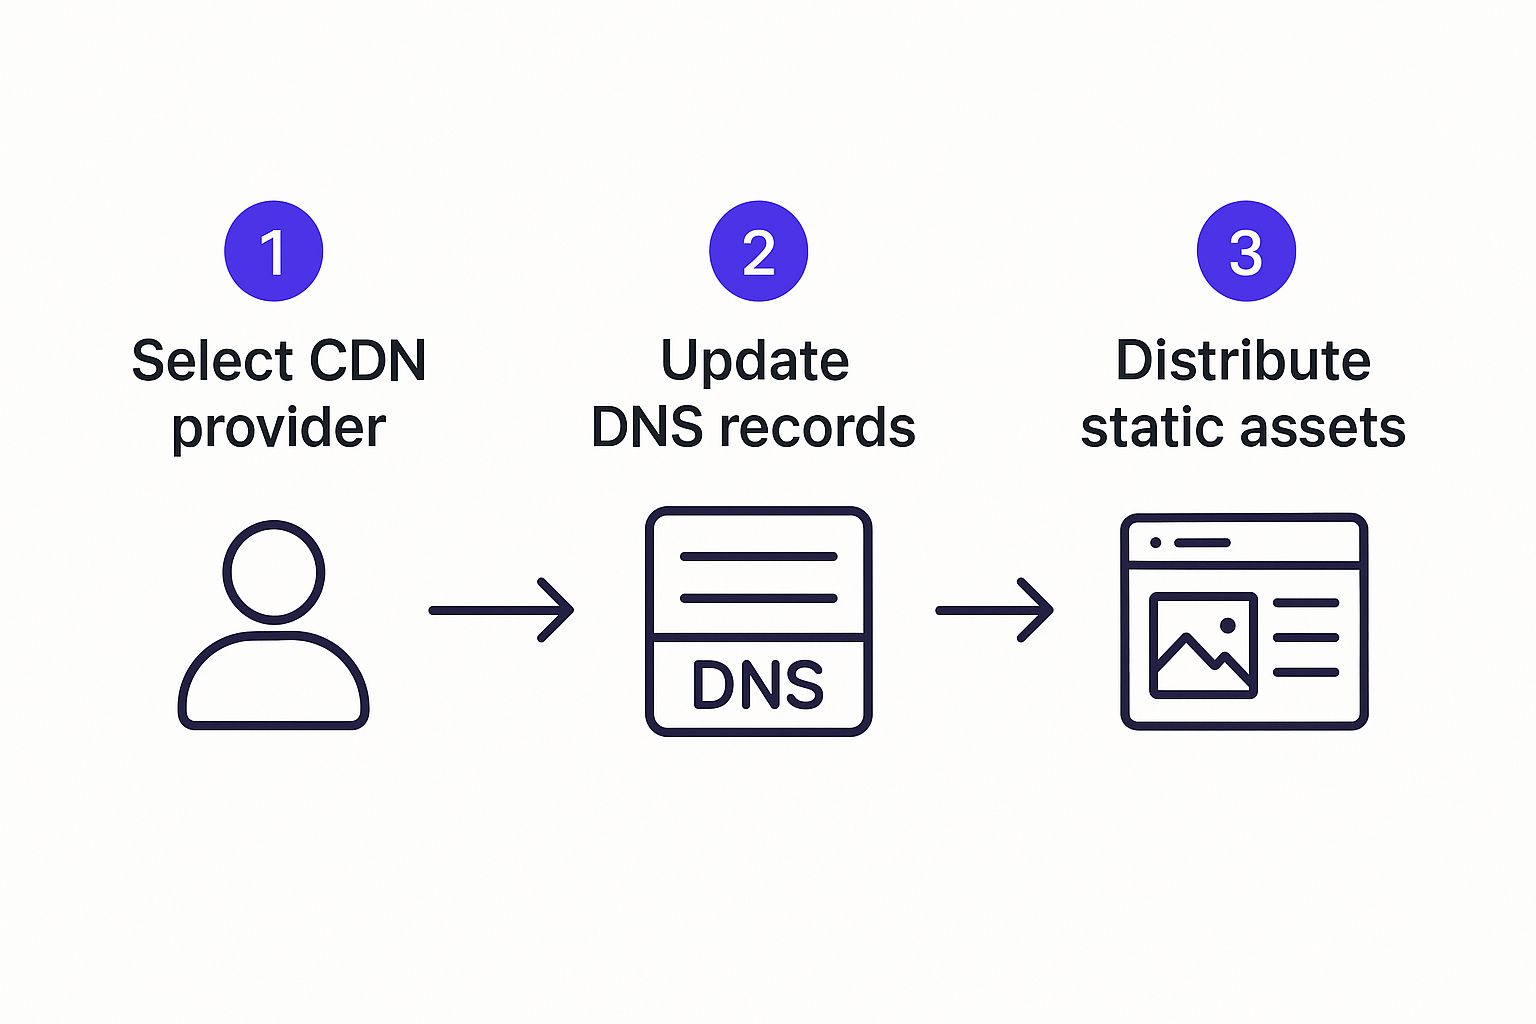
As you can see, setting up a CDN is usually a straightforward process that pays off with massive performance gains.
Choosing the Right CDN Provider
There are plenty of great CDN providers out there, and many of them are surprisingly affordable (or even free). Here are a few I've had great experiences with:
- Cloudflare: Easily the most popular choice, and for good reason. Cloudflare's free plan is incredibly generous, offering a global CDN, security features, and a dead-simple setup process. It works at the DNS level, automatically routing traffic through its network without you having to change much.
- Bunny.net: If you're looking for pure speed on a budget, Bunny.net is fantastic. It's a pay-as-you-go CDN that is lightning-fast and a favorite among developers. You only pay for the bandwidth you use.
- QUIC.cloud: This one is a no-brainer if your website is hosted on a LiteSpeed server. QUIC.cloud is built to integrate seamlessly with LiteSpeed, offering advanced caching and optimizations that are tailor-made for that environment.
This focus on delivery speed is especially critical for mobile users. In 2025, 53% of users will abandon a mobile site if it takes longer than three seconds to load. Expectations are tight, and speed has a direct impact on bounce rates and keeping people on your site. Implementing a CDN is one of the most powerful moves you can make to meet—and exceed—those expectations.
Streamlining Your Codebase for Performance
Let's talk about something you never see, but your browser definitely feels: your website's code. Bloated, messy code is like an invisible anchor dragging your site's performance down. Every extra line, every unnecessary space, and every developer comment in your HTML, CSS, and JavaScript adds weight, slowing down the loading process.
Cleaning this up is a foundational step toward a faster site and a much smoother user experience.
The good news is you don't need to be a seasoned developer to tackle this. Modern performance plugins have made code optimization accessible to just about anyone. It all starts with a process called minification.
The Power of Minification
Minification is a simple but powerful technique: it’s the automated process of stripping all the non-essential characters from your code files. Think of it as a digital spring clean.
It targets things developers use to keep code readable, like:
- Whitespace: Extra spaces and line breaks that structure the code for human eyes.
- Comments: Notes left inside the code for other developers.
- Long Variable Names: Descriptive names that get shortened to single letters.
A browser doesn't need any of this fluff to run the code. By removing it, the files become significantly smaller, which means they download faster. This directly contributes to a quicker page load.
To put it in perspective, a well-commented CSS file might start at 40KB. After minification, that same file could easily shrink to 25KB. When your page is loading a dozen of these files, those savings add up fast. Most top-tier caching plugins, like WP Rocket and Perfmatters, have a simple checkbox to handle all of this for you.
Fewer Files Mean Faster Loading
Picture this: every single file your website needs—every script, every stylesheet, every font—requires a separate trip for the browser to go and fetch it from your server. Each one of these trips is called an HTTP request. The more requests the browser has to make, the longer it takes to piece your page together.
This is where combining files, also known as concatenation, becomes a game-changer. Instead of making the browser fetch ten different CSS files, a good performance tool can merge them into a single, minified file. Now, the browser only has to make one request instead of ten. It's way more efficient.
Reducing the number of HTTP requests is one of the most impactful optimizations you can make. It's like sending one person to the store with a full shopping list instead of sending ten people to buy one item each.
But here’s a quick heads-up. With modern web protocols like HTTP/2 and HTTP/3, the penalty for making multiple requests isn't as severe as it used to be. Sometimes, combining everything into one giant file can actually be counterproductive and slow things down. The trick is finding the right balance, which is why I usually recommend letting a trusted performance plugin handle the logic for you.
Eliminate Render-Blocking Resources
Not all code is created equal, especially when it comes to loading speed. Some CSS and JavaScript are absolutely critical for displaying the content a user sees immediately—what we call "above-the-fold" content. But a lot of it, like the script for a newsletter pop-up or the styles for your footer, isn't needed right away.
When these non-critical files are loaded in the <head> of your website's HTML, they become render-blocking resources. This is bad news. The browser literally has to stop everything, wait for these files to download, and then execute them before it can show anything on the screen. It’s a huge reason for a slow First Contentful Paint (FCP).
The fix is to change how these resources are loaded.
- Defer JavaScript: By adding a
deferattribute to a script, you're telling the browser to download it in the background while it keeps rendering the page. The script only runs after the main HTML is fully parsed. - Load CSS Asynchronously: For CSS that isn't immediately needed, you can load it in a way that doesn't block the page from appearing. Performance plugins are brilliant at this. They often inline the critical CSS needed for the top of the page directly into the HTML and then load the rest later.
By managing your code this way, you allow the most important parts of your page to appear almost instantly. This dramatically improves the perceived load time and keeps your visitors from bouncing.
Choosing Hosting That Actually Keeps Up
Your website’s performance starts with its foundation, and that foundation is your hosting. All the caching tricks and image optimization in the world can't fix a slow, overloaded server. Honestly, picking the right host is one of the most important decisions you’ll make on your quest for a faster website.
That super-cheap shared hosting plan might look like a steal, but it's often the biggest bottleneck holding your site back. On a shared server, your website is crammed onto the same machine with hundreds—sometimes thousands—of other sites, all fighting for the same limited CPU and RAM.
Moving Beyond Shared Hosting
When one site on that shared server gets a sudden traffic spike, everyone else slows to a crawl. I like to think of it as living in a crowded apartment building with paper-thin walls; you're completely at the mercy of your neighbors. That environment just isn't built for performance.
To see real speed gains, you have to look at better options.
- Virtual Private Server (VPS): A VPS is a huge step up. While you're still sharing a physical machine, you get your own dedicated slice of its resources. No more noisy neighbors hogging all the power.
- Dedicated Server: This is your very own private machine. All the server's resources belong exclusively to you. It delivers top-tier performance but definitely requires some technical skill to manage.
- Managed Cloud Hosting: This option offers the best of both worlds—the scalability of cloud infrastructure combined with expert management. Providers like Kinsta, Cloudways, or Flywheel handle all the technical heavy lifting for you.
For most people building with Divi, managed cloud hosting hits that sweet spot of power, simplicity, and expert support, making sure your server is always fine-tuned for speed.
Before we dive into server-side tweaks, it's worth taking a moment to see how these hosting types stack up. The right choice often comes down to balancing your performance needs, budget, and how comfortable you are with the technical side of things.
Hosting Type Performance Comparison
| Hosting Type | Typical Performance | Average Cost | Technical Skill Level |
|---|---|---|---|
| Shared Hosting | Low to Moderate | $ | Beginner |
| VPS Hosting | Moderate to High | $$ | Intermediate |
| Dedicated Server | Very High | $$$$ | Advanced |
| Managed Cloud | High to Very High | $$$ | Beginner to Intermediate |
As you can see, you get what you pay for. While shared hosting is incredibly accessible, moving to a VPS or Managed Cloud plan is where you’ll unlock the performance needed for a professional, fast-loading Divi site.
Server-Side Tweaks That Make a Difference
Once you’ve got a solid hosting foundation, a couple of server-level adjustments can give you an immediate and noticeable boost. These are often simple changes your hosting provider can help you with or that you can toggle in your control panel.
One of the most effective is enabling Gzip compression. Gzip works by zipping up your website’s files—like HTML, CSS, and JavaScript—before sending them over to the user’s browser. The browser then quickly unzips them on arrival. This simple process can shrink file sizes by up to 70%, which drastically cuts down download times.
Another crucial update is to make sure you're running the latest stable PHP version. PHP is the scripting language that powers WordPress, and each new release brings significant performance improvements and security patches. Running an outdated version is like trying to run modern software on a ten-year-old computer—it’s just not going to be as fast. To learn more about these adjustments, check out our detailed guide on server performance optimization.
Your hosting choice directly impacts your mobile performance, where speed is most critical. Investing in a quality host is investing in a better experience for the majority of your visitors.
Speaking of mobile, the performance gap between desktop and mobile is staggering. Recent analysis shows mobile pages take an average of 8.6 seconds to fully load, while their desktop counterparts clock in at just 2.5 seconds. With mobile traffic now accounting for roughly 68% of all web traffic, this lag is a massive problem.
This is especially true when you consider that over 46% of mobile users will bounce if a site takes longer than four seconds to load. You can explore more data on this and see how different sectors are handling the challenge with these in-depth website load time statistics. The data makes it crystal clear: a fast server is non-negotiable for reaching a mobile audience effectively.
Common Website Speed Questions Answered
Even after you've implemented all the best practices, some questions always seem to linger. It's totally normal. Let's tackle a few of the most common ones I hear from clients and fellow Divi users. The goal here is to give you clear, straightforward answers so you can wrap up your optimization project with confidence.
What Is the Best Tool to Measure My Site Speed?
This is probably the number one question I get, and the truth is, there isn't one "best" tool. For a complete picture, you really need to use two different types of tools.
First up is Google PageSpeed Insights (PSI). Think of this as your "real-world" report card. It pulls data straight from the Chrome User Experience Report (CrUX), which means it's showing you how actual visitors are experiencing your site's speed. This is invaluable for understanding your Core Web Vitals.
But for the day-to-day work of optimizing, my go-to is GTmetrix. It gives you "lab data," meaning it runs tests from a consistent server location with a specific connection speed. This is perfect for before-and-after testing. Just installed a caching plugin? Run a GTmetrix test to see the direct impact.
- PageSpeed Insights: Use this to understand how real users perceive your site.
- GTmetrix: Use this for controlled tests to verify your changes are actually working.
Using both gives you the full story—how your site performs in a controlled environment and how it holds up out in the wild.
Which Single Optimization Gives the Biggest Impact?
If I had to bet on one thing that delivers the most dramatic speed boost for the least amount of work, it would be aggressive image optimization.
Hands down, bloated, unoptimized images are the number one speed killer I see on websites. They are almost always the heaviest assets on a page and have a massive, direct impact on your Largest Contentful Paint (LCP) score.
By properly resizing images before you upload them, compressing them, and converting them to a modern format like WebP, you can often slash your page weight by 50% or more. That's a huge win that visitors will feel immediately, no matter their connection speed. Caching and CDNs are powerful, but they can't fix a page that's choking on multi-megabyte images.
A fantastic rule of thumb is to get every single image on your page under 100KB. It’s a simple, actionable goal that forces you to be disciplined with your media, and it pays off every single time.
Are Expensive Themes or Page Builders Faster?
There's a popular myth that a higher price tag on a theme or page builder automatically buys you better performance. That's just not true.
A theme's speed has far more to do with the quality of its code than its price. I've seen plenty of bloated, slow premium themes get absolutely smoked by lightweight, well-coded free ones.
The key is to look for themes that are built with clean code and minimal dependencies. Page builders, including our beloved Divi Builder, do add another layer of code, which can create some overhead. But a modern, well-maintained builder combined with solid optimization practices (like everything in this guide) can absolutely produce a lightning-fast website. More often than not, the builder isn't the problem—the real culprits are unoptimized content and cheap hosting.
How Often Should I Run a Performance Audit?
You definitely don’t need to obsess over your speed scores every single day, but you can't just "set it and forget it" either. A simple, sustainable schedule is the way to go.
- After Any Major Change: Always run a quick speed test after installing a new plugin, switching themes, or launching a big new feature. This helps you catch any performance hits right away before they become a bigger problem.
- A Quarterly Check-in: A more thorough audit every three months is a great routine. It's the perfect time to review your scores, look for new optimization opportunities (the web is always changing!), and make sure nothing has slipped through the cracks.
This rhythm keeps performance on your radar without it becoming a chore.
Can a Few Lines of Code Really Make My Site Faster?
Yes, absolutely! It’s one of the cooler developments in web performance. There’s something in Chrome called the Speculation Rules API. By adding a tiny snippet of HTML to your site's <head>, you can give the browser a hint about which pages a user is likely to click on next.
When a user hovers over a link, the browser can start preloading or even pre-rendering the next page in the background. If they click, the navigation feels almost instantaneous.
While this is a Chrome-specific feature for now, the effect is pretty remarkable. It creates a fluid, almost app-like browsing experience and is a perfect example of how a small, clever technical tweak can lead to a huge win in perceived performance.
At Divimode, we're all about helping you build faster, more engaging Divi websites. Our plugins and tutorials are designed to give you the tools and knowledge you need to master performance and create exceptional user experiences. Discover how Divi Areas Pro can transform your site.
More Articles You Will Like