Knowing how to import products into WooCommerce is an absolute game-changer. At its core, the process is straightforward: you prep a CSV file with your product data, upload it using either WooCommerce's own tool or a specialized plugin, and then map the data fields to make sure everything lines up. Nail this down, and you have a fundamental skill for scaling any e-commerce store.
Why Mastering Product Imports Is a WooCommerce Superpower
When you're only dealing with a handful of items, adding them to your store one by one is no big deal. But what happens when you need to upload a catalog of hundreds, or even thousands, of products? That's when a solid import strategy shifts from a nice-to-have convenience to a mission-critical operation.
This is the key to scaling your business, keeping your data consistent, and quickly expanding your product catalog.
I've been there. A new client needs their store populated with 5,000 SKUs from a supplier's feed, and they need it done overnight. Or maybe you're migrating a massive store from another platform like Shopify or Magento. In these real-world scenarios, doing it manually isn't just slow—it's completely out of the question. A well-planned import lets you launch new product lines in a flash and keeps your data clean across the entire catalog.
Choosing Your Import Toolkit
This guide will walk you through the three main ways to get products into WooCommerce. Each one is built for different needs and levels of technical comfort. Figuring out which one is right for you is the first step toward building a reliable workflow you can count on.
- The Built-In CSV Importer: This is your starting point. It's free, baked right into WooCommerce, and is perfect for simple, one-off imports of standard products.
- Powerful Import Plugins: When you need more muscle—like handling messy supplier files, scheduling automated imports, or working with XML feeds—you'll want a dedicated plugin like WP All Import. They're essential for more complex jobs.
- The WooCommerce REST API: For developers and agencies that need full automation and custom integrations, the API offers total control. It's the go-to for real-time syncing with external systems like an ERP or inventory management software.
This flowchart breaks down how to pick the right method for the job at hand.
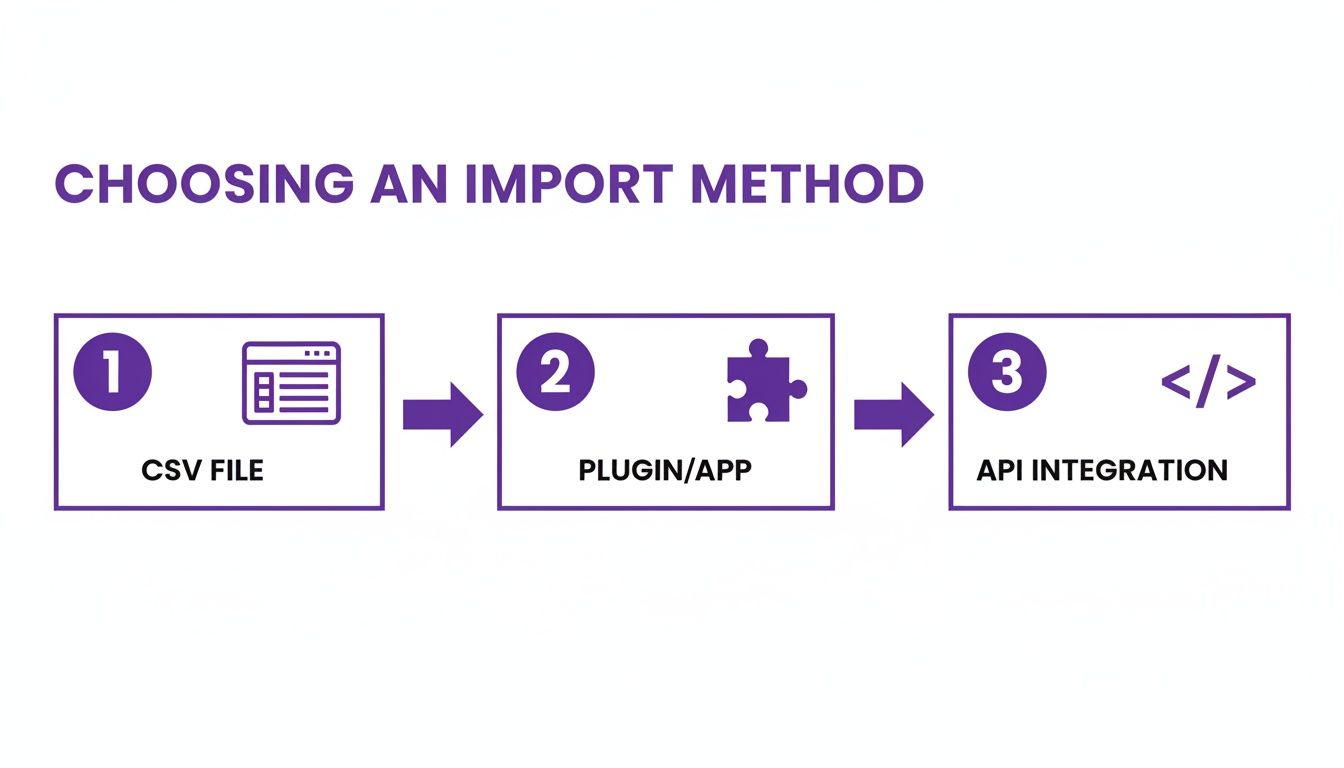
As you can see, the best tool really depends on how complex and frequent your imports are going to be.
The Scale of WooCommerce and Its Impact
The need for efficient product management really hits home when you look at the sheer scale of the platform. As of 2025, over 6.4 million live websites are powered by WooCommerce, giving it a huge slice of the e-commerce market.
This ecosystem includes more than 5,300 large-scale retailers managing catalogs that exceed 20,000 products each. For them, bulk data operations aren't a special project; they're a daily necessity.
Mastering imports isn’t just a technical skill; it’s a strategic advantage that makes your business more agile. You can jump on market trends, bring on new suppliers, and expand your offerings without getting bogged down by endless manual data entry.
At the end of the day, a solid import process, paired with a powerful theme, is the foundation for a successful online store. For anyone looking to build a shop that's both high-performing and visually stunning, figuring out how to effectively combine WooCommerce with Divi is a fantastic way to start creating a unique and compelling customer experience.
Getting Your Product Data Ready for a Flawless Import
The real secret to a successful WooCommerce product import has almost nothing to do with the uploader tool itself. It’s all about the prep work. If you can get your product data clean, organized, and perfectly formatted in a CSV file before you start, you’ll sidestep 90% of potential headaches right out of the gate.
Think of your CSV as the blueprint for your entire product catalog. A messy, inconsistent plan will always lead to a rickety structure, but a well-thought-out one ensures every single product shows up exactly where and how it should. Trust me, the time you invest here is the single biggest factor in a smooth import.
To help you get this right, here’s a breakdown of the most critical columns you'll be working with. Some are non-negotiable, while others are what separate a basic product listing from one that’s ready to convert.
Essential vs Optional CSV Columns for WooCommerce Imports
| Column Header | Purpose | Data Type | Example | Required? |
|---|---|---|---|---|
SKU |
The unique identifier for each product or variation. Absolutely essential. | Alphanumeric Text | TSHIRT-BLK-L |
Yes |
post_title |
The name of your product. | Text | DiviMode Awesome T-Shirt |
Yes |
regular_price |
The standard price for the product. | Numeric | 24.99 |
Yes |
Type |
Defines if it's a simple or variable product (or variation). |
Text | simple or variable |
Yes |
Parent |
Links a variation to its parent product using the parent's SKU. | Alphanumeric Text | TSHIRT-MAIN |
For Variations |
Images |
URL(s) for product images, separated by commas for multiple. | URL | https://site.com/img1.jpg |
Optional |
Categories |
Assigns product to categories. Use > for subcategories. |
Text | Apparel > T-Shirts |
Optional |
Stock |
The inventory quantity. | Numeric | 100 |
Optional |
In stock? |
Sets stock status. 1 for in stock, 0 for out of stock. |
Binary (1 or 0) | 1 |
Optional |
Description |
The main product description. Supports basic HTML. | Text/HTML | <p>A great shirt.</p> |
Optional |
Getting familiar with these columns is half the battle. The SKU, post_title, regular_price, and Type are the bare minimum, but you'll want to include the optional fields to build out a proper, customer-ready store.
Core Columns You Cannot Ignore
Every product import, no matter how simple, hinges on a few non-negotiable columns. Get these wrong, and the import will fail before it even starts. The absolute most critical field is the SKU (Stock Keeping Unit).
Your SKU is the product’s unique fingerprint. It's a distinct code that tells WooCommerce, "This is product XYZ, and there's no other one like it." You could have two products with the exact same name, but their SKUs must be different. This is also how WooCommerce knows which product to update later on, preventing duplicates.
Beyond the SKU, you'll need a post_title (your product name) and a price. While plenty of other columns are technically optional, I consider these three the foundational pillars of any product listing.
Structuring Simple vs. Variable Products
This is where things can get tricky, and it’s a common stumbling block. A simple product, like a book, is easy—it just gets one row in your spreadsheet. But a variable product, like a t-shirt with different sizes and colors, needs a more complex setup.
Variable products rely on a parent-child relationship that you define right in the CSV.
- The Parent Product: This is your main product row. It gets a unique SKU and its
Typeis set tovariable. This row holds all the general info—the main product name, the long description, categories, etc. - The Child Variations: Each specific variation (e.g., Small Red T-Shirt, Large Blue T-Shirt) gets its own row directly underneath the parent. These rows need their own unique SKUs, but they all share the same
ParentSKU (which is the SKU of the main product). This is how they get linked. Each variation row will also have its specific attributes defined, like color and size.
Pro Tip: Nail this parent/child structure, and you've conquered the hardest part of building a product CSV. Incorrectly linking parent and child SKUs is one of the top reasons variable product imports fail.
Essential Fields for a Rich Product Page
Getting the basics in is one thing, but you need more than that to create a product page that actually works for customers. Skipping these next columns might technically get the product into your store, but it won't be ready to sell.
- Images: You can pop image URLs directly into the
Imagescolumn. If you have more than one, just separate the URLs with a comma. Make sure these links are publicly accessible, otherwise WooCommerce won’t be able to download and add them to your media library. - Categories: Assign products to categories by simply entering the category name. For subcategories, use the
>symbol, like this:Apparel > Shirts. - Stock: The
Stockcolumn is for your inventory count, while theIn stock?column sets the status. Use1for in stock and0for out of stock. - Description: This field supports basic HTML, so you can add paragraphs (
<p>) and links (<a>) to make your product descriptions much easier to read.
Of course, structuring your data correctly is just the first step. You also need to write compelling copy. For some deeper insights on that front, our guide on creating product pages that sell has a ton of practical tips.
A Sample CSV Structure in Action
To pull this all together, let’s look at a quick, real-world example for a variable T-shirt.
| SKU | Type | Parent | post_title | regular_price | Attribute 1 name | Attribute 1 value(s) | Attribute 1 visible | Attribute 1 global |
|---|---|---|---|---|---|---|---|---|
| TSHIRT01 | variable | Divi T-Shirt | Color | Black, Blue | 1 | 1 | ||
| TSHIRT01-BLK-S | variation | TSHIRT01 | Divi T-Shirt – Black, S | 25.00 | Color | Black | 1 | 1 |
| TSHIRT01-BLK-M | variation | TSHIRT01 | Divi T-Shirt – Black, M | 25.00 | Color | Black | 1 | 1 |
| TSHIRT01-BLU-S | variation | TSHIRT01 | Divi T-Shirt – Blue, S | 27.50 | Color | Blue | 1 | 1 |
See how that works? The parent row (TSHIRT01) defines the available attributes ("Black, Blue"). Then, each child variation specifies its own value from that list and gets its own unique SKU and price. This precise structure is exactly what you need to successfully import products into WooCommerce with all their variations perfectly intact.
For a quick, no-fuss way to get products into your store, you can't beat the built-in CSV importer. It's the free, native tool that comes packaged right with WooCommerce, making it perfect for straightforward tasks. Think populating a new store with simple products or running a one-time bulk price update.
Best of all? You don’t need to install anything extra, which is a huge plus for keeping your site lean and mean.
To get started, just head over to Products > All Products in your WordPress dashboard. You'll spot an "Import" button right at the top of the page. Clicking this kicks off a simple, two-step wizard that holds your hand through the whole process. The first step is just picking your prepared CSV file. This is where the data prep we talked about earlier really pays off—a clean, well-formatted file makes everything that follows a breeze.
Once your file is uploaded, you'll land on the most critical stage of the whole operation: Column Mapping.
The Crucial Step of Column Mapping
This is where you essentially translate your spreadsheet for WooCommerce. You're telling it exactly how to interpret the data in your file. The importer is pretty smart and will try to automatically match your column headers (like SKU or Regular price) to the right WooCommerce product fields. But it's not foolproof, especially if you're working with a CSV from a supplier that uses quirky, non-standard column names.
You’ll see a list of WooCommerce fields on the left and a dropdown next to each one, showing the columns from your uploaded file. Your job is to go down the list and make sure everything lines up perfectly. If you see a field that says "Do not import," it means the tool couldn't figure out which of your columns to use. No big deal—just use the dropdown to manually select the correct one.
Here’s a look at the Column Mapping screen in action. You're just matching your CSV columns to the right WooCommerce fields.
Take your time on this screen. I can't stress this enough. Incorrect mapping is probably the #1 reason for messy or failed imports. I've seen people accidentally map their short_description column to the main description field, completely throwing off their product page layouts. A few minutes of double-checking here can literally save you hours of cleanup work later.
Advanced Options and Running the Import
Before you hit the big button, there's one small but mighty checkbox to consider: "Update existing products." This little feature is a game-changer because it prevents duplicate products.
When you check this box, WooCommerce scans your CSV for a matching SKU or ID that already exists in your store. If it finds a match, it will simply update that product with the new data from your file instead of creating a brand-new one.
This update feature is your best friend for routine store maintenance. Let's say you need to update the prices for 500 products. Just create a simple CSV with two columns—SKU and Regular Price—check this box, and run the import. It's a massive time-saver.
Once you’re confident in your mappings, go ahead and click "Run the Importer." A progress bar will pop up to show you its progress. For a few hundred products, this usually only takes a minute or two. When it’s done, you'll get a success message, and your new products will be live and ready to view.
Knowing the Limitations of the Native Tool
While the built-in importer is fantastic for basic jobs, it's important to know where it hits its limits. It was designed for simplicity, which means it starts to struggle with more complex scenarios.
- Complex Metadata: It has a tough time with custom fields or special data added by other plugins unless you're comfortable adding some custom code.
- Image Imports: It can be slow and a bit finicky with huge image libraries, especially if those images are hosted on slow, external servers.
- File Types: It's a one-trick pony—it only works with CSV files. If your supplier gives you data in XML or some other format, you're out of luck.
- No Scheduling: The process is 100% manual. You can't schedule recurring imports from a supplier's feed, which is a must-have for many stores with frequently changing inventory.
The native tool is the perfect choice for store owners who just need to handle simple, infrequent imports. But as your store's needs grow, you'll likely find yourself needing the more powerful, flexible features that only a dedicated import plugin can provide.
Leveling Up with a Dedicated Import Plugin
The built-in WooCommerce importer is a solid starting point, but let’s be real: your store's needs are going to grow. Sooner or later, you'll be staring down a messy supplier file, needing to import from an XML feed, or wanting to schedule automatic updates. This is the exact moment a dedicated plugin goes from a "nice-to-have" to a mission-critical tool for importing products into WooCommerce at scale.
While the native tool is fine for a clean, simple CSV, it hits a brick wall with real-world data chaos. Dedicated plugins like WP All Import are built specifically to handle that chaos, offering a level of flexibility and power the standard importer just can't touch.
These tools are designed to solve the very problems that make most imports fail. They can turn what would be hours of manual data cleanup into a smooth, repeatable workflow. This is especially true when you're dealing with data from third-party suppliers who, trust me, rarely format their files perfectly for WooCommerce.
Tackling Messy Supplier Files with Ease
Let’s walk through a common scenario. Your new dropshipping supplier sends you a product feed, but the column names are all wrong. Instead of post_title, they use productName, and regular_price is labeled cost_USD. The built-in importer would just choke on this, forcing you to manually rename every single column in your spreadsheet before you could even think about starting.
This is where a premium plugin really shines. Most of them feature a visual, drag-and-drop mapping interface.
- You upload your file—it doesn't matter what the structure or column names are.
- The plugin shows your file's data on one side and the WooCommerce product fields on the other.
- You just drag
productNamefrom your file and drop it onto theTitlefield in WooCommerce. You do the same forcost_USDtoRegular Price, and so on for every field.
This process is so intuitive, and it means you never have to touch the original source file. You set up a mapping template one time, and the plugin remembers it for all future imports from that same supplier. Easy.
Key Takeaway: The ability to map any incoming data field to any WooCommerce field without editing the source file is the single biggest advantage of a dedicated plugin. It saves a staggering amount of time and cuts out human error.
This same principle applies to a huge range of e-commerce data needs. For instance, beyond core product data, you might need to figure out how to bulk import shipping restrictions via CSV using a specialized plugin. Specialized plugins handle these complex tasks with the same mapping-based efficiency.
Automating Imports for Hands-Off Management
Another game-changing feature you'll find in dedicated plugins is scheduling. A lot of stores depend on supplier feeds that update daily with new stock levels and prices. Manually downloading and importing that file every single morning is a drag, and it's easy to forget—which can lead to you selling out-of-stock items. No one wants that headache.
A premium plugin solves this by letting you set up scheduled imports, often using cron jobs.
- Provide a URL: You can usually point the plugin directly to a URL where the supplier's feed lives (like a public Google Sheet or a link to their CSV/XML file).
- Set a Schedule: Configure the import to run automatically whenever you want—every hour, once a day, or even weekly.
- Define Update Rules: You get to tell the plugin exactly what to do with the new data. For example, you might only want to update stock and prices, leaving your carefully written product descriptions untouched.
This kind of automation ensures your store’s inventory and pricing are always synced with your supplier, with zero manual work from you. For any growing business, that's not just a convenience; it's essential for maintaining data integrity and customer trust. Having the right toolset is crucial, and you can explore some of the best WordPress plugins for e-commerce to see how these tools fit into your overall strategy.
Why the Investment Is Worth It
Look, free tools are always tempting, but the built-in importer's limits become glaringly obvious as soon as your needs get even a little bit complex. A premium import plugin is really an investment in efficiency, accuracy, and your store's ability to scale. It lets you:
- Work with Any File Format: Easily handle CSV, XML, and even Google Sheets without breaking a sweat.
- Handle Huge Files: Import massive catalogs with tens of thousands of products by processing them in smaller chunks to avoid server timeouts.
- Manage Complex Data: Effortlessly map all your custom fields, attributes, and even data from other plugins.
For any serious e-commerce store, the question isn't whether you can afford a premium import plugin. It's whether you can afford the time and the costly errors of not having one.
Automating Imports with the WooCommerce REST API
So far, we've walked through CSV files and plugins, which are fantastic tools for most store owners. But for developers, agencies, or stores with really complex integration needs, these methods can start to feel a bit restrictive.
When you need real-time inventory sync, custom workflows, or a direct line into third-party systems like an ERP, it’s time to bring out the big guns: the WooCommerce REST API. This is your toolkit for taking complete programmatic control over your store's data.
At its core, a REST API (Representational State Transfer Application Programming Interface) is just a standardized way for different pieces of software to communicate over the internet. Instead of you manually uploading a CSV, a script can send product data directly to your WooCommerce store, creating or updating products instantly.
This completely changes the game for importing products into WooCommerce. You're moving from manual, batch-based tasks to fully automated, event-driven updates that just happen in the background.
Why Go with an API-Driven Approach?
The number one reason to use the API is automation and real-time data synchronization.
Imagine your store is hooked up to an Enterprise Resource Planning (ERP) system that acts as your master inventory source. When a new product gets added to the ERP, a script can create it in WooCommerce a moment later. When stock levels change, that data can be pushed to your website within seconds.
This completely does away with the need for daily CSV exports and imports. It dramatically cuts down the risk of human error and keeps your storefront perfectly in sync with your backend systems. Before you dive into building an integration, it's a good idea to get comfortable with the essential concepts of REST APIs to build a solid foundation.
Here are a few scenarios where the API is the clear winner:
- Connecting to an ERP: Keep inventory, pricing, and product details synchronized in real-time between your central command center and your online store.
- Building a custom supplier integration: If a supplier offers an API endpoint for their product catalog, you can build a script to automatically pull new products right into your store.
- Creating a mobile app: A custom mobile app for store management could use the API to add or edit products on the go from a phone or tablet.
The API isn't meant to replace plugins or CSVs for every single task. It's a powerful, flexible solution for custom integration challenges where other methods just don't cut it. Think of it as the key to building a truly bespoke e-commerce operation.
A Glimpse into How It Works
A full-blown coding tutorial is beyond what we're covering here, but a quick example can help pull back the curtain on how it works. The API operates by sending HTTP requests to specific "endpoints." For example, to create a product, you'd send a POST request to the /products endpoint.
This request includes a "payload" in JSON format that contains all the product details—name, SKU, price, description, you name it.
Here’s a simplified look at the data you might send for a simple t-shirt:
{
"name": "API-Created T-Shirt",
"type": "simple",
"regular_price": "29.99",
"description": "This is a product created programmatically.",
"sku": "API-TSHIRT-001",
"images": [
{
"src": "http://example.com/path/to/image.jpg"
}
]
}
A developer would write a script in a language like Python or PHP to format this data and send it to the WooCommerce API, using a unique set of API keys from your store's dashboard to authenticate the request.
The possibilities are pretty much endless. You can create simple, variable, and grouped products, manage categories and tags, update stock levels, and so much more, all through code.
For anyone ready to dig deeper, the official WooCommerce REST API documentation is the best place to start. It's an excellent and incredibly comprehensive resource.
Wrestling with Imports: Errors, Fixes, and Performance Tips
No matter how carefully you prep your CSV, the import process can sometimes throw a curveball. You've double-checked everything, but the import still fails, leaving you scratching your head. This is a totally normal part of working with WooCommerce, and the good news is that most errors are predictable and have simple fixes.
This isn't just about fixing what's broken, though. It's about making the whole process faster and more reliable, especially when your product catalog starts to grow. Think of this as your go-to guide for both troubleshooting and optimization.
Common WooCommerce Import Errors and Their Solutions
When an import goes sideways, WooCommerce usually gives you an error message. They can seem a little cryptic at first, but they're often pointing right at the problem. I've run into just about every error imaginable over the years, and most of them boil down to a handful of common culprits.
Here's a quick reference table I've put together to help you diagnose and solve the most frequent issues you'll encounter.
| Error Message / Symptom | Common Cause | How to Fix It |
|---|---|---|
| "Invalid or missing SKU" | The SKU column has empty cells or, more often, duplicate SKUs that confuse the system. |
Meticulously check your SKU column for blanks and duplicates. Every single product and variation needs a unique SKU. |
| Products import, but images are missing | The image URLs in your CSV are incorrect, not publicly accessible, or formatted improperly. | Test a few image URLs by pasting them into an incognito browser window. Ensure they are direct links to the image file and are separated by a single comma with no extra spaces. |
| Variable products don't link to their parent | A typo or extra space in the Parent column means it doesn't exactly match the parent product's SKU. |
This is a classic case for a find-and-replace function. Double-check that every variation's Parent value is an exact match for a parent SKU in the file. |
| "Sorry, this file type is not permitted for security reasons." | Your server's security settings are blocking the CSV file type from being uploaded. | This is a server configuration issue. You may need to contact your hosting provider or add a line like define('ALLOW_UNFILTERED_UPLOADS', true); to your wp-config.php file (use with caution). |
| The import times out or fails halfway through | The import file is too large, and the process is exceeding your server's maximum execution time. | Break your large CSV into smaller, more manageable chunks of 200-500 products each and import them one by one. |
This table covers the vast majority of problems. Whenever an import fails, come back to this list first—chances are, your solution is right here.
Taming the Beast: Importing Large Catalogs
Importing 50 products is one thing. Importing 50,000 is a whole different beast. Big imports can seriously strain your server, leading to timeouts and failed jobs. Success here is all about managing your server's resources.
The most common hurdle is hitting your server’s PHP time limit. Most web hosts cap how long a single script can run—often just 30 or 60 seconds. A massive import will blow past that limit in no time.
Pro Tip: Never, ever try to import a massive file in one go. The easiest win is to break your CSV into smaller chunks. I usually aim for 200-500 products per file. This keeps each import process short and sweet, staying well within server limits and dramatically cutting the risk of a timeout.
If you’re still running into performance walls, it might be time to chat with your hosting provider. Ask them about increasing resources like your memory limit (WP_MEMORY_LIMIT) and max execution time. Alternatively, premium plugins like WP All Import are built for this stuff and automatically process large files in smaller batches for you.
Your Pre-Flight Safety Check
Before you ever hit that "Run the Importer" button on a big job, there's one step you absolutely cannot skip: back up your website.
Seriously. This is your ultimate undo button. One small mapping mistake could accidentally wipe out all your product prices or overwrite carefully crafted descriptions. Without a fresh backup, recovering from that kind of disaster is a complete nightmare.
Use a trusted backup plugin or your web host's built-in feature to create a full site backup. It takes a few minutes but can save you from hours of painful, manual disaster recovery.
At Divimode, we build tools that make powerful website management simple. If you're looking to create dynamic, engaging user experiences on your Divi site, check out our suite of plugins and resources at https://divimode.com.
More Articles You Will Like